
When shopping online, customers want one thing above all: certainty about delivery time.
In fact, we’ve tested this on multiple Shopify stores, and every time we displayed an estimated delivery date on the product page, cart page, and checkout page, we saw fewer abandoned carts and stronger conversion rates.
As a Shopify Partner with experience implementing custom Liquid code and delivery date apps, I can confirm that adding this feature improves user experience (UX) and builds long-term customer trust.
In this guide, I’ll explain four ways to show the estimated delivery date in Shopify, from built-in settings to advanced coding solutions.
Why Display an Estimated Delivery Date on Shopify?
Customers hesitate to buy when they don’t know when their order will arrive. According to Shopify’s own best practices, showing accurate delivery times increases transparency and reduces uncertainty.
In my experience working with Shopify merchants, adding estimated delivery messaging reduced cart abandonment by up to 20%.
Clear delivery dates also:
-
Improve conversion rates
-
Strengthen order fulfillment transparency
-
Differentiate your store from competitors who only display vague “ships in X days” notices
When people shop online, they aren’t just buying a product; they’re buying the assurance of when it will arrive.
In fact, a Baymard Institute study found that nearly 22% of U.S. shoppers abandon carts due to unclear delivery times. That means failing to show a clear estimated delivery date can directly cost you sales.
Methods to Show Estimated Delivery Date on Shopify
I’ve mentioned five ways to show an estimated delivery date on Shopify, and the right choice depends on your store’s needs and level of expertise. Let’s examine each method one by one.
#1. Using Shopify Shipping & Delivery Settings
Based on Shopify’s documentation, the easiest way to add estimated delivery dates is Shopify’s built-in Shipping & Delivery settings. But they won’t give you product-specific flexibility.
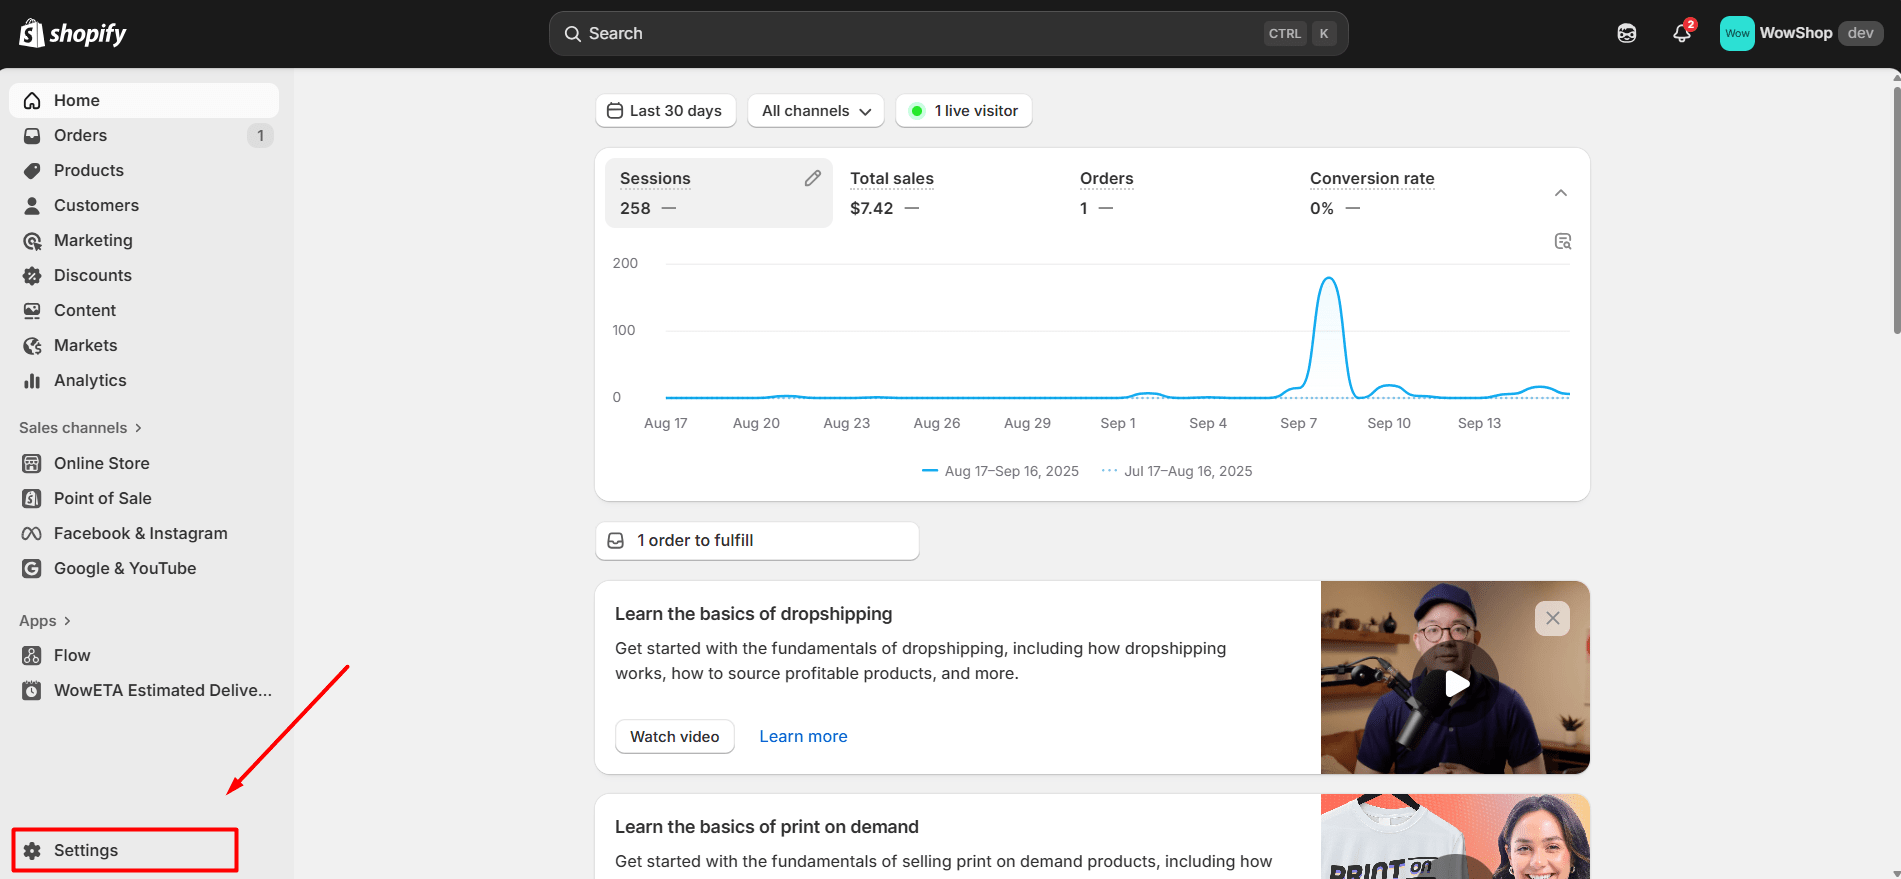
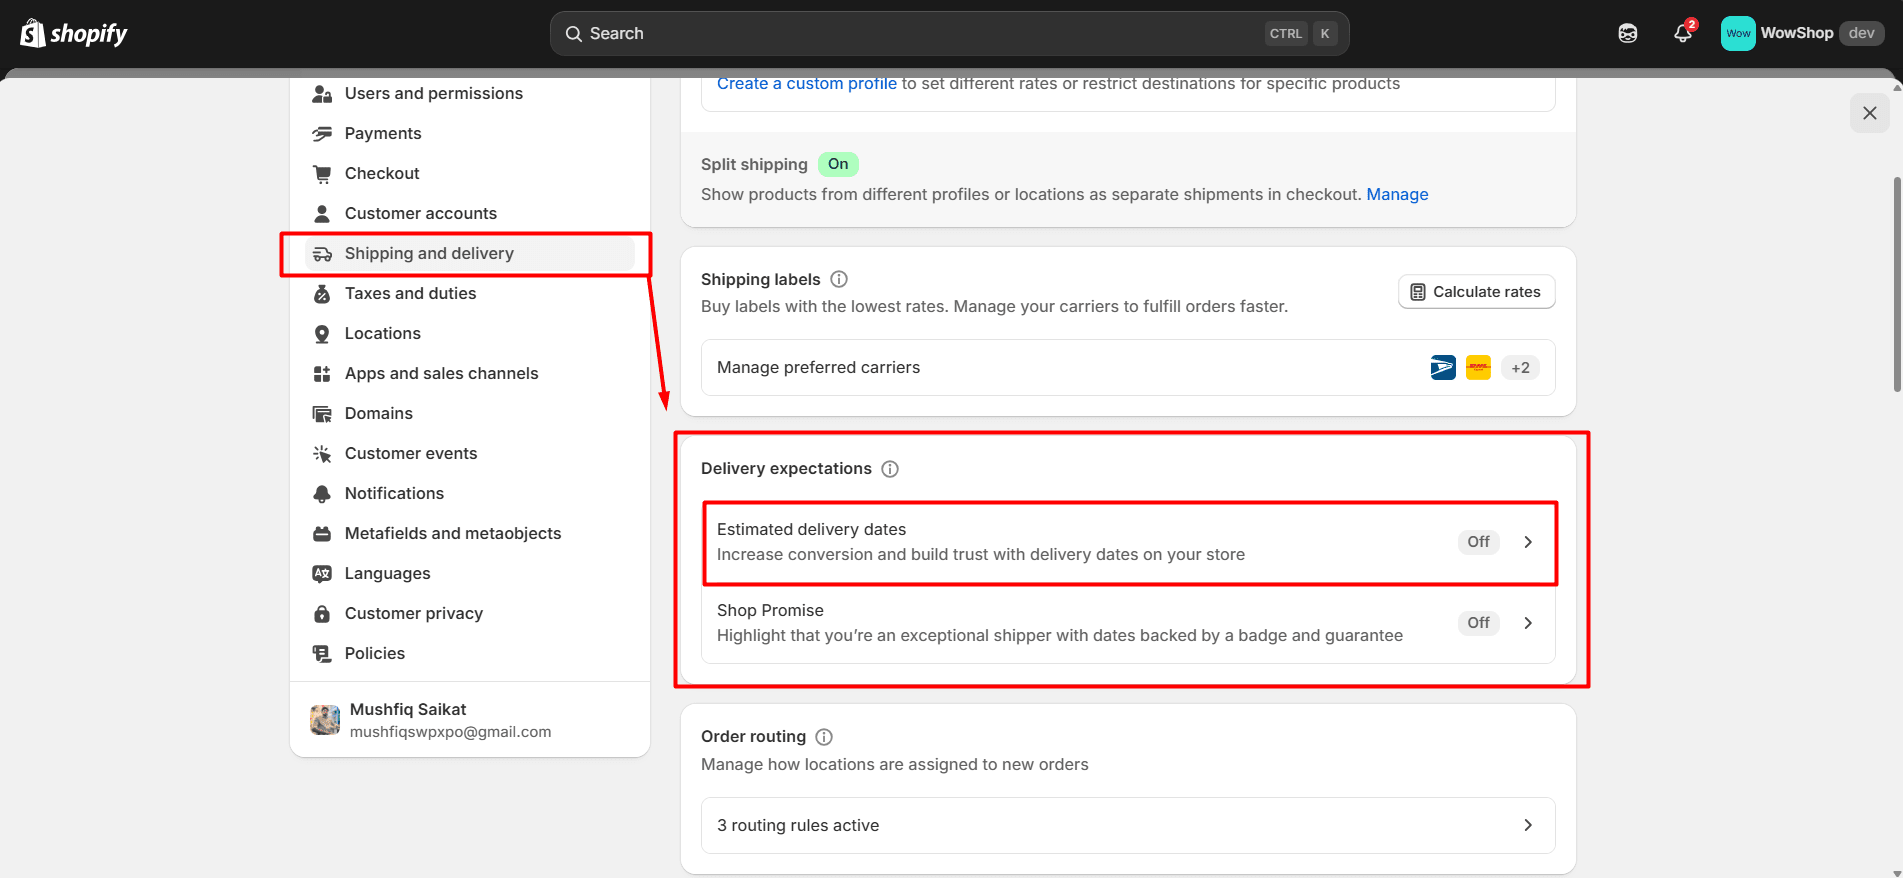
In Settings → Shipping and delivery, there is a section named Delivery expectations. Under that, you’ll find the option for estimated delivery dates.
Here’s the setup flow:
-
Go to Shopify Admin → Settings → Shipping and delivery.
-
Scroll to Delivery expectations → Estimated delivery dates.

-
Click to open its settings.
-
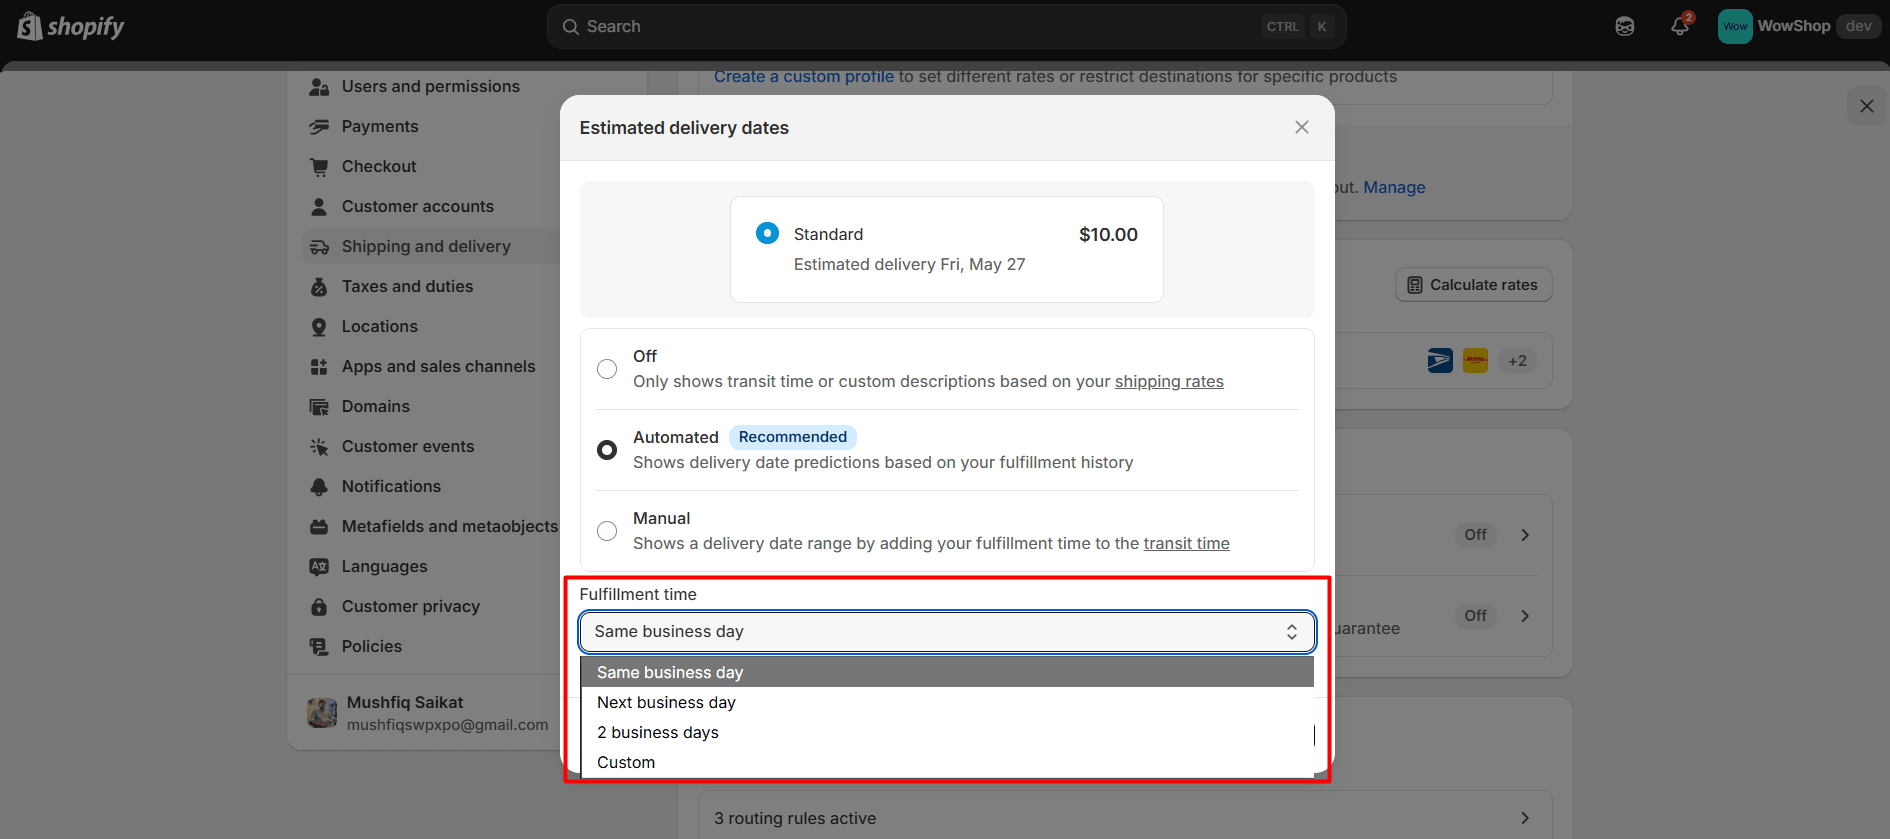
Select Automated (recommended) or Manual, depending on how you want estimates to be generated.
-
Choose the Fulfillment time (how long you need to process the order) from the dropdown (Same day, next day, etc., or custom).

Save the settings. Once saved, Shopify will start showing delivery estimates to eligible customers.
Key Options & What They Mean
|
Option |
Description |
|
Off |
No estimated delivery prediction shown. Only shows transit times (or whatever is in your shipping rate descriptions) or static custom text you may have added. |
|
Automated |
Shopify uses your past fulfillment history, your transit times, etc., to predict delivery dates. These are dynamic and shown to customers (on product pages, checkout, etc.) where eligible. (Shopify Help Center) |
|
Manual |
You set your own delivery date range by adding your fulfillment time + transit time. This is more static/predictable from your end. Good if you don’t have historic fulfillment data or want full control. |
Fulfillment Time Setting
-
This is how long it takes you (the merchant) to fulfill an order, that is, the time from order placement to when it’s shipped or ready for shipment.
-
Options provided include: Same business day, Next business day, 2 business days, or Custom, where you can define something else.
This fulfillment time gets added to the “transit” time to compute the estimate shown to the customer.
Eligibility & Limitations to Be Aware Of
Automated estimates are subject to certain requirements and limitations. Shopify's help docs mention:
-
The store must be on Basic plan or higher.
-
A fulfillment location in the United States (for the automated prediction to work in the U.S.).
-
Products in the order must be in stock and fulfillable immediately from that location.
-
If the prediction is more than 5 days out (for U.S.-based delivery), then manual delivery dates may be shown instead.
What Happens After Enabling
Once enabled and configured properly:
-
Customers will see the estimated delivery date in a number of places: Product pages, checkout, order confirmation, and thank you / order details pages.
-
The displayed estimates will include your fulfillment time + transit time + any business days rules (weekends/holidays), depending on what Shopify considers in its transit/fulfillment data.
-
If you use Manual mode, you must maintain those estimates yourself; Shopify will show what you set (within the limits of shipping zones/rates, etc.).
#2. Adding Estimated Delivery Dates with a Shopify App (No-Code Solution)
If you want more control, apps from the Shopify App Store are the way to go. These apps handle business days, cut-off times, holidays, and even adjust for time zones automatically. Here’s the five-step setup flow:
Step 1: Install the WowETA App
-
From the Shopify admin, go to Apps and sales channels → Shopify App Store.
-
Search for WowETA
-
Click Install, and authorize necessary permissions.
Step 2: Configure Global Settings First
Open the app and under the Global Settings, configure things like:
Business Hours / Workdays: define which days of the week are business days and hours during which orders are prepared/delivered.
Preparation Time: time needed to process / package orders before shipment.
Cut-off Time: the time of day after which new orders are pushed to the next business/preparation day.
Holidays: define dates (and whether repeating) where deliveries or preparation do not happen.
Timezone selection: By default buyer’s timezone is used; you can override if needed.
Step 3: Set Up Country-Based Estimates
Use the Delivery Country section to define estimated delivery times for specific countries. For example, for “USA” or “UK”, you might set different lead/transit times.
-
From the WowETA app, navigate to Delivery Country
-
Confirm shipping zones are set up in Shopify in advance.
-
Search and select countries

-
Select a range type and set the delivery time in days
-
Once done, click Apply

✅ Tip: If you want customers to pick their country (or detect automatically), enable the Country Dropdown in ETA Rule settings.
Step 4: Configure ETA Rules
From the WowETA Estimated Delivery Date app → go to ETA Rules

-
Add a new rule, give it a name, and set the status to Active
-
Choose Trigger Products (All products / Collections / Specific products)

-
Define Preparation time and Delivery time (fixed values or ranges)
-
Click on the Pre-made Templates button to choose an ETA design
-
Enable Country Dropdown if you want country-based estimates
-
Enable the ETA Message Bar (where the message appears)
-
Use shortcodes in the message text such as {prep_min}, {delivery_max}, {country}, etc.
-
Enable the ETA Steps Bar that shows a timeline
-
Create the steps required for your process (the first 2 are selected by defaul
-
Customize the look from the Appearance and save the rule so it starts working live
Step 5: Enable the App Block / Embed in Theme
If You Have an OS 2.0 Theme
-
Use the WowETA “App Embed Block” / “App Block” provided—these work with OS 2.0 themes.
-
In the theme editor, insert the WowETA block into the template/section where you want the ETA message to appear (product page, cart, etc.).
-
Adjust its position (e.g., above or below the “Add to Cart” button) via drag & drop.
-
Save the theme. Once enabled, the ETA messages will automatically appear wherever the block is placed.
Preview the ETA messages across product/cart/checkout pages, and ensure they update properly based on country, cut-off time, and holidays.
#3. Adding Manually in the Product Description
This method isn’t automated. This is simple but means you’ll have to edit each product manually if times change. Here’s the setup flow:
-
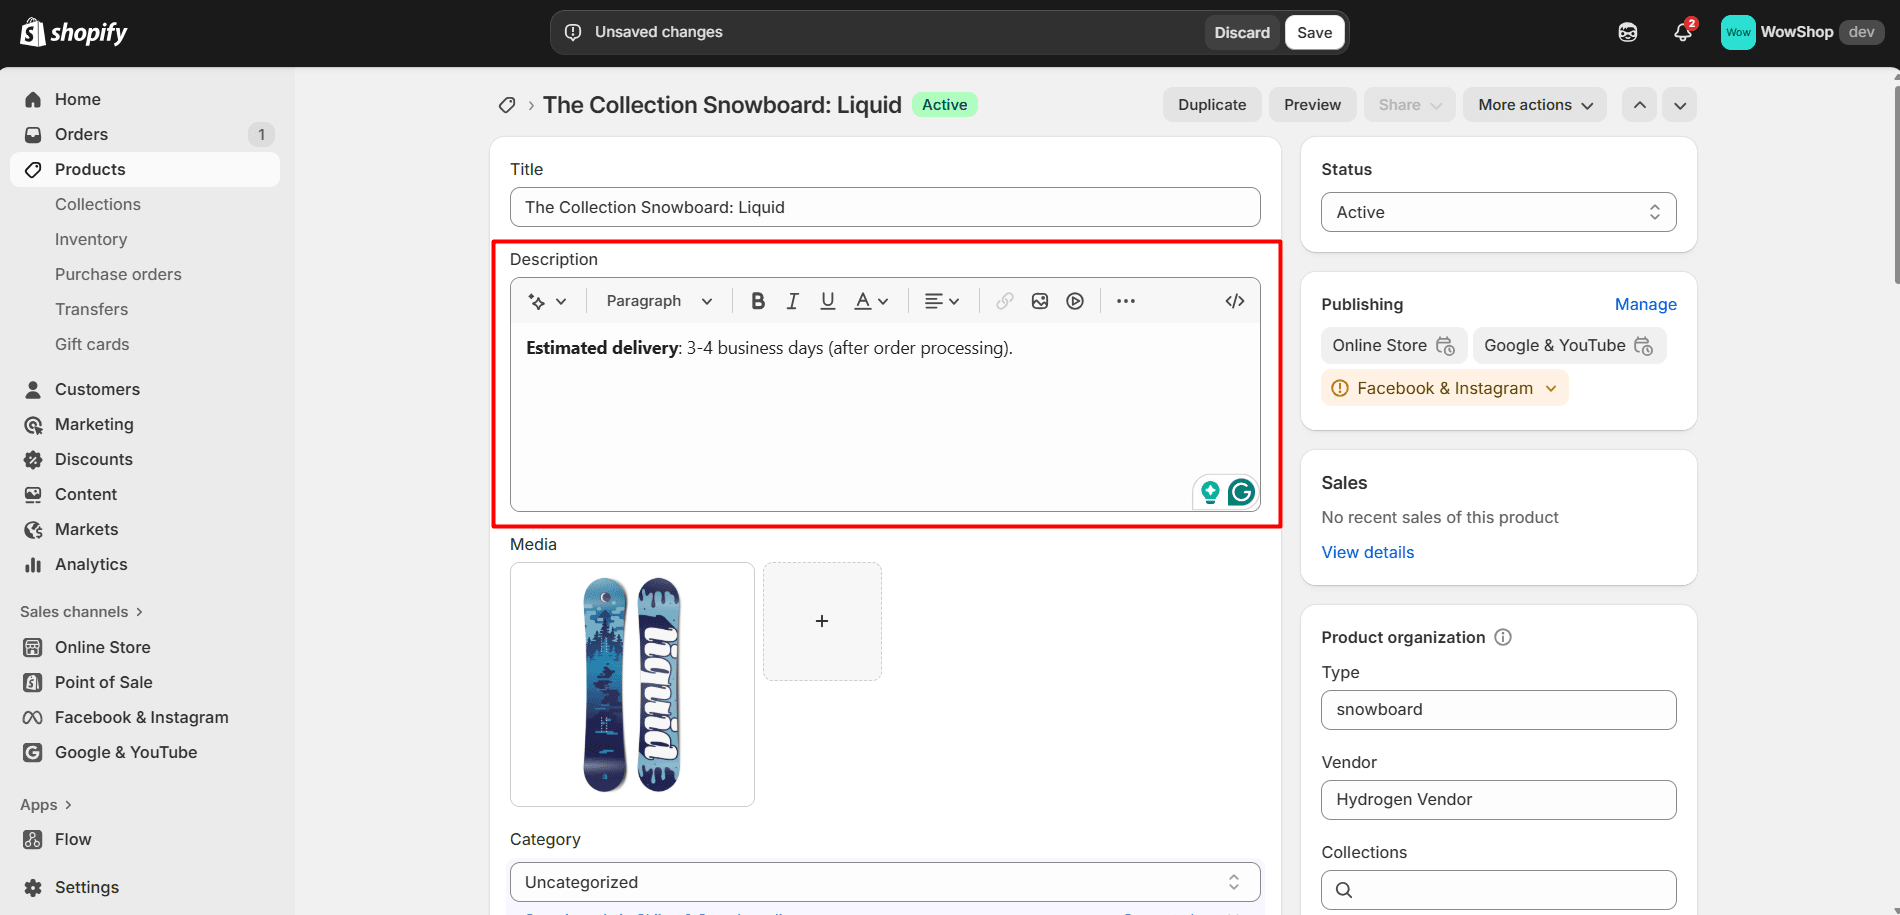
In your Shopify admin, go to Products > All products.
-
Select the product you want to edit.
-
In the Description field, add something like:
“Estimated delivery: 3-4 business days (after order processing).”
Or:
“Delivery expected between May 20-25.”
-
Save the product.
👉 This will show the same delivery estimate for every customer, regardless of their location or order date.
#4. Using Metafields (More Maintainable)
If you want something more flexible, use metafields and theme changes so that:
-
You set an estimated delivery date per product via metafields.
-
Theme picks up that metafield and renders it under the product title/price or somewhere visible.
Here’s the three-step setup flow:
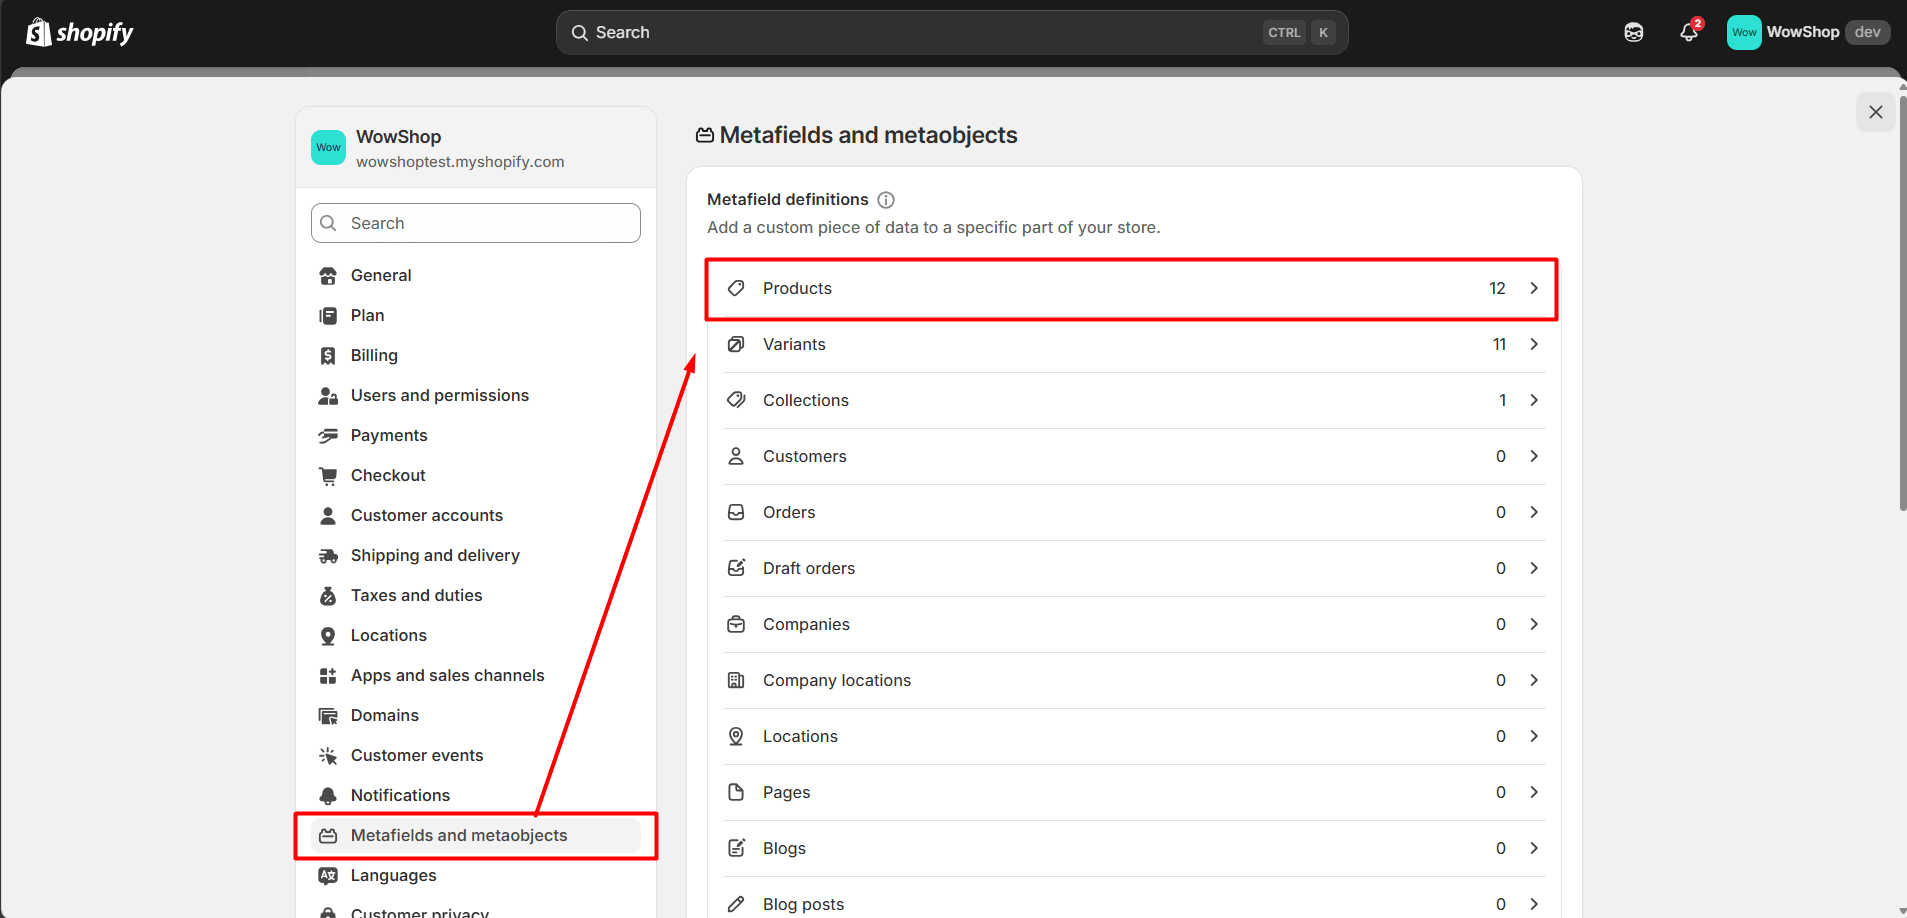
Step 1: Define a Metafield for Delivery Info
In Shopify Admin:
-
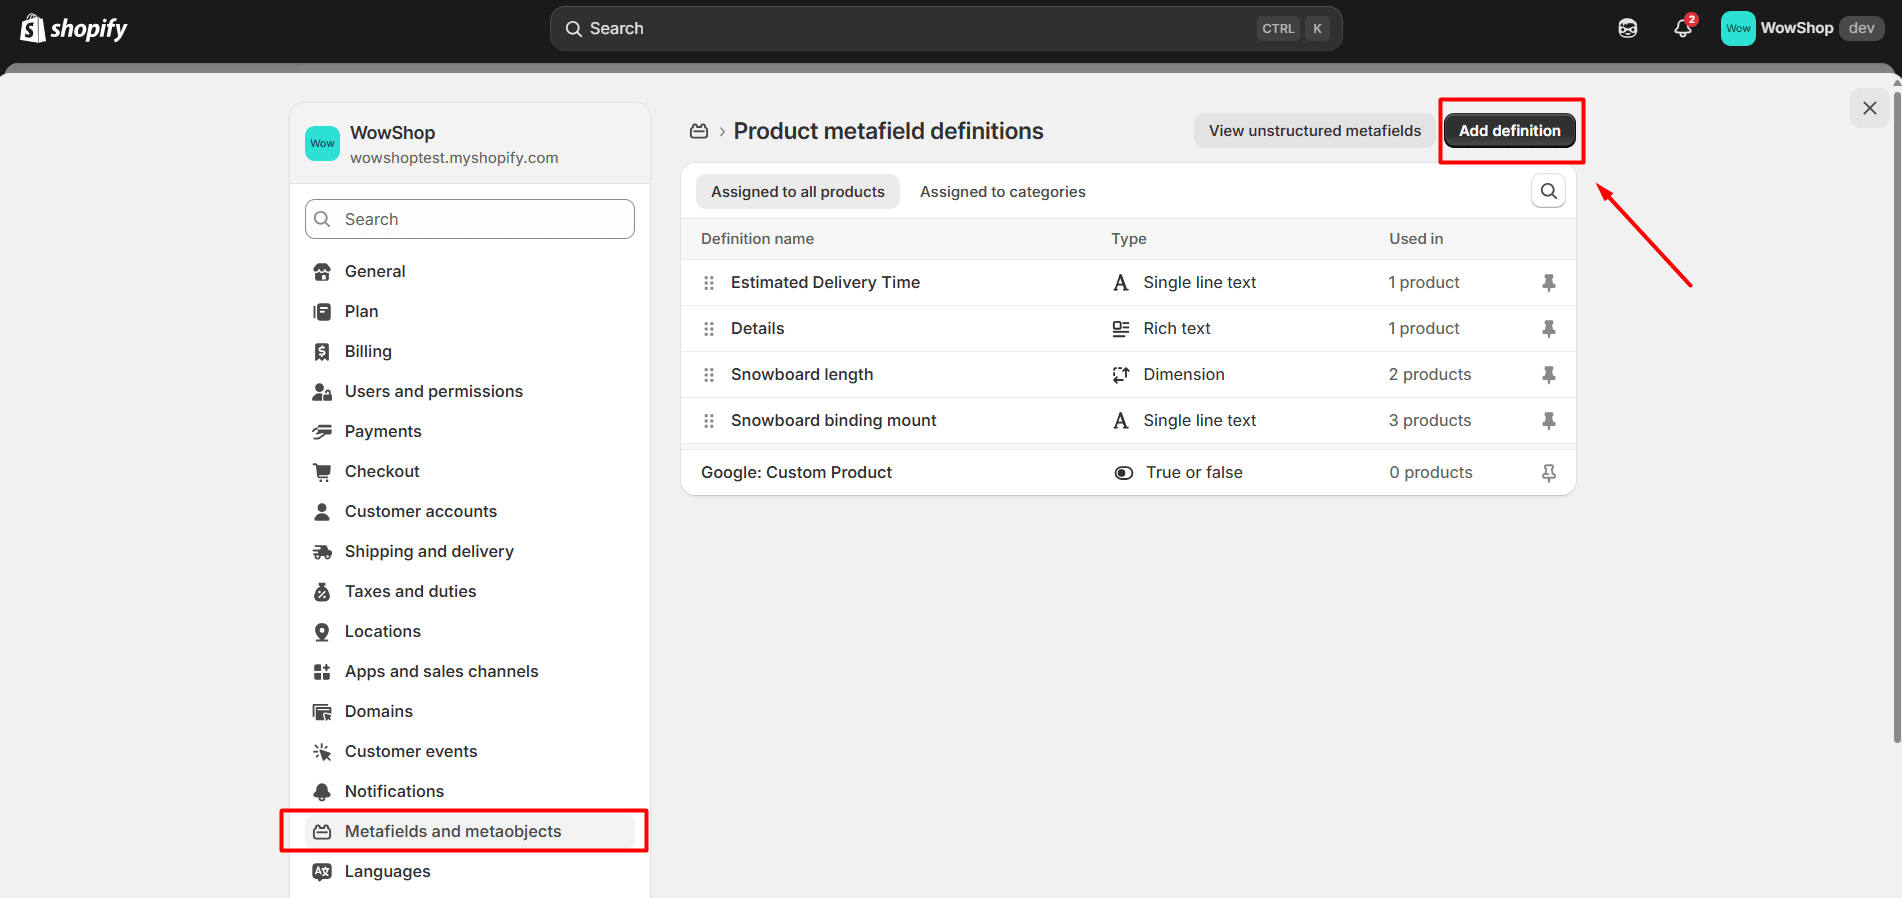
Go to Settings → Metafields and metaobjects
-
Choose Products
-
Click on Add definition
-
Give a name (e.g., “Estimated Delivery Time”)
-
Select a type (Single line text) so you can enter something like “3-4 days” or “May 20-25”
-
Keep the rest as it is.
Step 2: Add the Metafield Value on Products
From the Shopify admin:
-
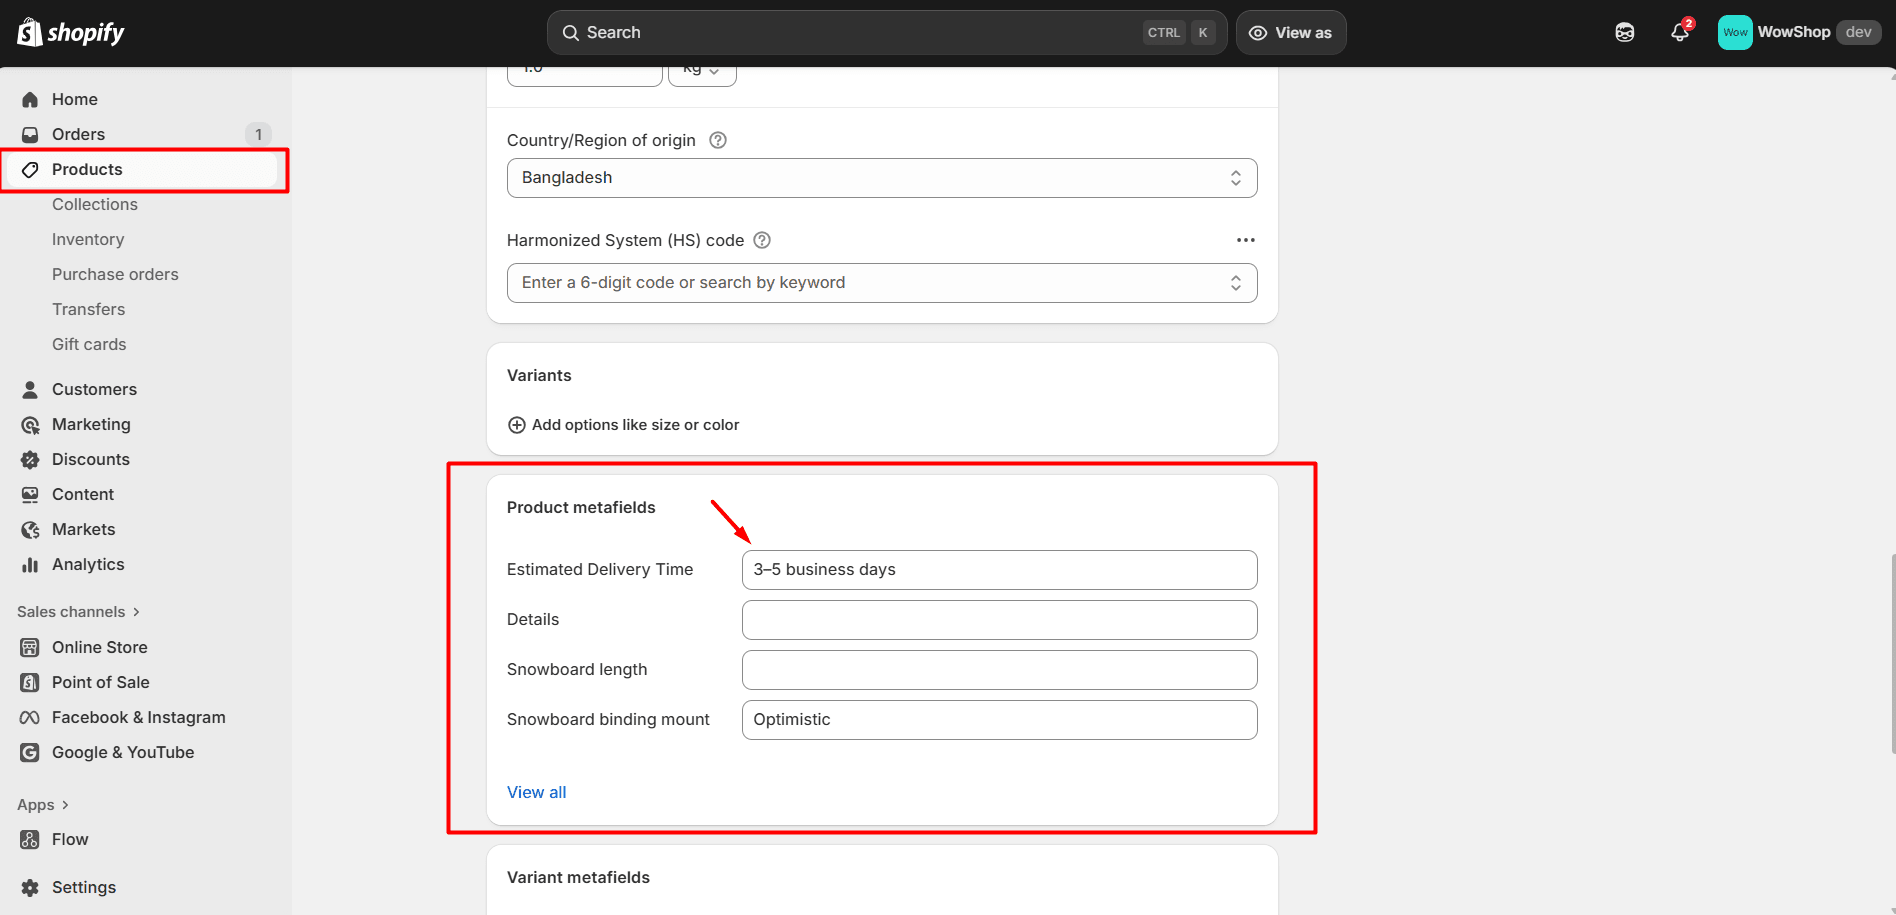
Go back to the Products page
-
Click on any product to enter the editor
-
Scroll down to the Product metafields section and enter the delivery timeframe for that product (e.g., “3–5 business days” or “Arrives between Sept 20–Sept 25”).
-
Save the changes
Step 3: Edit Theme to Display Metafield
Update your theme to display the metafield in the product page. For Online Store 2.0 themes (like Dawn):
-
In Online Store > Themes > Customize.
-
From the header area, go to the Products template.
-
Locate where you want the delivery text to appear (commonly under price, or under the “Add to Cart” button).
-
Add a Text block, then Connect dynamic source → choose your Estimated Delivery Time metafield.
-
Click Save, and it’s done
Now, each product can have its own delivery estimate displayed dynamically.
#5. Use Liquid Code for Automatic Date Range (Advanced Option)
If you want to go beyond static but not fully automated, you can compute a delivery range based on today’s date plus a fixed number of days (for processing + shipping). Here's a simple example snippet:

{% assign processing_days = 2 %}

{% assign min_shipping_days = 3 %}

{% assign max_shipping_days = 5 %}

{% assign start_days = processing_days | plus: min_shipping_days %}

{% assign end_days = processing_days | plus: max_shipping_days %}

{% assign now_seconds = 'now' | date: "%s" %}

{% assign start_sec = now_seconds | plus: start_days | times: 86400 %}

{% assign end_sec = now_seconds | plus: end_days | times: 86400 %}

{% assign start_delivery = start_sec | date: "%b %d" %}

{% assign end_delivery = end_sec | date: "%b %d" %}

<p class="estimated-delivery">Estimated delivery: {{ start_delivery }} – {{ end_delivery }}</p>
You may need to adjust for business days / skip weekends manually (or via JavaScript) if that’s important. Here’s the setup flow:
-
In your Shopify Admin, go to Online Store → Themes → Edit Code.
-
Add a snippet of Liquid code in your product template where you want the date to appear.
-
Use JavaScript to calculate delivery ranges. For example: add processing days + shipping days, skip weekends, and exclude holidays.
-
Save, publish, and test across product, cart, and checkout pages.
✅ Tip: If you’re not a developer, apps are usually safer and faster. But if you like having full control over the customer experience, coding gives you endless flexibility.
Where to Display Estimated Delivery Dates in Your Shopify Store
We have understood that estimated delivery dates (EDD) are one of the most powerful ways to build trust and reduce friction in the buying journey. Here’s where you should display them and why it matters.
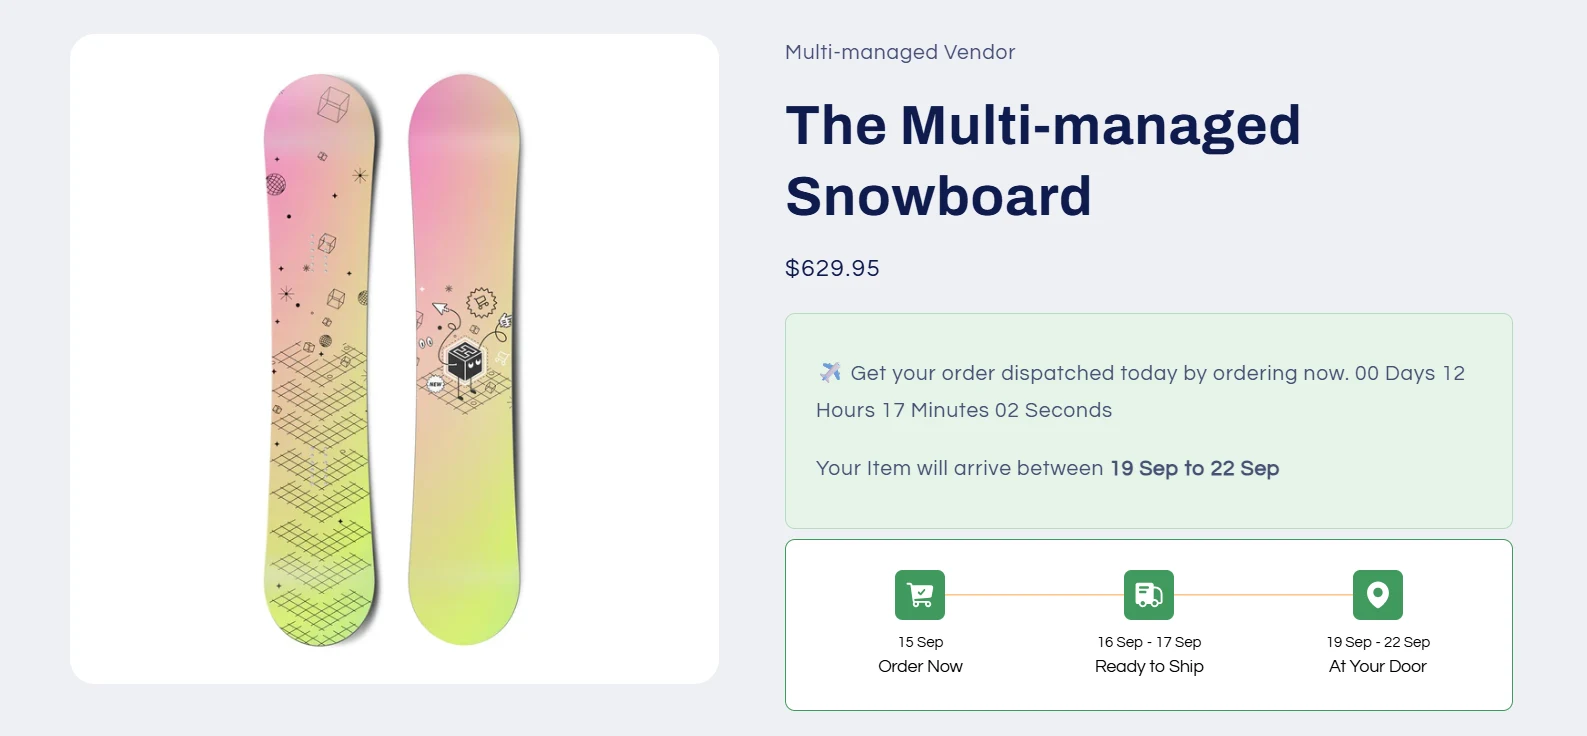
1. Product Page: Set Expectations Early
The product page is the first place a customer seriously considers making a purchase. They’re scanning product details, reviews, and shipping info before committing.
The EDD should be shown close to the “Add to Cart” button, where it naturally reassures the customer right before making the purchase decision.. For example,
“Estimated delivery: September 15–18 (3–5 business days, excluding weekends and holidays).”
Why this works:
-
Customers don’t have to guess how long shipping will take.
-
It eliminates one of the most common pre-purchase objections.
-
It provides a sense of professionalism and transparency, which builds trust.
According to e-commerce usability studies, removing uncertainty at this stage can increase conversion rates significantly. Some retailers report conversion rate lifts of 5–10% after making delivery dates visible at this stage.
2. Cart Page: Reinforce Confidence Before Checkout
The cart is where second-guessing often happens. Shoppers might be thinking: “Do I really want this?”, “Will it arrive in time?”, or “Maybe I should wait.”
Showing the delivery estimate here provides reassurance right before they click “Checkout.”
In a test with a mid-sized fashion store, showing delivery windows in the cart reduced cart abandonment by 12% compared to when shipping times were only revealed later.
Why this matters:
-
The cart is the last chance to reinforce trust before asking for payment details.
-
Consistency (seeing the same delivery promise on product and cart pages) removes doubt.
-
It prevents “surprise shipping info” later in checkout, which is a known trigger for drop-offs.
3. Checkout Page: The Final Push
On standard Shopify plans, checkout customization is limited. However, with Shopify Plus or an approved checkout extension app, you can show EDD directly at checkout.
“According to Shopify’s Plus documentation, checkout extensions are the only way to add estimated delivery dates natively at checkout.”
Why this matters:
-
Checkout is the most sensitive step—small uncertainties here can derail a purchase.
-
Displaying EDD at checkout aligns with shopper psychology: reassurance right before entering payment details.
-
Customers who feel confident about delivery timelines are more likely to complete their purchase without hesitation.
4. Thank You Page: Reassurance After Purchase
The moment after purchase is often overlooked. Customers just spent money and want immediate validation that their order will arrive as promised.
Placing EDD here creates a seamless bridge between purchase and fulfillment.
“Estimated delivery: September 15–18. You’ll receive tracking updates by email as soon as your order ships.”
Why this works:
-
It reduces post-purchase anxiety, lowering the risk of buyer’s remorse.
-
Customers are less likely to contact support asking, “When will my order arrive?”
-
Reinforcing the promise immediately after checkout builds trust and long-term loyalty.
5. My Account & Order Details Page: Ongoing Transparency
Customers often return to their accounts to double-check when their order will arrive. Keeping the delivery estimate visible here ensures consistency.
“My Orders → Order #2345 → Estimated delivery: September 15–18.”
Why this matters:
-
It creates a single source of truth for order expectations.
-
Reduces “Where is my order?” (WISMO) inquiries, which are one of the most common support tickets in e-commerce.
-
Continuous transparency strengthens trust, which improves repeat purchase rates.
How Displaying Estimated Delivery Dates Impacts Customer Trust and Sales
Estimated delivery dates (EDD) do more than reassure customers. They directly affect sales and loyalty.
Reduce Cart Abandonment: The Baymard Institute reports that 22% of shoppers abandon carts due to unclear delivery timelines. Showing EDD on product, cart, and checkout pages removes this uncertainty.
Cut Support Costs: “Where is my order?” Tickets are the most common support queries. Proactive EDDs reduce these inquiries, saving time and money.
Boost Conversions: MetaPack research shows that 50% of customers abandon purchases if delivery doesn’t meet expectations. Clear dates help close the sale.
Build Loyalty: According to Convey, 98% of consumers say delivery affects brand loyalty, and most won’t return after a poor delivery experience.
In short, displaying EDD on Shopify is a proven way to convert more customers, reduce friction, and strengthen trust.
Common Mistakes to Avoid While Adding Estimated Delivery Dates to Your Shopify Store
While adding estimated delivery dates to your Shopify store can boost conversions and trust, a few common pitfalls can undermine the effort:
Overly Broad Estimates – Ranges like “5–15 days” feel vague and unreliable. Customers want precision, not guesswork.
Inconsistent Messaging – Showing different delivery timelines on the product, cart, and checkout pages creates confusion and damages credibility.
Ignoring Cutoff Times & Weekends – Promising delivery without accounting for order deadlines, holidays, or non-business days often leads to missed expectations.
Failing to Update During Peak Seasons – Delivery networks slow down during holidays and sales events. Not adjusting estimates risks disappointing customers when it matters most.
By avoiding these mistakes, your estimated delivery dates become a trust signal instead of a potential frustration point.
Add Estimated Delivery Dates on Shopify Today!
Adding an estimated delivery date to your Shopify store is one of the simplest ways to boost sales and customer trust.
Whether you use Shopify’s delivery settings, a third-party app like WowETA Estimated Delivery Date, or custom Liquid code, the key is consistency and transparency.
We’ve implemented this feature using WowETA for multiple Shopify merchants, and every time it has increased customer satisfaction and repeat purchase rates.
By clearly showing delivery time on multiple pages, you’ll give customers the confidence they need to click the “Buy Now” button.
FAQs about Estimated Delivery Dates in Shopify
Find answers to common questions about how Shopify calculates and displays estimated delivery dates.
You May Also Like Reading: how to create custom product options in Shopify.