
Today's online shoppers expect flexibility. Whether they're ordering a custom-printed mug ring, a personalized gift box, or a T-shirt with their name on it, they want to choose exactly what they get. If your Shopify store can't offer that flexibility, you're leaving money on the table.
The good news is that adding custom product options in Shopify is entirely achievable – even without a single line of code.
This guide walks you through two practical methods, from using Shopify's native variant system to leveraging a dedicated product options app like WowOptions, so you can build the kind of product pages that convert browsers into buyers.
Why Should You Add Product Options in Shopify?
Product options in Shopify allow customers to choose specific customizations like size, color, or personalized text, presenting all variations in a single product listing to enhance customer experience.
Adding product options to your Shopify store is one of the highest-impact improvements you can make. Here's why:
Cleaner, more organized storefronts → Instead of creating a separate product listing for every variation, product options let you present everything in one place.
Higher average order value → When you let customers add personalized engravings, premium packaging, or gift wrap and attach a price to each – every customization becomes a revenue opportunity. Price add-ons and cost-per-option features can meaningfully boost your revenue per order.
Fewer returns and disputes → When customers explicitly select every detail: size, color, design, custom text – there's less ambiguity about what they ordered. That means fewer mismatches and lower return rates.
Limitations of Shopify's Built-In Product Options
Shopify's native variant system works well for straightforward use cases, but you will quickly hit the limit if you have a growing store.
Understanding these limitations will help you decide which method is right for your store.
|
Feature |
Shopify Built-In Options |
Product Options Apps |
|
Max option types per product |
3 (e.g., Size, Color, Material) |
Unlimited |
|
Max variants per product |
2,048 on newer themes/models |
Unlimited |
|
Per-option price add-ons |
Not supported |
Supported |
|
Conditional logic (show/hide fields) |
Not supported |
Supported |
|
Custom text input fields |
Not supported |
Supported |
|
File uploads from customers |
Not supported |
Supported |
|
Color/font pickers |
Not supported |
Supported |
|
Coding required |
No |
No |
|
Analytics per option |
No |
Yes |
The gap becomes more noticeable as soon as you need anything beyond a simple dropdown or color selector.
For stores selling personalized products such as jewelry, apparel, gifts, custom prints, or anything requiring customer input – a third-party app is almost always the better path.
How to Add Product Options in Shopify
There are two main approaches to adding custom product options to your Shopify store:
Method 1: Using Shopify's built-in product variant feature
This is Shopify's native system for adding options like size and color directly from your product admin page. It's quick to set up and works without any apps.
It's best suited for products with simple, finite combinations — think a T-shirt with three sizes and two colors. If you have a few products and a few variants and don't need advanced input types, this method is perfectly adequate.
Method 2: Using a product options app
Product options apps extend Shopify's functionality with unlimited options, dynamic field types, conditional logic, price add-ons, and custom options like text boxes, file uploads, and date pickers.
This method is the right choice for any store that needs to collect specific customer input or offer truly personalized products at scale.
We'll walk through both methods in detail below.
Method 1: Using the Built-In Product Variant Feature of Shopify
Shopify's native system lets you add up to three option types per product (such as Size, Color, and Material), generating a unique variant for every combination.
Step 1: In your Shopify admin dashboard, from the left-hand menu, click Products, then select the product you want to edit - or click Add product to create a new one.
Step 2: Scroll to the Variants section. Click on the Add variant button. Click on Add options like size or color.
Here, note that Shopify offers preselected meta fields based on your product category. So, for example, if you select the T-shirt category, it gives you 10 types of metafields. But you can use at most 3 options here.
Step 3: Define your option name and values. You can select an option from the dropdown or enter a name for your option, if you want to give it a custom name.
After that, you can choose the values - again Shopify gives you a list of predefined options you can select from.
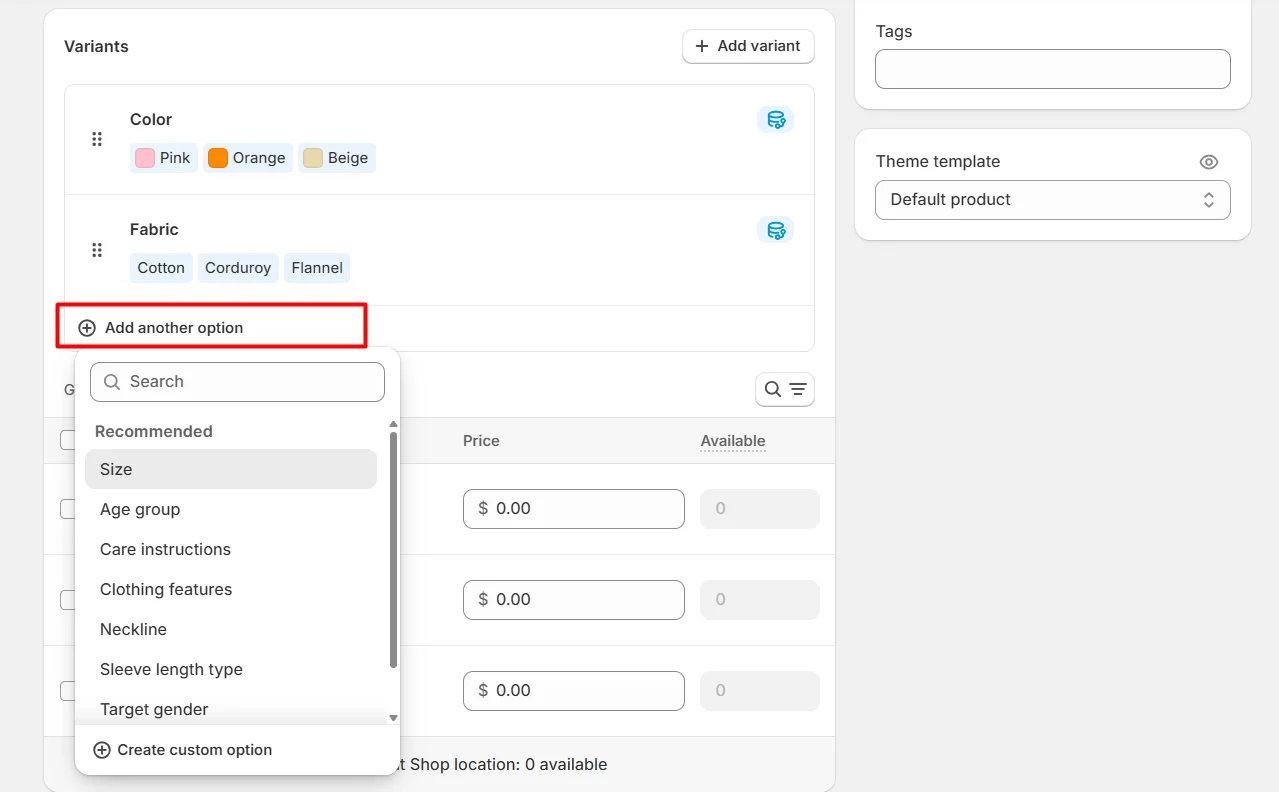
Step 4: Add more options if needed. Click Add another option to create a second or third option type. Shopify will automatically generate all possible variant combinations from your option values.
Step 5: Set individual variant details. For each variant, you can set a unique price, SKU, barcode, and inventory quantity. You can also assign a specific product image to each variant.
Step 6: Save and preview. Click Save at the top right. Then use the Preview function to check how your options appear on the storefront. Make sure everything displays correctly before publishing.
This method works well for simple, structured products. However, once you need a text input for custom notes, a file upload for a logo, or any form of conditional logic, you'll need to move to Method 2.
Method 2: Using a Product Options Shopify App
If you need more options and variant limits, you will need to use a product options app.
WowOptions is a dedicated Shopify product options app that removes Shopify's variant limits entirely and gives you a no-code interface for building revenue-generating product option sets.
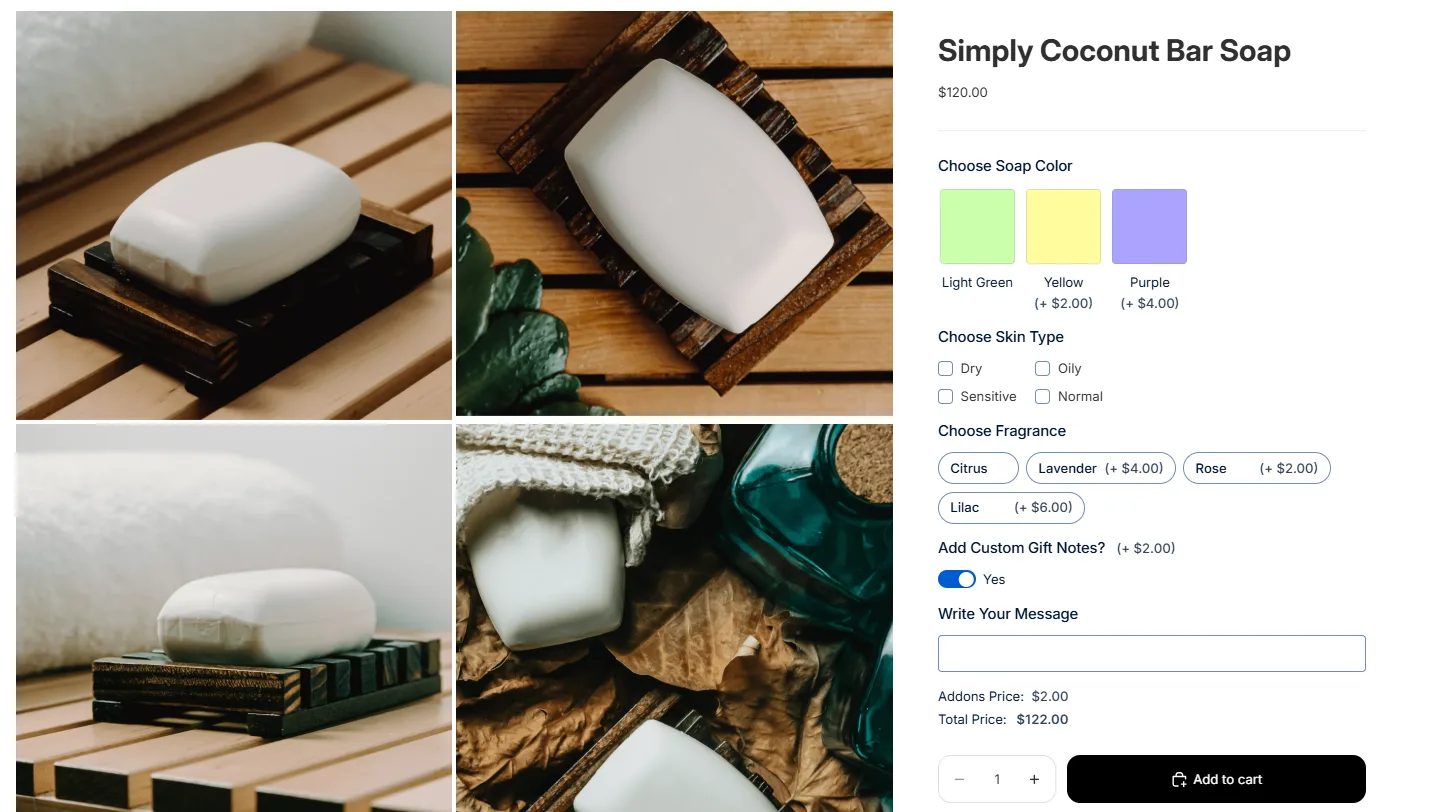
Before we start, here’s a quick preview of what we will be building today – a customized soap product that allows customers to choose soap color, fragrance, skin type, and even add custom notes.
Let’s get started!
Step 1: Install a product options app such as WowOptions
Log in to your Shopify admin. Go to Apps in the left sidebar – which will bring a pop-up. Here you can search for WowOptions to quickly find the app. Alternatively, you can also visit the Shopify App Store and find the app there.
After finding it, simply click on Install, review the requested permissions, and confirm by clicking Install again. Once installed, WowOptions will appear under your Apps section.
Step 2: Activate the app on your storefront
Now, we need to activate the app so the product options work seamlessly across your store.
Go to Apps → WowOptions and land on its dashboard. You should see a few setup guide instructions on how to get started.
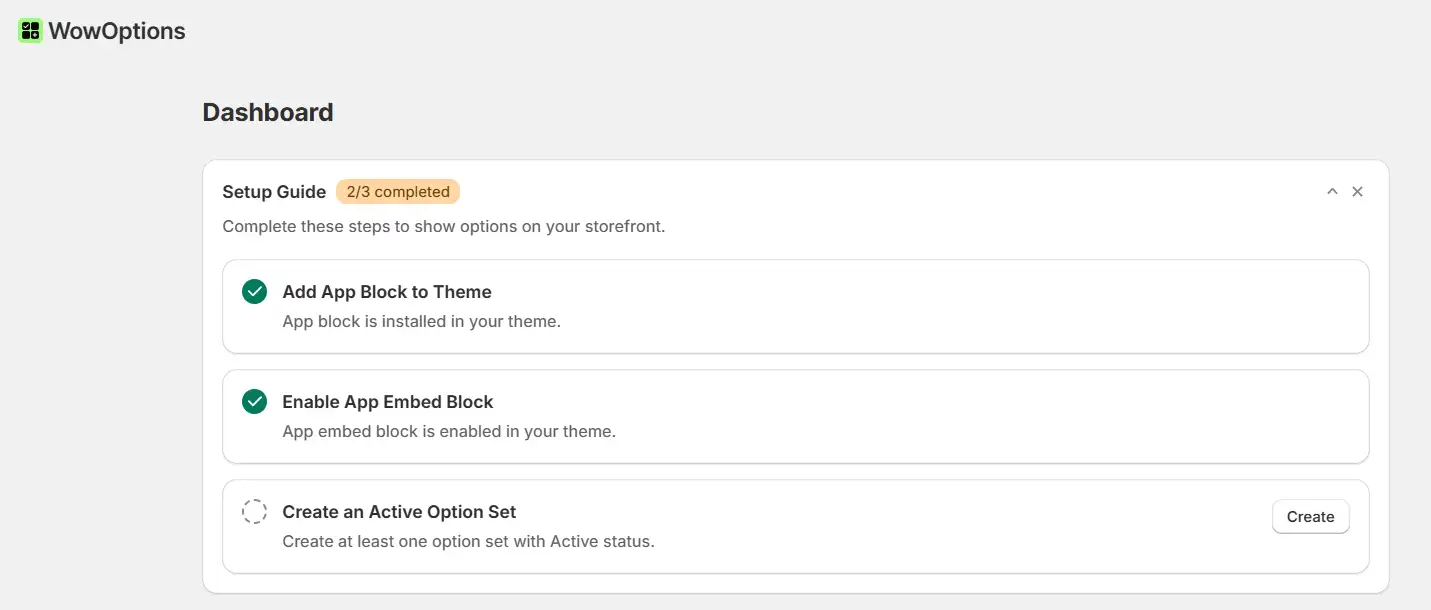
Make sure both options: Add App Block to Theme and Enable App Embed Block are enabled. Save your theme after each step. Both steps are required for the app to display on your storefront.
Next, we will create a new product option using the custom fields offered by WowOptions.
Step 3: Create a new option set
In the WowOptions dashboard, go to Options Set List and click Create Option Set. You can create the option from scratch or start with a template.
WowOptions includes templates for common product options use cases – so you can get started quickly.
For this instance, we will choose the option Create from Scratch.
Step 4: Assign the options to your chosen products
The first step I recommend is selecting the products to which the options will be applied. Click on the Applies to section at the top, and from the dropdown, choose either:
-
All Products: The Options will be displayed on all products in your store
-
Specific Products: The Options will only be visible on selected products
-
Specific Collections: The Options will only be applied to selected collections.
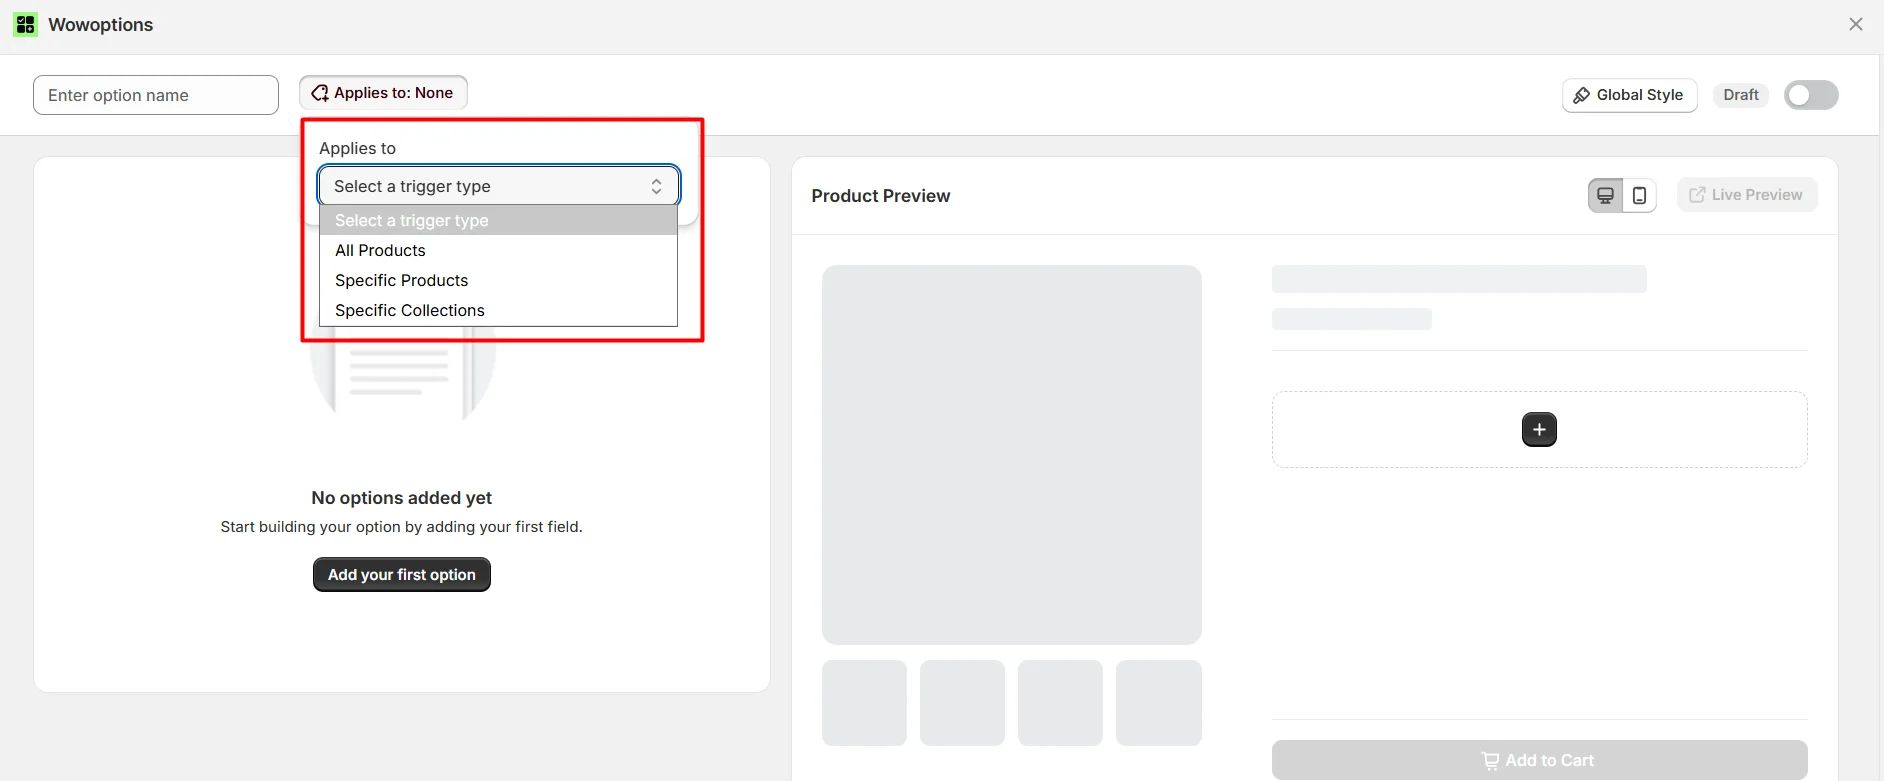
Also, don’t forget to give your option set a clear name for easy identification. Click on the Save button to save the changes so far.
Step 5: Add and configure option fields
Now, the most essential step - setting up the options.
Click Add your first option, and you will see a library of product options offered by WowOptions.
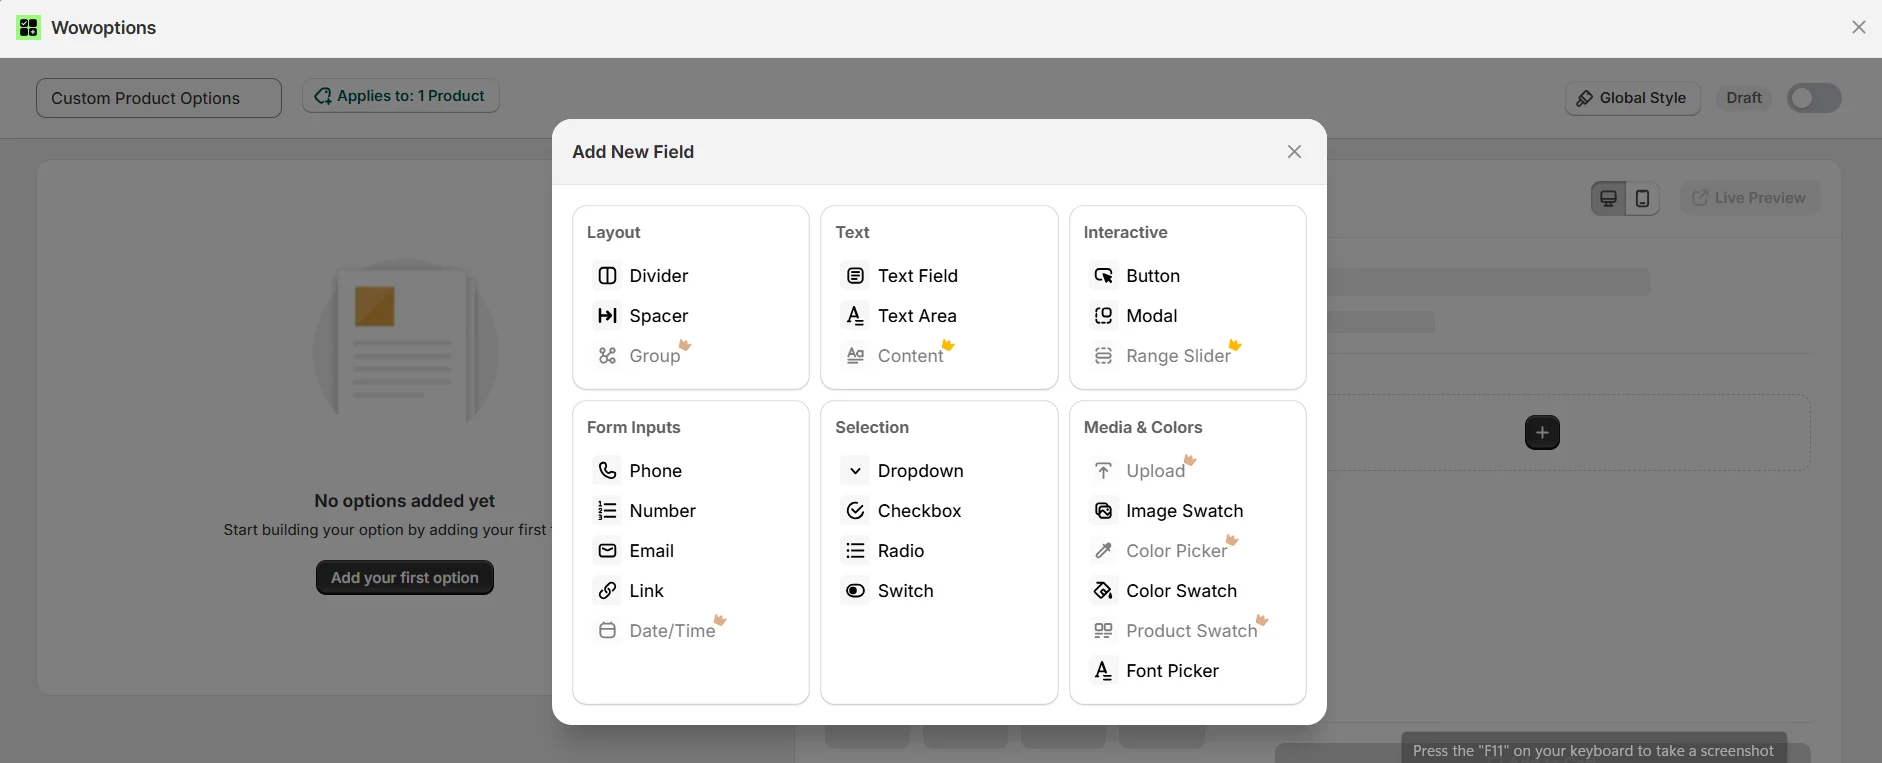
Select the field type you need. WowOptions supports over 25 option types, including text fields, text areas, dropdowns, radio buttons, checkboxes, product swatch, color swatch, image swatch, color and font pickers, file uploads, range slider, email, number, and more.
In the previous step, I picked a specific product, which is a Coconut Bar Soap. Now, I will add options that are relevant for this product.
Adding the color swatch option
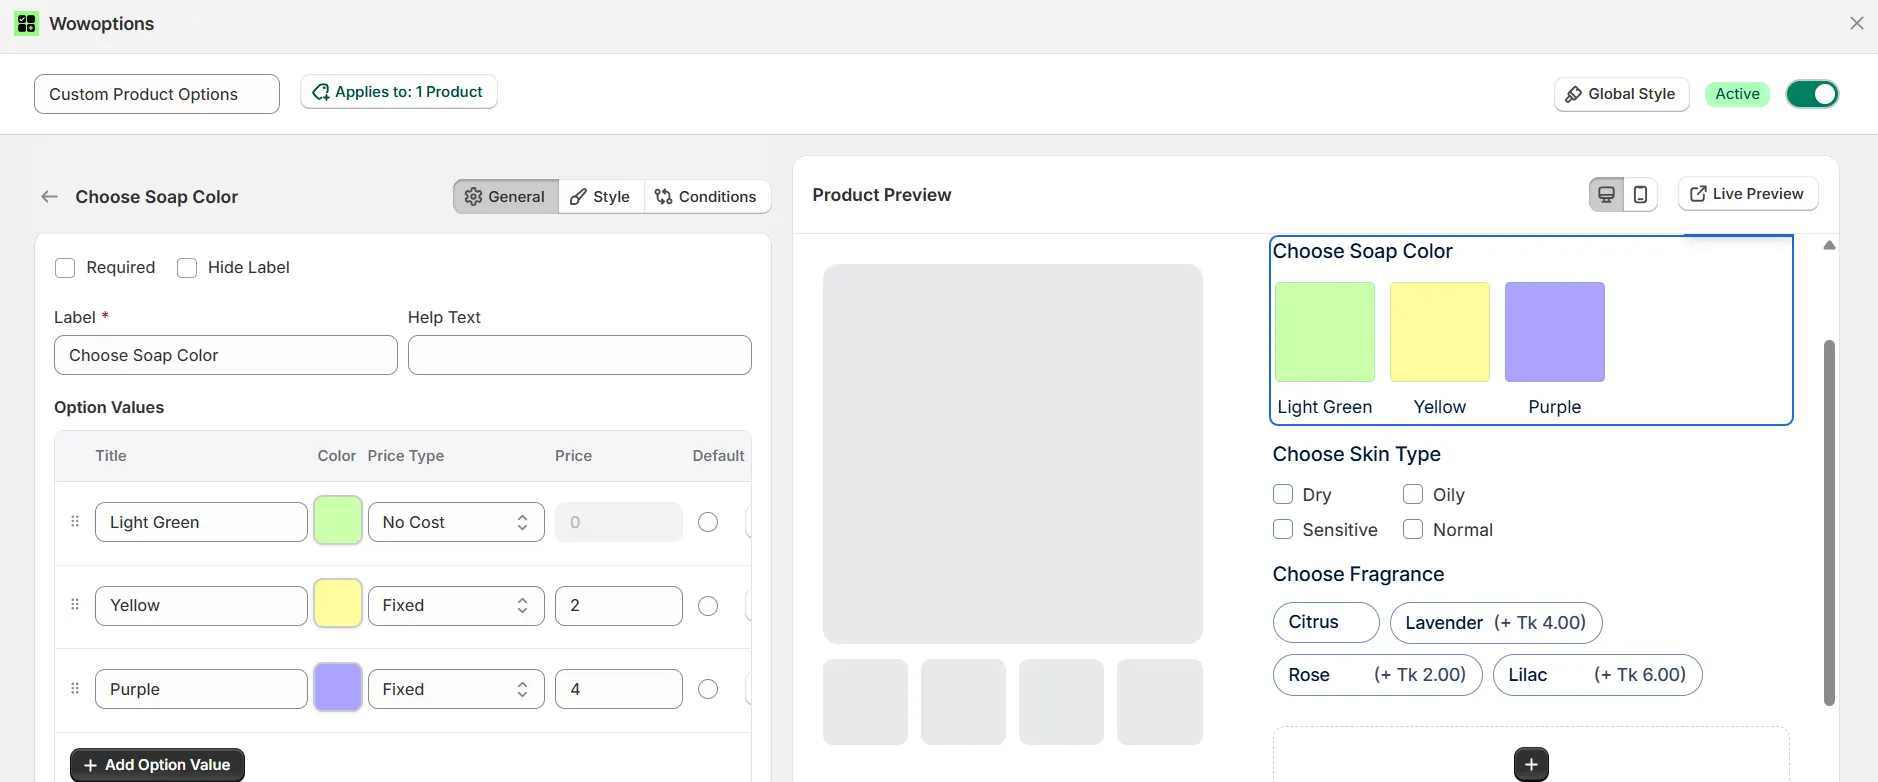
To start with, I added an Image Swatch addon, giving customers the option to choose Soap Color.
Here, note that, after selecting the addon, you can customize it with a plethora of options.
First, I customized the Label to be “Choose Soap Color”, so customers can easily understand what the option does.
Next, from the Option Values, I chose 3 colors: Light Green, Yellow, and Purple.
For each of these colors, you have the option to decide the Add-on pricing. You can offer it for free, with a fixed price, or with a percentage.
I chose the Fixed cost – assigned different pricing for different colors.
Adding the checkbox option
Next, I added the Checkbox addon - offering 4 options based on different skin types. This will let customers order soap based on their skin condition.
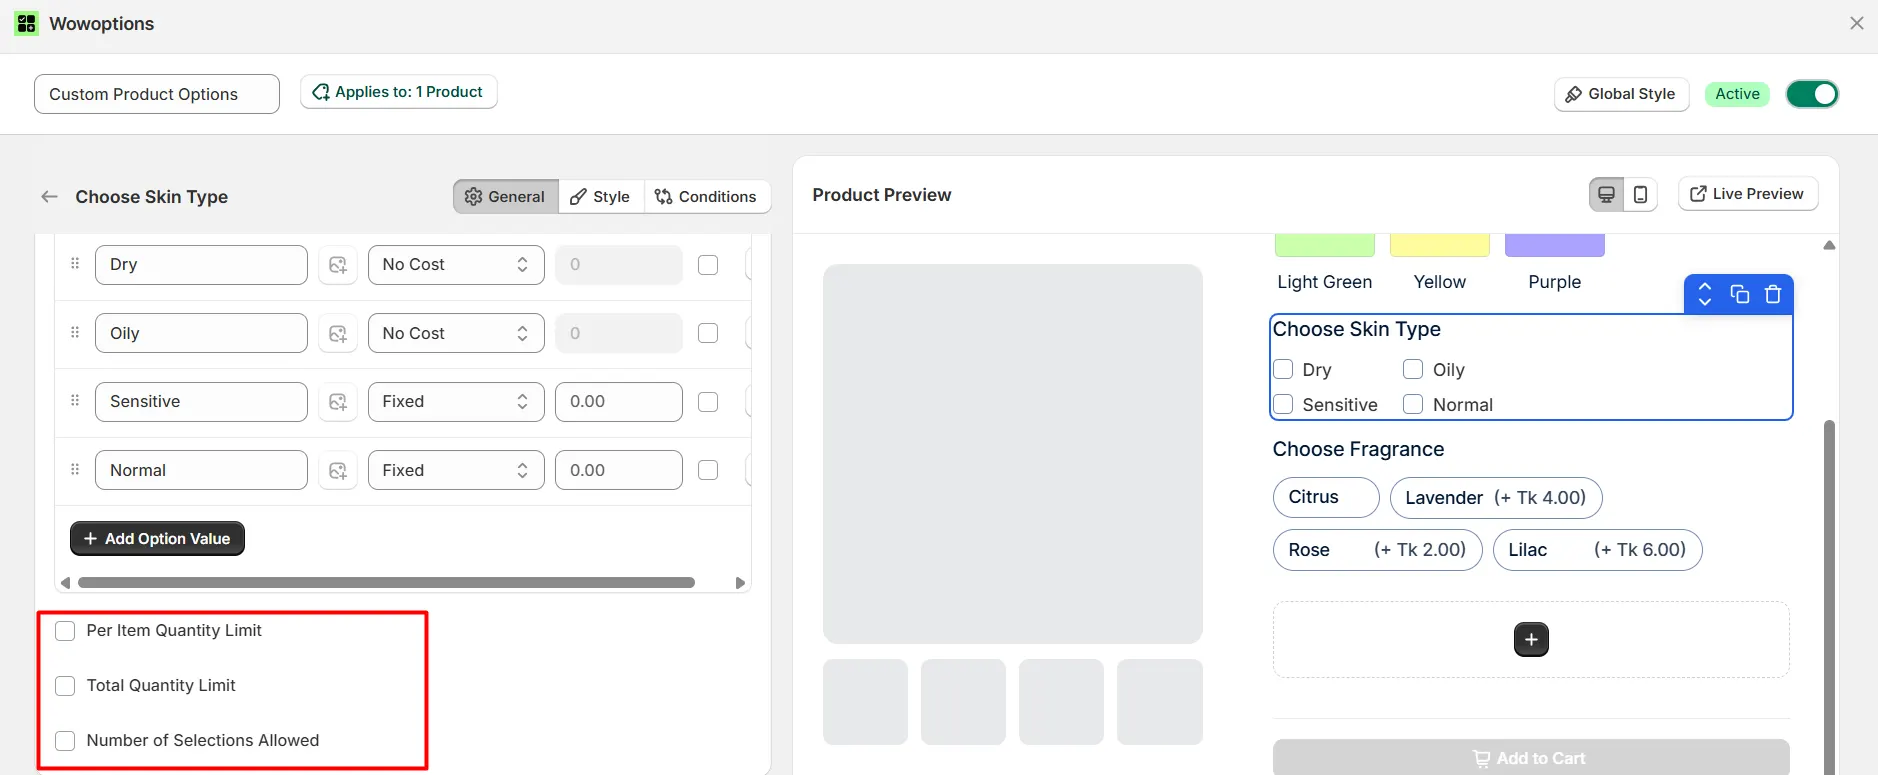
As mentioned earlier, each custom field from WowOptions comes with many helpful customization options. For example, you can set:
-
Per item quantity limit: how many items can be purchased for each selection
-
Total quantity limit: how many total items can be bought for that particular option
-
Number of selections allowed: how many options a user can select
Now, not all of these options need to be selected. It will depend on your use case.
For example, it does not make sense to allow selecting multiple selections for the Skin Type option.
Adding the button option
Next, I also added buttons as options to show different fragrances for the soap.
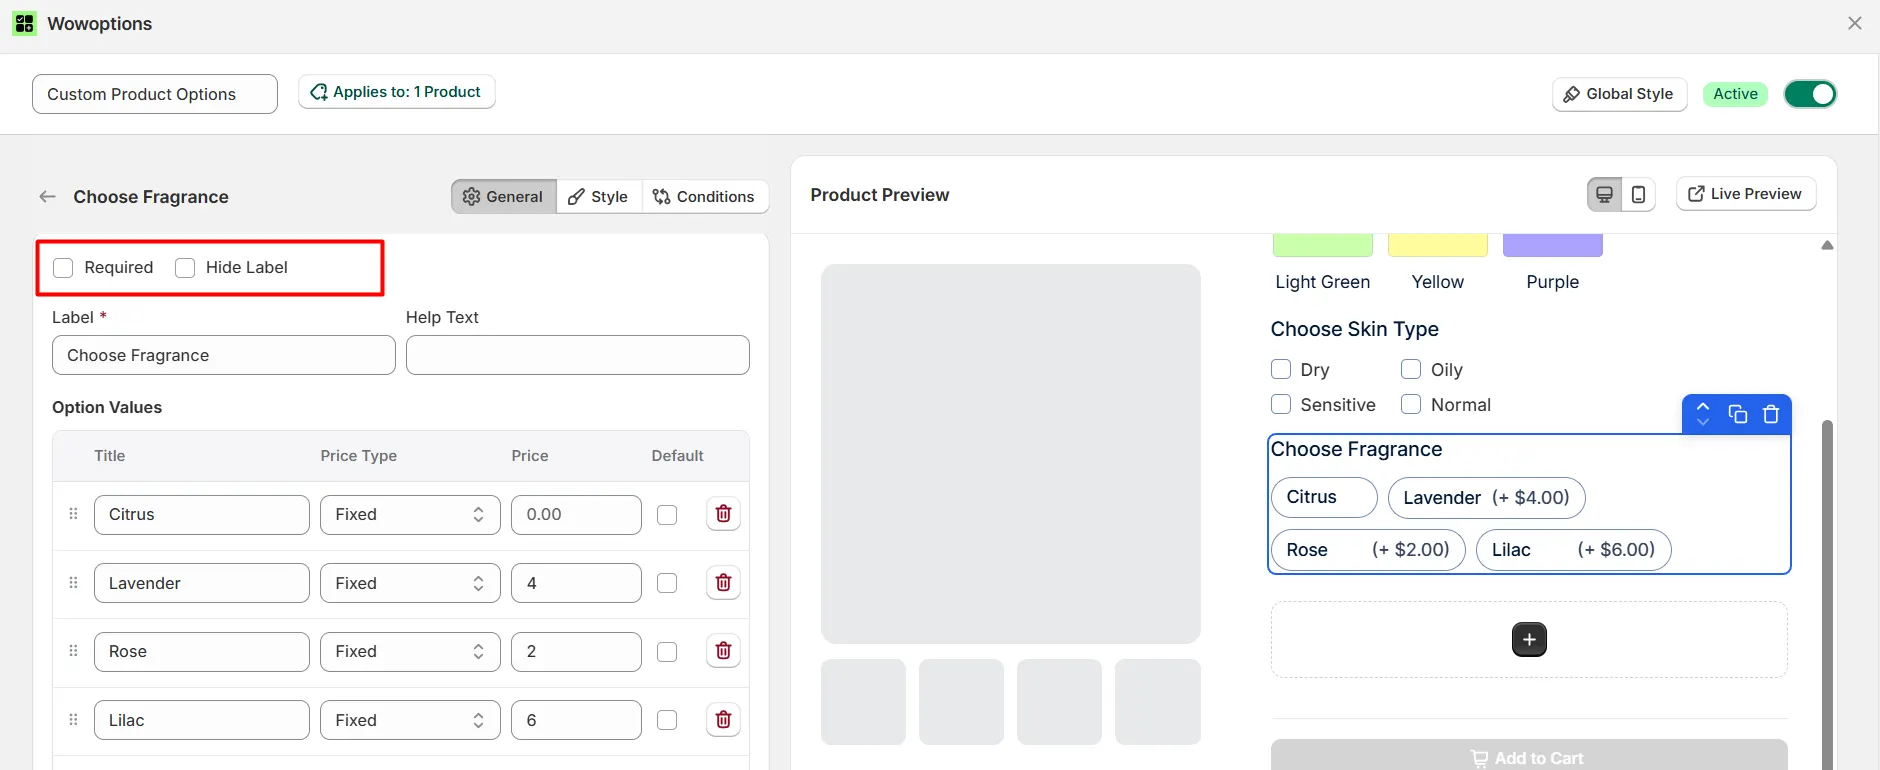
Here, I would like to mention that – you can choose to show any option as Required – meaning the user must select a specific choice. Also, you have the option to hide the label text.
Feel free to explore all the available settings for each option.
Step 6: Show or hide options based on conditions
Now, what if you wanted to show or hide specific options based on how customers interact? Yes, using the Conditions feature of WowOptions, you can easily do that.
I added a Switch addon, which says “Add Custom Gift Notes?” – if a customer selects Yes, only then will he see the Text Field option, letting him input his custom gift message.
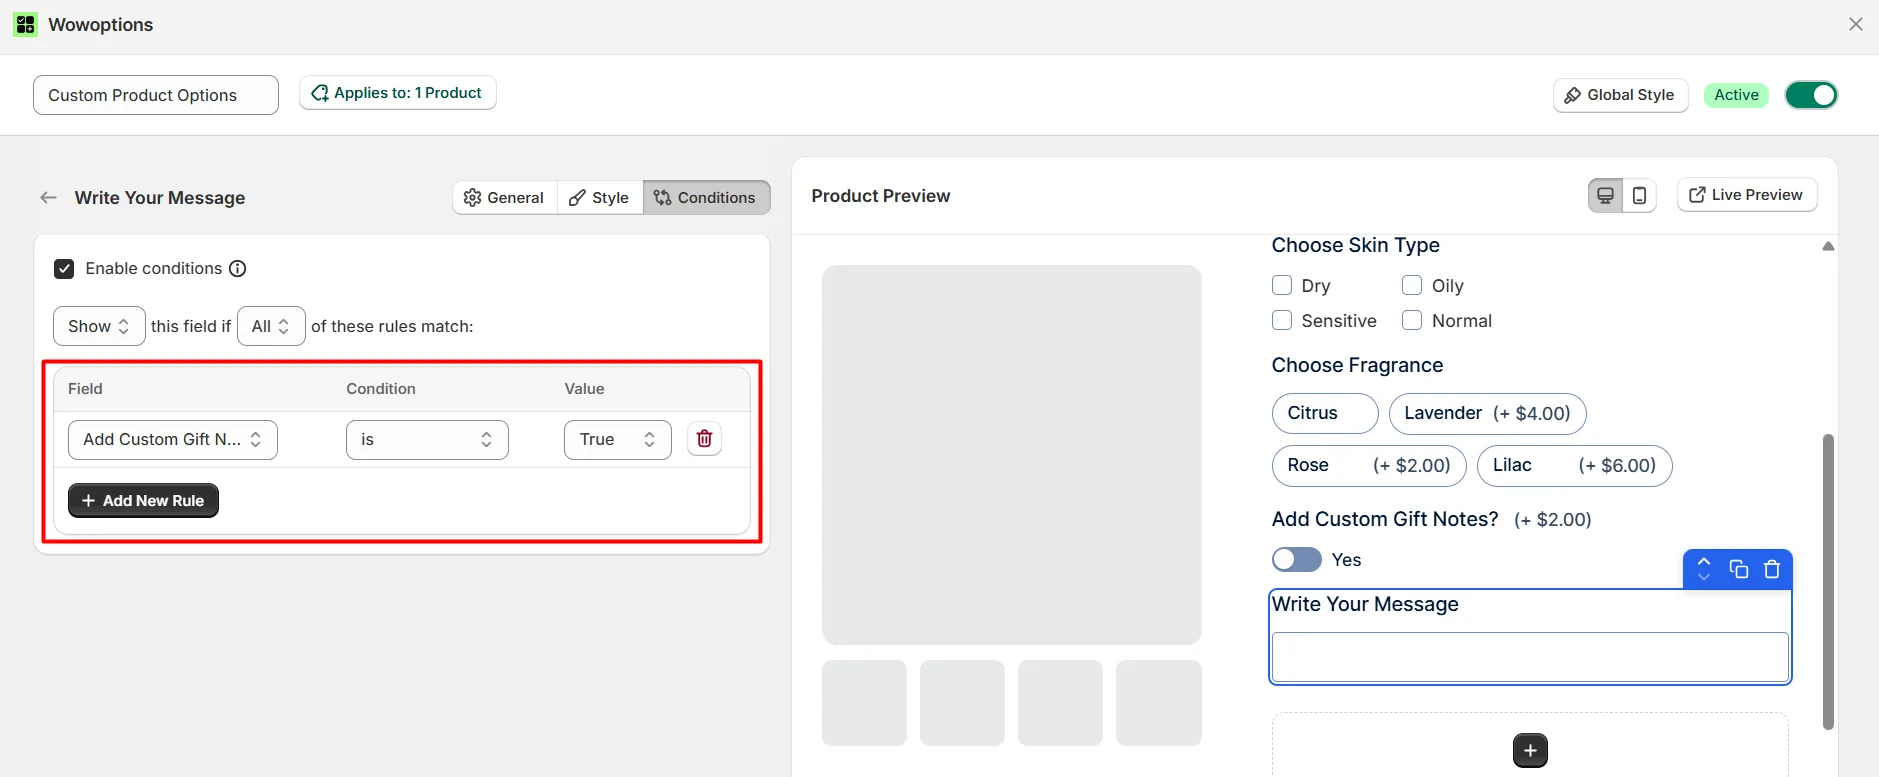
Go to the Conditions tab of the Text Field addon and select the Trigger Addon - in this case, it's our Switch addon. Select the condition and the value, true or false.
As we want to show the message only when the condition is True, we will select that value.
Note: Use Any (OR) or All (AND) match types to build more complex rules. Apply conditions to the field you want to show or hide, not to the trigger field.
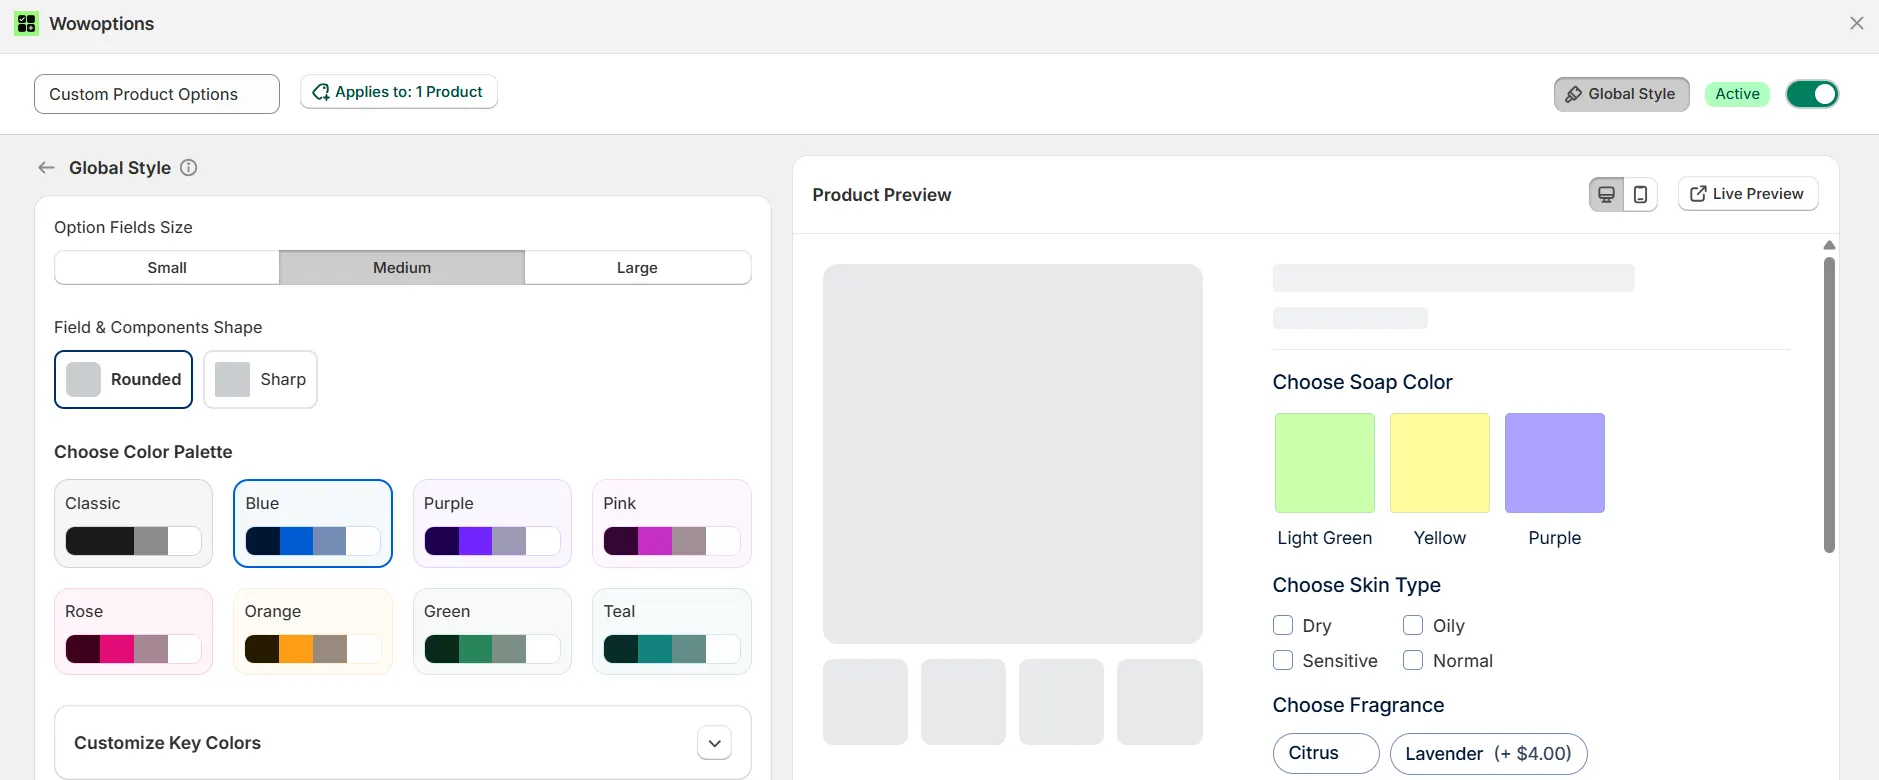
Step 7: Styling and Tracking Your Options
You can customize the addons’ visuals by navigating to the Global Style settings. Here, you can control the size (small, medium, large), shape (rounded, sharp), and color palette (Classic, Blue, Purple, Green, etc.) of all your option fields, ensuring they integrate seamlessly with your store's aesthetic.
Once the options are live, you can also leverage the Analytics tab to track performance and optimize for growth.
This feature monitors key metrics, including total revenue, orders with options, average order value (AOV), and the revenue generated by specific option fields.
You can filter this data by time periods (7, 30, 90 days, or all time) to gain actionable insights for continuous optimization.
Summing Up
Adding custom product options is one of the most direct ways to increase conversions, boost average order value, and create a shopping experience that keeps customers coming back.
Start with Shopify's built-in variants if your needs are simple. But if you are quickly growing and need more options, you can upgrade to a product options app that includes custom addons like text inputs, file uploads, conditional logic, or per-option pricing.