

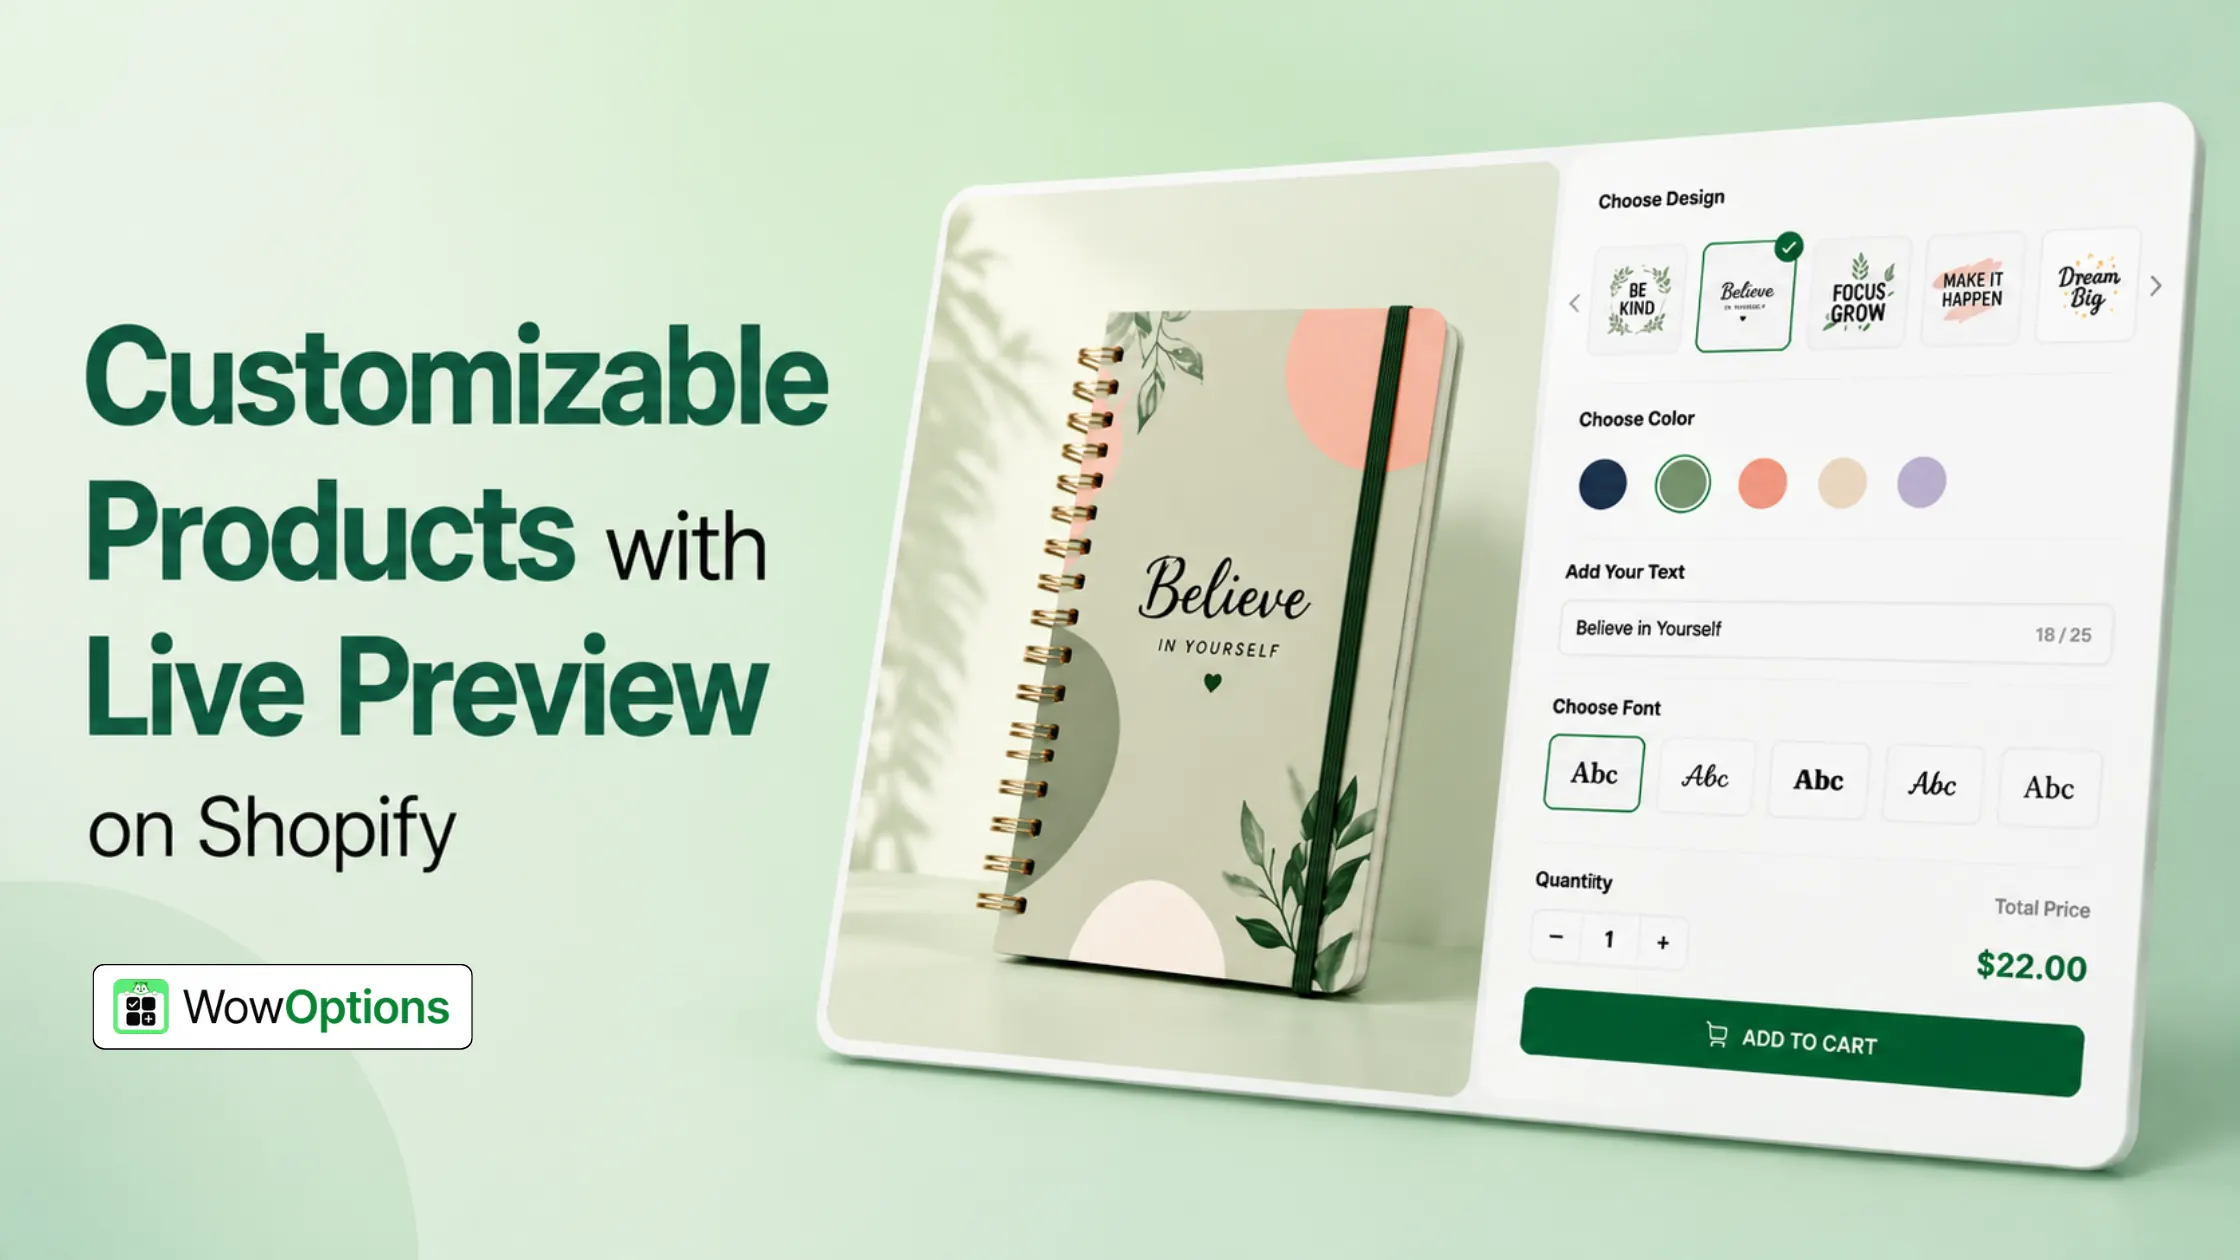
In this guide, we'll use WowOptions to create the customizable product and give shoppers a live visual preview of their choices.
Understanding the Difference Between Product Options and Live Preview Personalization
Traditional product options allow customers to select or provide customization details, but they do not show how those choices will appear on the final product.
For example, a regular product option setup may allow customers to:
-
Enter custom text
-
Upload a logo or image
-
Select a design
-
Choose a color or style
However, customers only see their selections as option values, fields, or uploaded files. They need to imagine how the customized product will look.
A Live Preview Personalizer creates a visual customization experience by displaying customer selections directly on the product image in real time. Customers can see their changes before purchasing and understand how the final product will appear.
|
Regular Product Options |
Live Preview Personalization |
|
Collects customization details from customers |
Displays customization changes visually in real time |
|
Shows selections as text, dropdowns, swatches, or uploaded files |
Places text, images, and designs directly on the product preview |
|
Requires customers to imagine the final result |
Lets customers preview the actual customized product |
|
Provides limited interaction with customization elements |
Can allow moving, resizing, and rotating elements |
|
Works well for simple choices like size, color, or basic selections |
Ideal for products requiring visual customization accuracy |
For example, a regular image upload field allows customers to submit a logo, but they cannot see where the logo will appear on the product.
With Live Preview Personalization enabled, the uploaded logo can appear directly on the product image. Customers can preview its placement and adjust it if those controls are enabled.
Choosing the Right Shopify Product Personalization App for Your Store
If you want to sell customizable products with live previews on Shopify, WowOptions, Easify, and Globo are three popular product customization apps to consider.
All three apps help merchants go beyond Shopify's default product variants by adding custom fields, conditional options, uploads, and personalization features. However, the best choice depends on the type of customization experience you want to provide.
Some stores only need customers to select options and submit details. Others need a complete visual customization experience where customers can see, adjust, and approve their personalized product before purchasing.
|
Use Case |
WowOptions |
Easify Custom Product Options |
Globo Product Options |
|
Best For |
Stores selling personalized products that need live visual customization |
Stores needing advanced product options and flexible field configurations |
Stores needing a mature product options system with extensive option support |
|
Live Product Preview |
✅ Visual live customizer with personalized text, images, designs, and uploaded elements displayed on the product image |
✅ Product personalizer with real-time customization preview |
✅ Product personalizer with live preview for customized products |
|
Product Personalization Workflow |
Create options → enable Live Personalizer → position and configure visual elements → define customization area |
Create options → configure personalization fields → customize preview experience |
Create options → configure product options → enable personalization features |
|
Visual Customization Controls |
Move, resize, rotate, and control personalized elements based on merchant settings |
Provides live personalization controls for customized products |
Provides customization controls for preview elements |
|
Print Area Control |
✅ Define a fixed customizable region for products like apparel, mugs, and printed merchandise |
Available personalization controls vary by setup |
Available personalization controls vary by setup |
|
Best Fit Products |
Custom apparel, personalized gifts, print-on-demand products, custom accessories |
Personalized products requiring many option combinations and advanced fields |
Stores requiring broad product option configurations |
|
Option Types |
23+ |
28+ |
30+ |
|
File Upload Support |
Up to 25 files, 20 MB each on Advanced |
Up to 20 files, 100 MB each on Premium |
Up to 20 files, 100 MB each on Advanced |
|
Conditional Logic |
Advanced conditional logic |
Conditional logic support |
Conditional logic support |
|
Image & Color Swatches |
✅ |
✅ |
✅ |
|
Price Add-ons |
✅ |
✅ |
✅ |
|
Character-Based Pricing |
✅ |
Available depending on setup |
Not highlighted as a primary feature |
|
Linked Products / Add-ons |
✅ |
Not highlighted as a primary feature |
Not highlighted as a primary feature |
|
Starting Price for Live Preview |
$14.99/month |
$19.99/month |
$19.90/month |
Note: Feature availability and pricing are based on the apps' Shopify App Store listings and can change over time.
Which App Should You Choose?
Choose WowOptions if you need a visual product customization experience.
WowOptions is designed for stores where customers need to see the final product before buying. The combination of live preview, visual element positioning, print-area control, and flexible product options makes it suitable for personalized apparel, gifts, and made-to-order products.
Choose Easify if your priority is advanced product option management.
Easify is a strong choice for stores that need a wide variety of option fields, complex configurations, and detailed product customization rules.
Choose Globo if you need a broad product options solution.
Globo works well for merchants who need a mature product option system with many field types and customization possibilities.
What Can Customers Customize and Preview with WowOptions Live Personalizer?
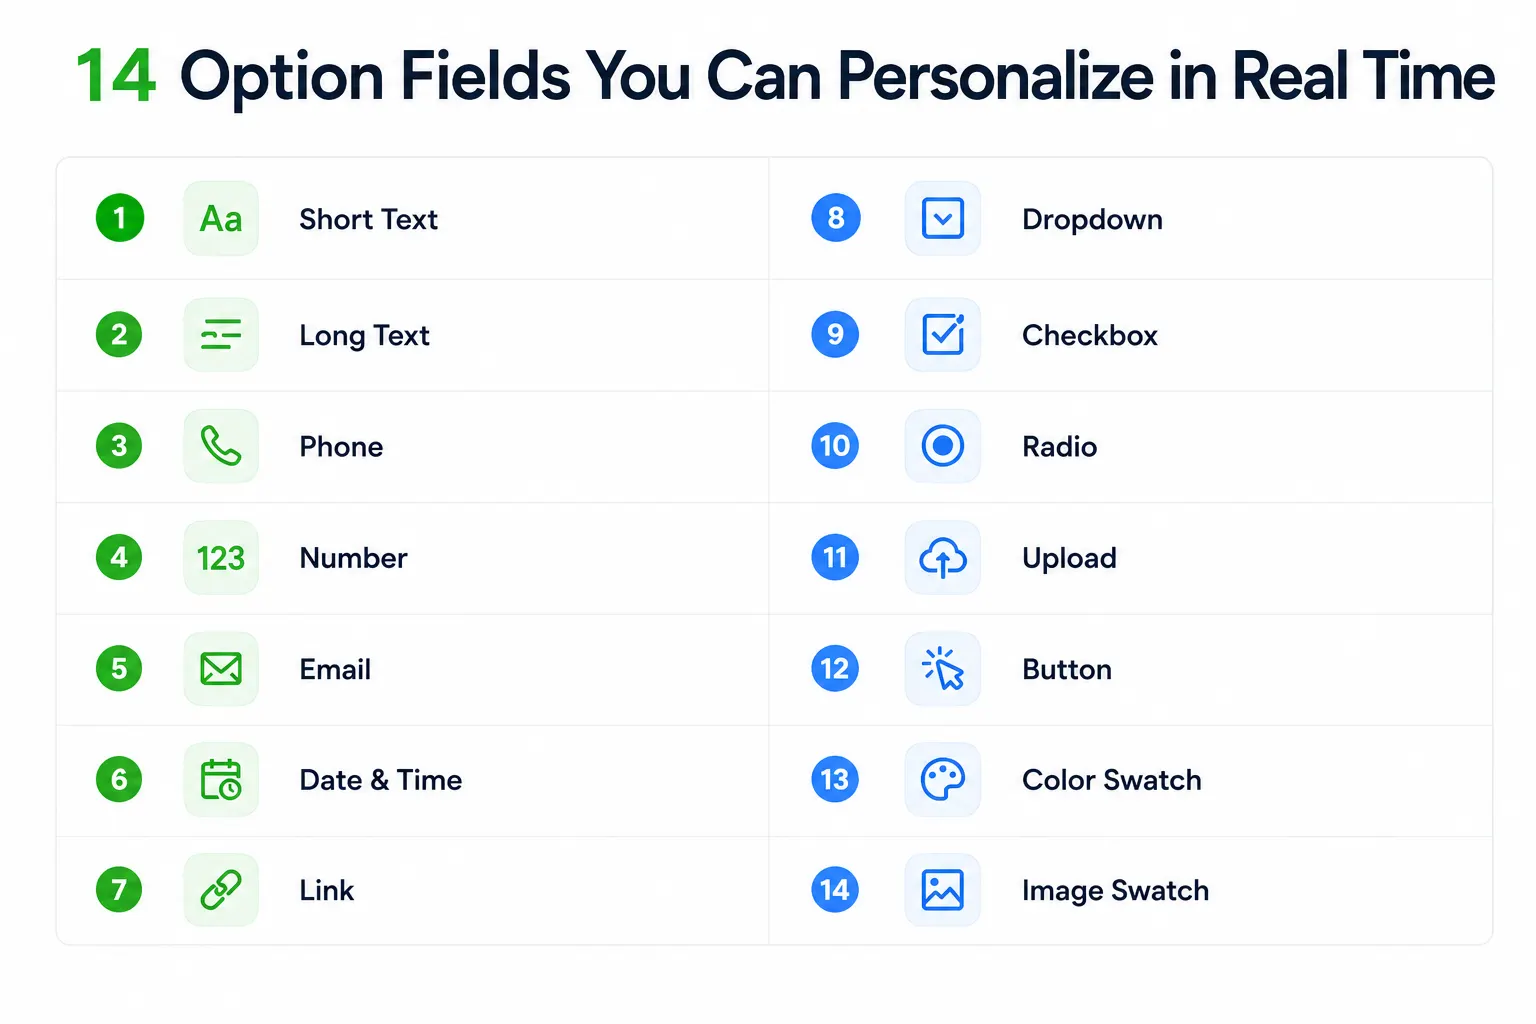
Customers can customize and preview text, images, logos, colors, designs, numbers, dates, links, and other option values with WowOptions Live Personalizer. It supports 14 option fields, allowing merchants to create visual customization experiences for personalized products.
Text-Based Live Personalization
Customers can add personalized content and see it appear directly on the product preview using fields like:
-
Short Text / Long Text — names, messages, or custom wording
-
Number — jersey numbers, codes, or numeric labels
-
Phone, Email, Date & Time, Link — contact details, dates, or references
Choice-Based Live Personalization
Customers can select predefined options and instantly see the selected variation on the product image using:
-
Dropdown
-
Checkbox
-
Radio
-
Button
Image and Visual Live Personalization
Customers can preview visual elements such as:
-
Upload — logos, photos, or artwork
-
Color Swatch — color selections
-
Image Swatch — designs, patterns, or visual variations
How to Add Customizable Products with Live Preview on Shopify Using WowOptions
To add customizable products with live preview on Shopify using WowOptions, create a personalization option set, add the required customization fields, enable Live Personalizer for the elements that should appear visually, configure the preview settings, and test the final shopping experience.
Before starting, install and activate the WowOptions app on your Shopify store. Once the app is ready, you can begin creating your product personalization workflow.
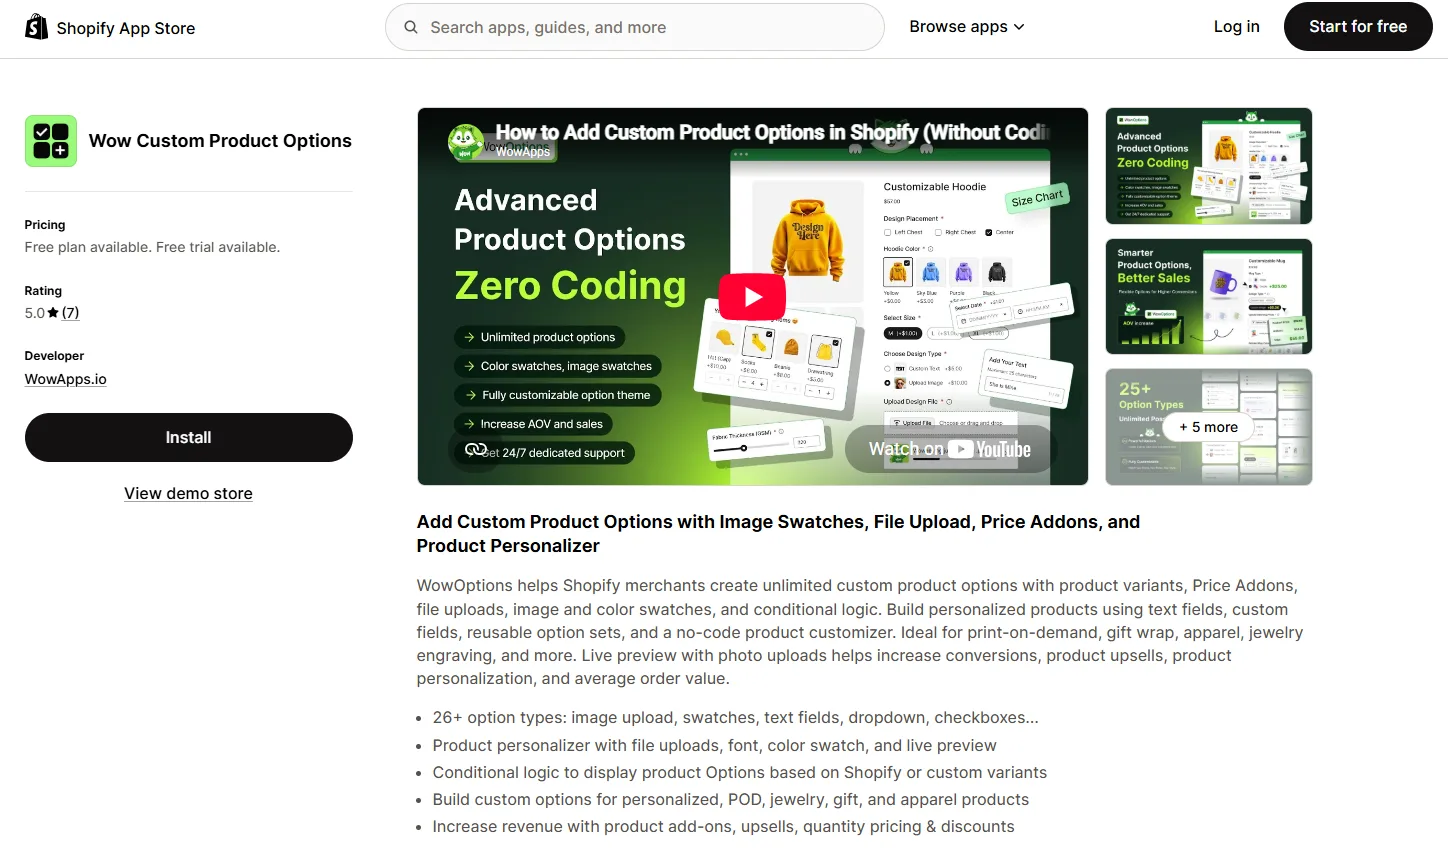
Here is the complete setup process.
Example Product: Custom Phone Case
In this example, we will create a customizable phone case where customers can upload their own artwork, add custom text, choose a font style and text color, and preview the final design before purchasing.
The workflow below follows the general WowOptions setup process while using a custom phone case as the practical example.
Step 1: Create a Personalization Option Set and Assign It to Your Product
Start by creating a new option set in WowOptions.
You can create an option set from scratch or use a premade template and customize it according to your product requirements.
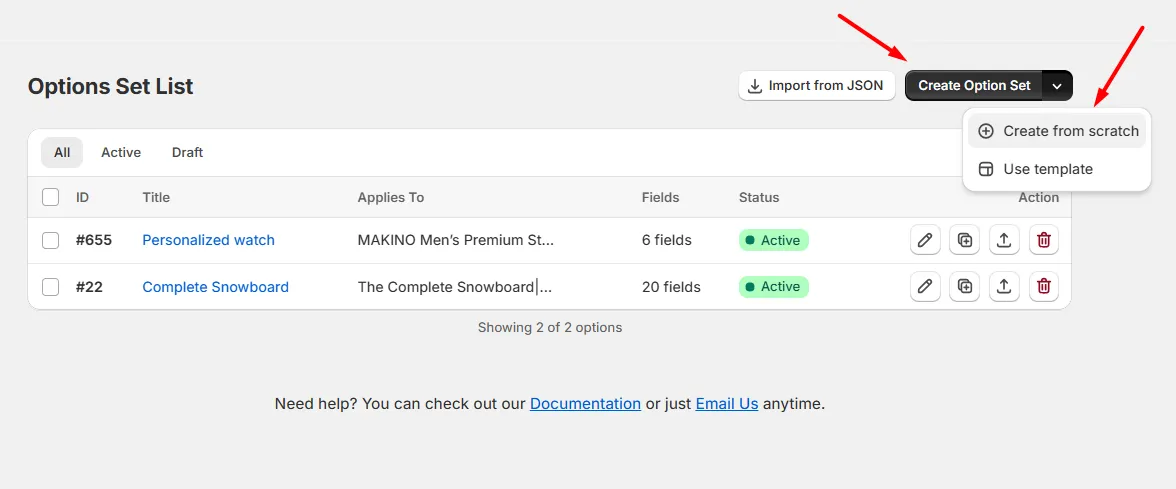
Give the option set a clear name that helps you identify its purpose internally. For this example, we will create an option set named Custom Phone Case.
After creating the option set, assign it to the Shopify product where you want to add customization options.
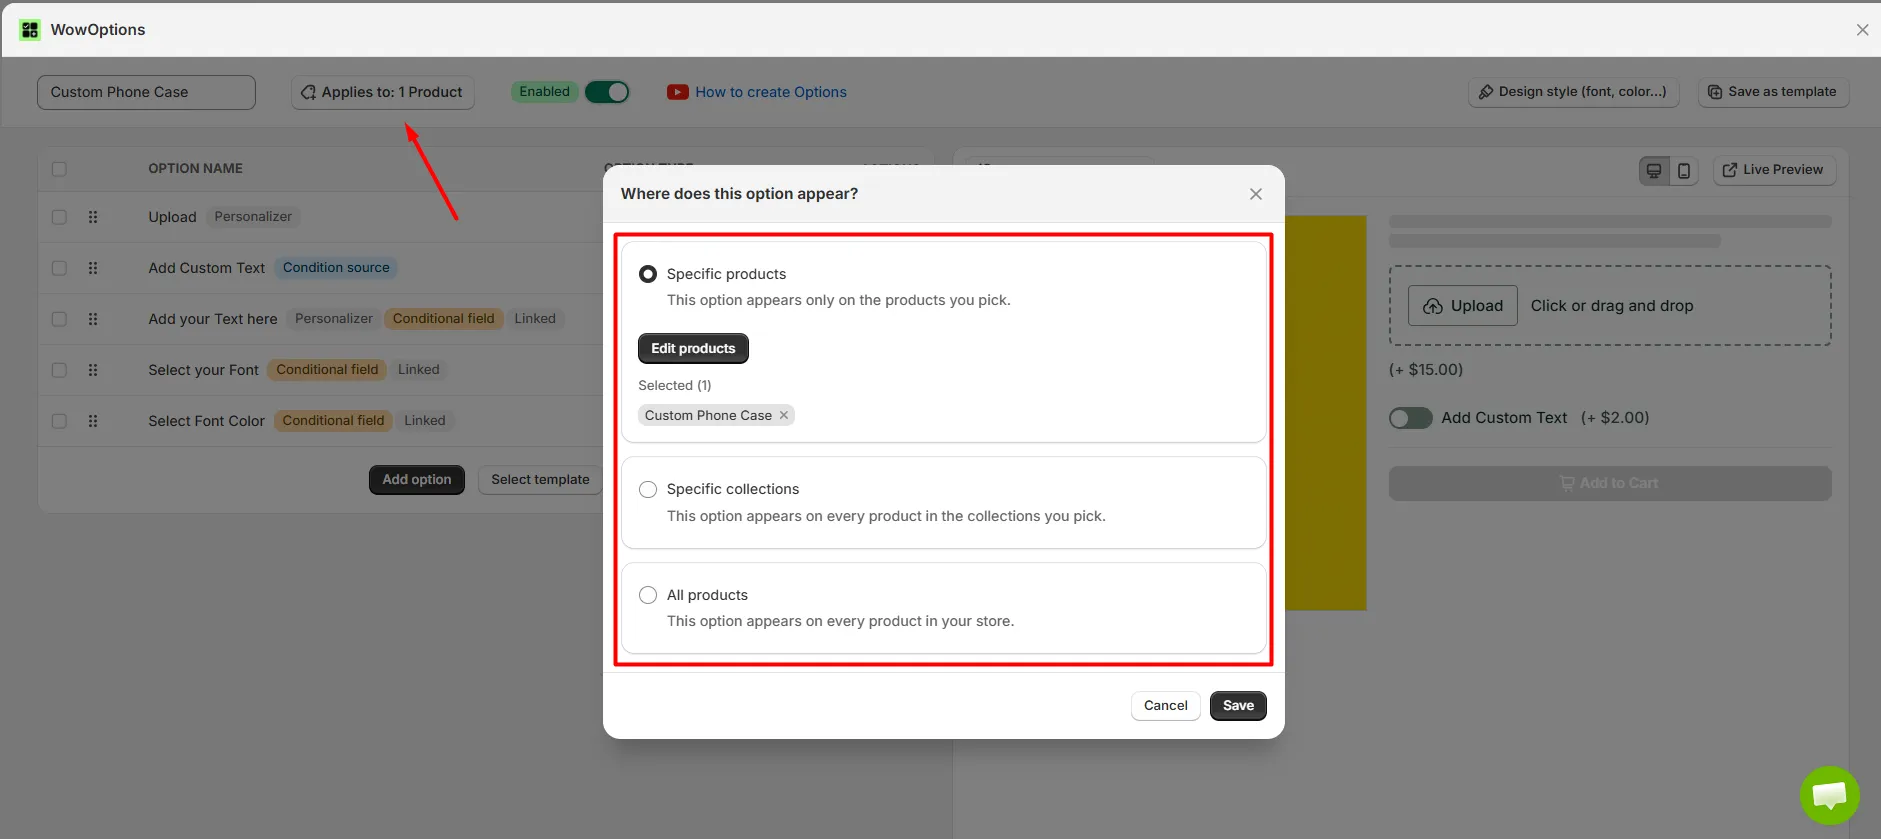
Once the option set is connected with the product, you can start adding the fields customers will use to personalize it.
Step 2: Build Your Product Customization Fields
Now add the option fields customers need to personalize the product.
The fields you choose depend on the type of customization you want to offer. Some fields collect customer information, while others represent visual elements that should appear in the live preview. Common examples include:
-
Upload — for customer-provided images, logos, or artwork.
-
Short Text / Long Text — for names, messages, or custom wording.
-
Image Swatch, Radio, Button — for selecting designs, styles, colors, or visual variations.
-
Color Swatch — for choosing colors that affect the product appearance.
-
Dropdown — for selecting predefined options such as fonts, sizes, or styles.
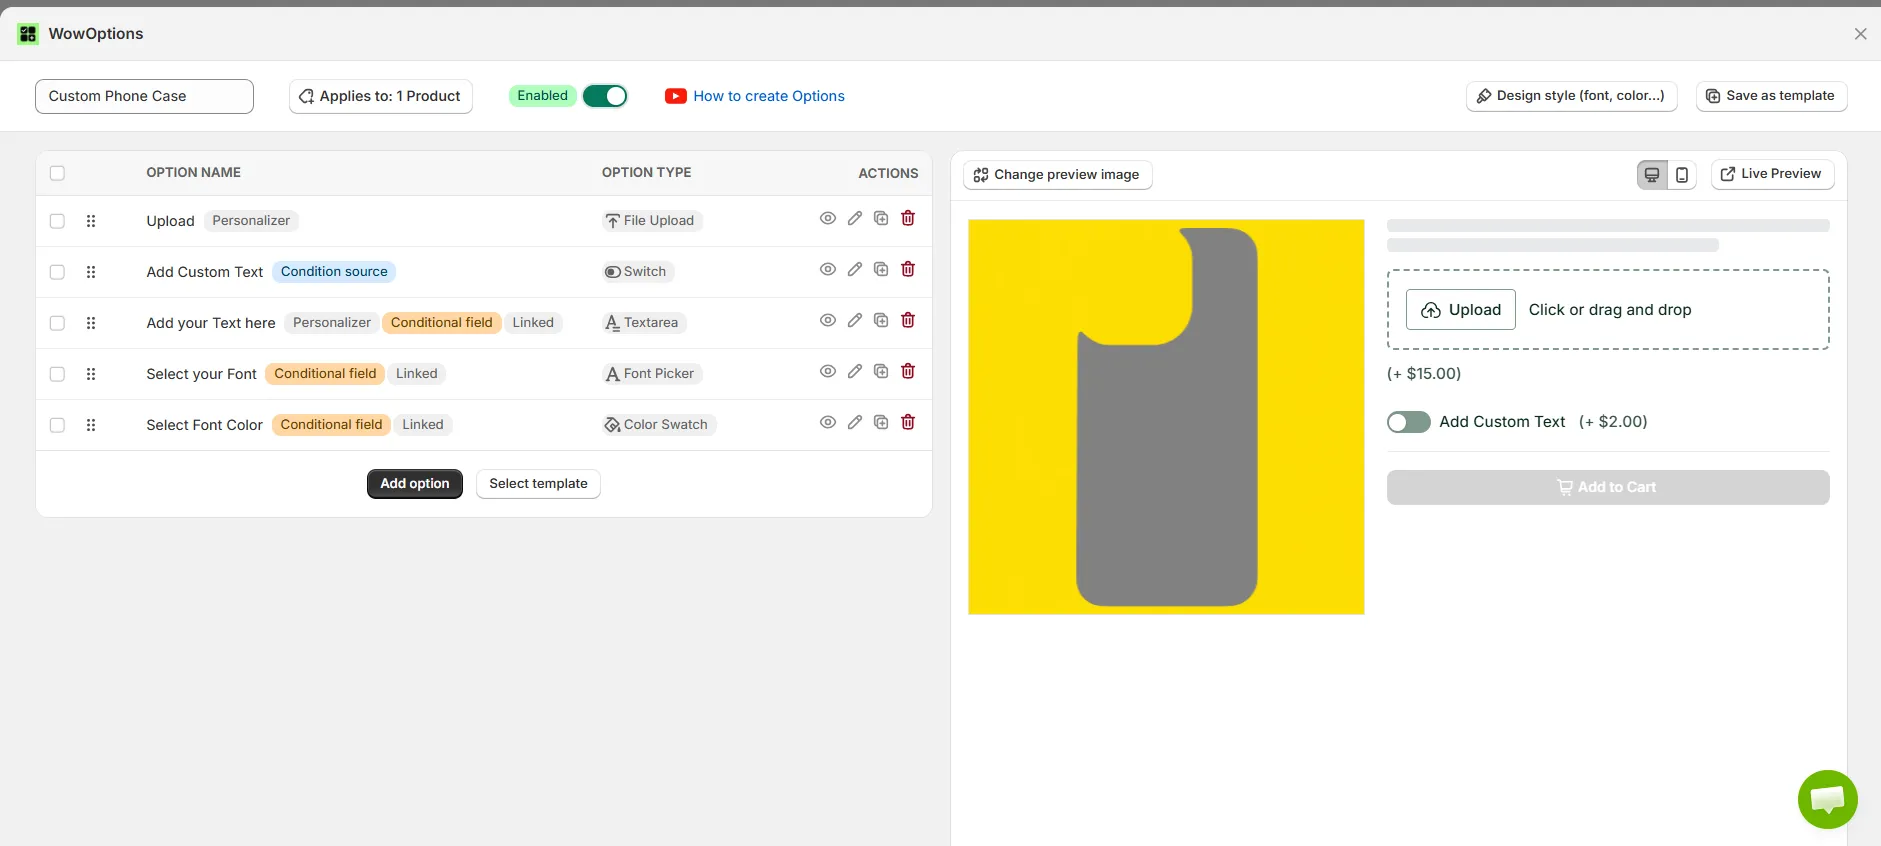
For this Custom Phone Case example, we will add:
-
Upload to allow customers to add their own artwork or image.
-
Short Text to let customers add personalized text.
-
Dropdown to allow font selection.
-
Color Swatch to let customers choose the text color.
These fields create the basic customization structure before connecting them with the live preview.
Configure the Basic Settings for Each Customization Field
After adding each field, configure its basic settings based on how you want customers to use it.
Available settings depend on the field type but may include:
-
Field label
-
Option values
-
Required or optional status
-
Default selection
-
Additional pricing
-
Field-specific controls
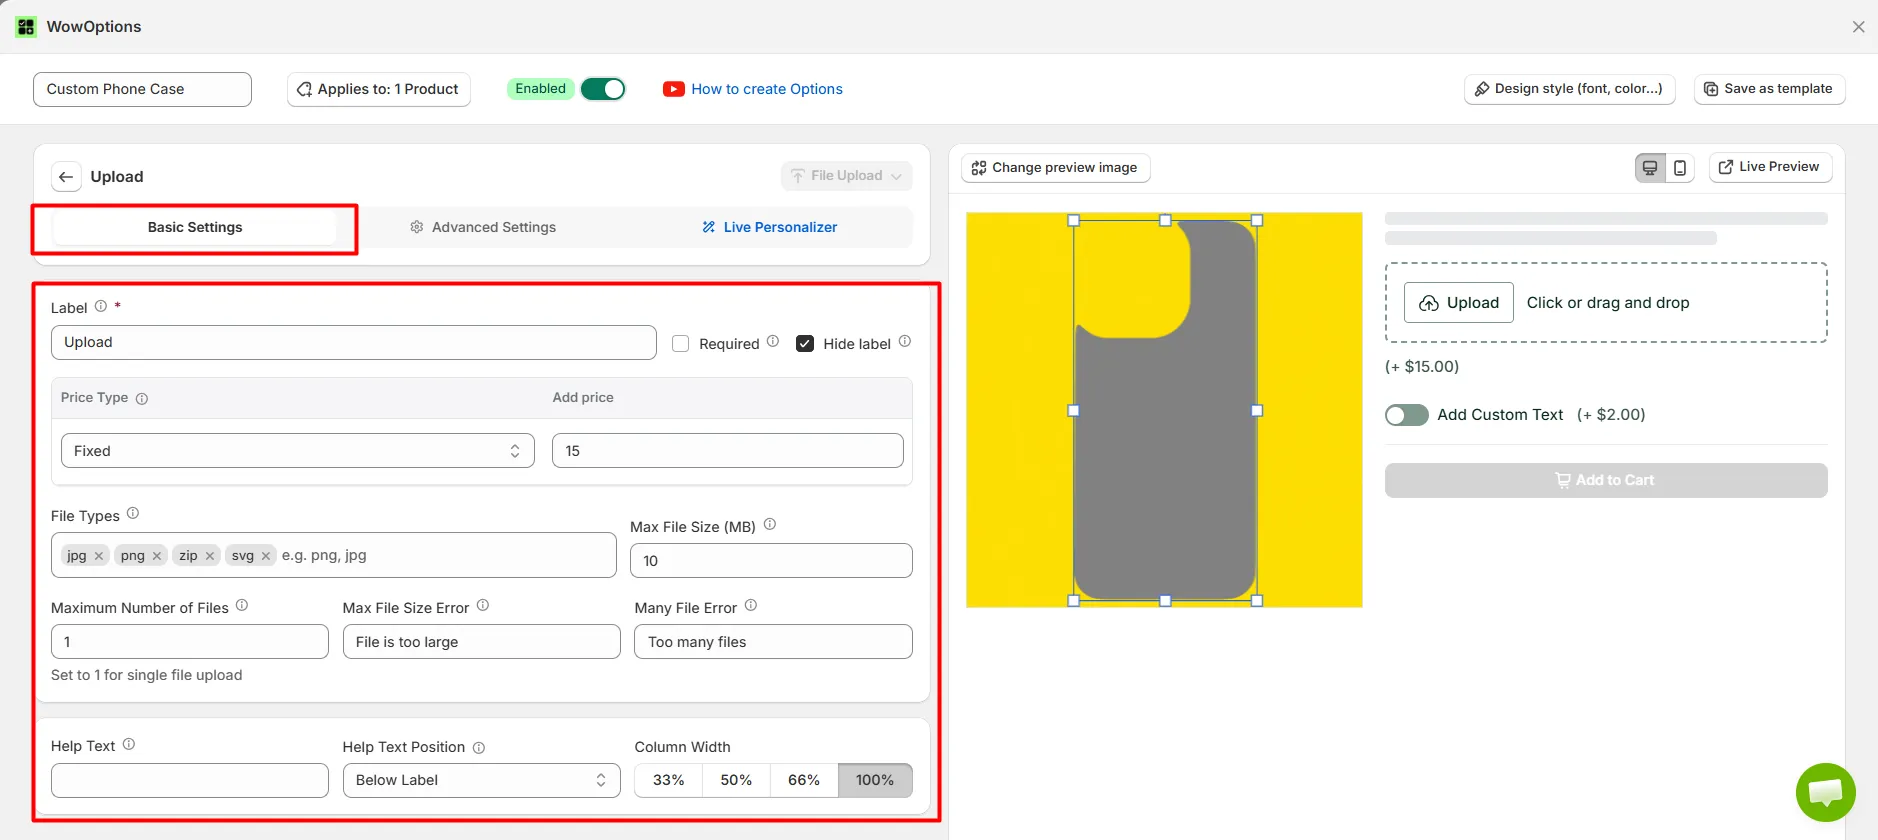
For this phone case example:
-
The Upload field can be configured to accept customer images or artwork.
-
The Short Text field can include a required text input and character limit.
-
The Dropdown field can include available font choices.
-
The Color Swatch field can include available text colors.
After completing the basic configuration, you can enable Live Personalizer for the fields that should affect the product preview.
Step 3: Enable Live Personalizer for Visual Customization Fields
Live Personalizer connects selected option fields with the visual product preview.
Enable it for fields that change how the final product looks, such as uploaded images, text, designs, or colors.
Not every option needs Live Personalizer. Fields like quantity, size, or other non-visual selections may only collect information and do not need to appear in the preview.
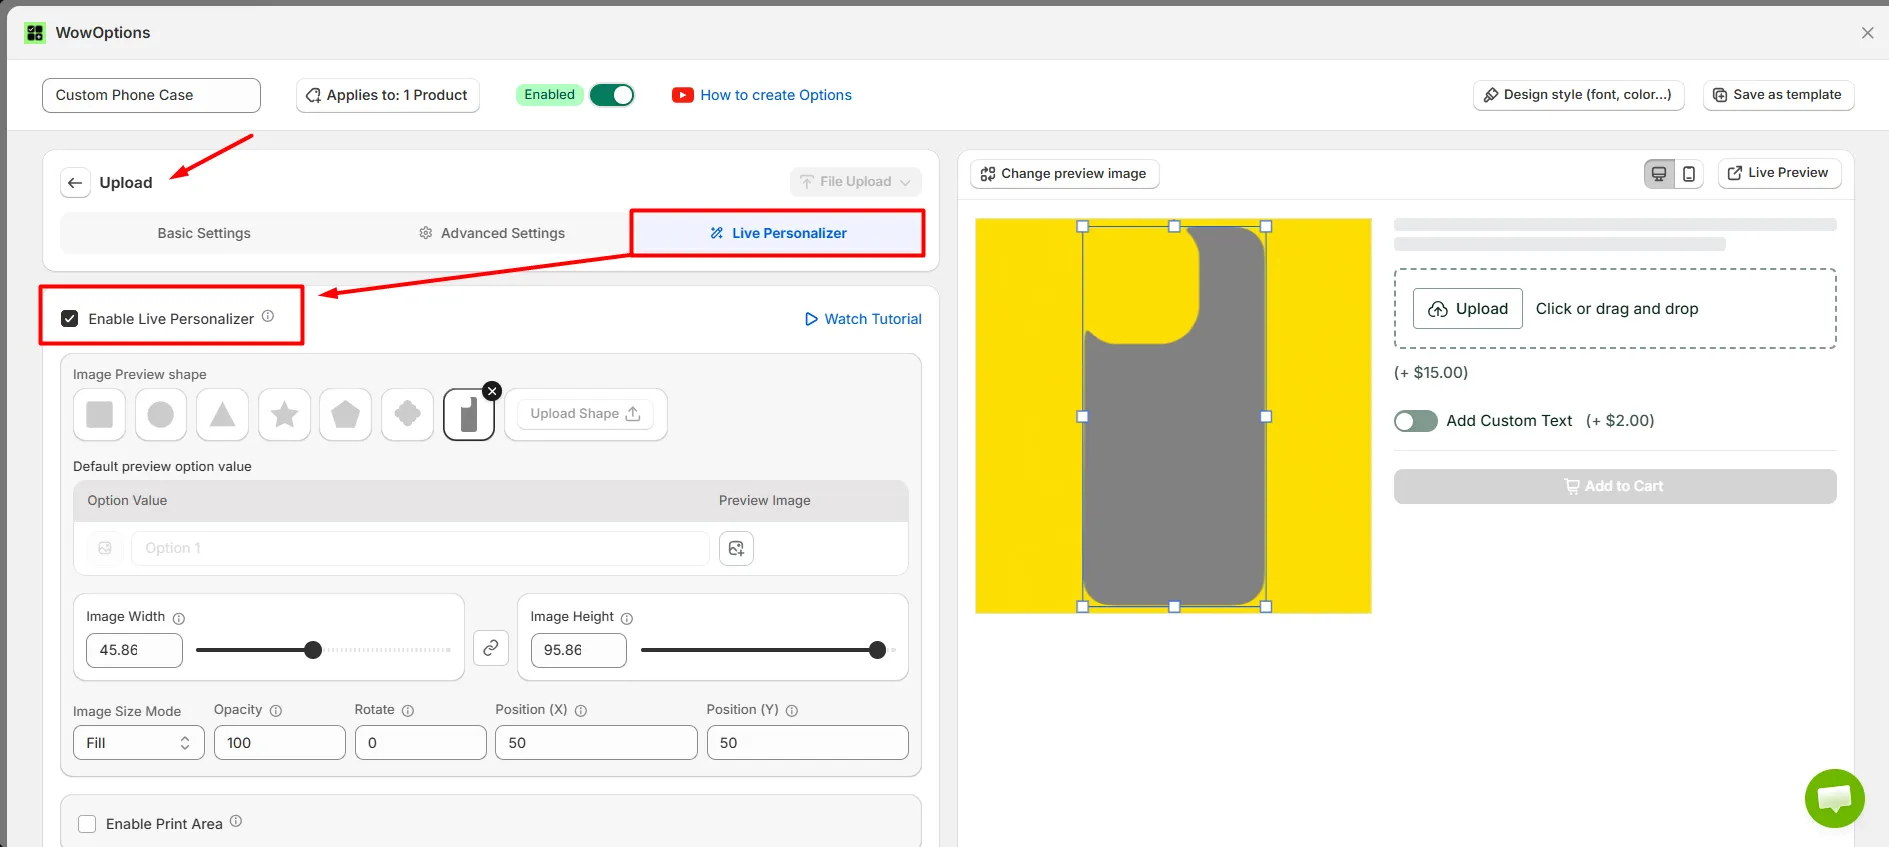
For this Custom Phone Case example, we will enable Live Personalizer for:
-
Upload so the customer's artwork appears on the phone case.
-
Short Text so the custom message appears on the design.
-
Dropdown and Color Swatch so font style and text color changes are reflected in the preview.
Once enabled, customers can see their selected elements combined on the product image.
Step 4: Configure the Product Preview Area and Image Settings
After enabling Live Personalizer, configure how personalized elements appear inside the product preview.
Start by choosing the Image Preview Shape.
The preview shape defines the area where the personalized content appears and controls how the image is clipped.
The best shape depends on the product surface:
-
Rectangular areas work well for printed surfaces.
-
Circular areas work well for badges, stickers, and round products.
-
Custom shapes work well for unique product designs.
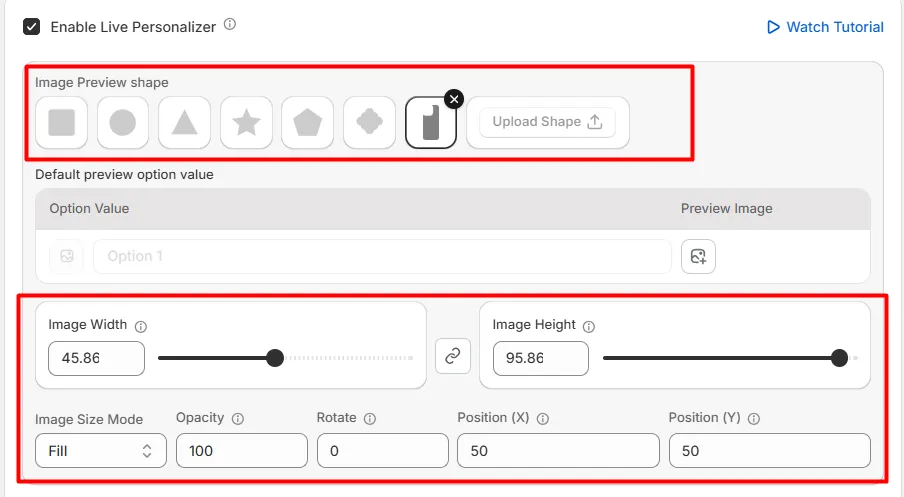
For this Custom Phone Case example, we will use a rectangular preview area because the back of a phone case is a flat printable surface.
After selecting the preview shape, configure:
-
Image Width
-
Image Height
-
Image Size Mode
The image size mode controls how uploaded artwork fits inside the preview area.
Available options include:
-
Fit Inside — keeps the complete image visible.
-
Fill — expands the image to fill the available area.
-
Cover — fills the area while maintaining proportions.
-
Fit with Width
-
Fit with Height
For a phone case, the best option depends on whether you want customers' artwork fully visible or covering the entire case surface.
Step 5: Set Default Preview Values and Visual Elements for Each Option Field
For option fields with multiple selectable values, you can assign preview images or visual elements to each value.
This is useful when customers choose between predefined designs, patterns, styles, or product variations.
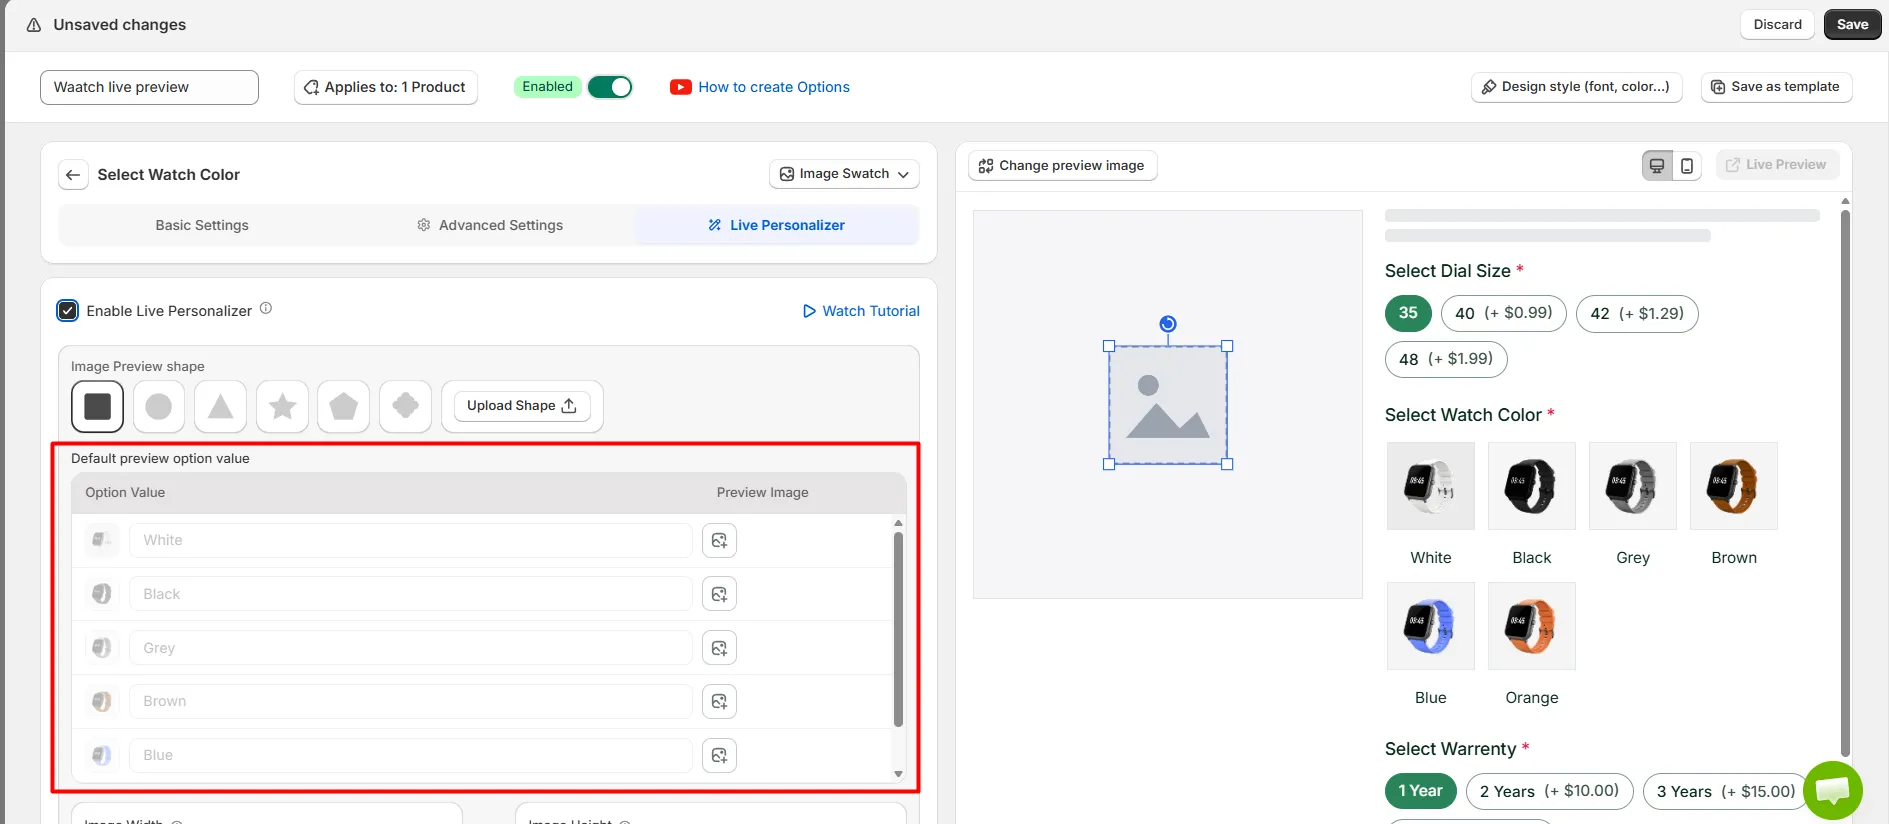
For this Custom Phone Case example, the main visual element comes from the customer's uploaded artwork. The text, font, and color selections are added as additional preview layers.
The final preview combines:
-
Uploaded image
-
Custom text
-
Selected font
-
Selected text color
Customers can see the complete phone case design before completing their purchase.
Step 6: Define a Print Area for Controlled Customization Placement
Enable the Print Area when a product has a fixed region where customization can appear.
A print area helps ensure the live preview matches the actual production limitations.
It is useful for products such as:
-
Phone cases
-
T-shirts
-
Hoodies
-
Mugs
-
Printed merchandise
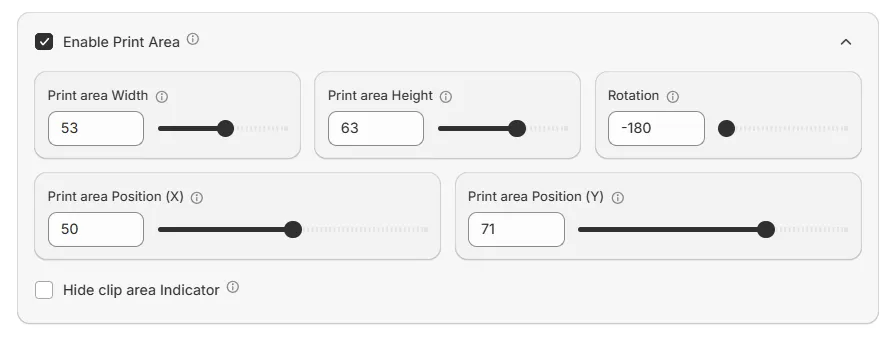
You can configure:
-
Print Area Width
-
Print Area Height
-
Rotation
-
Print Area Position X
-
Print Area Position Y
For this Custom Phone Case example, the print area should match the printable back portion of the case.
This prevents customers from placing artwork outside the actual printable surface and creates a more accurate preview.
You can also enable Hide Clip Area Indicator if you want to keep the print restriction active without showing the boundary to customers.
Step 7: Control Customer Editing Permissions for Personalized Elements
Decide how much control customers should have over personalized elements. For example can they Change position Resize and also Rotate? The right settings depend on the product and your production workflow.
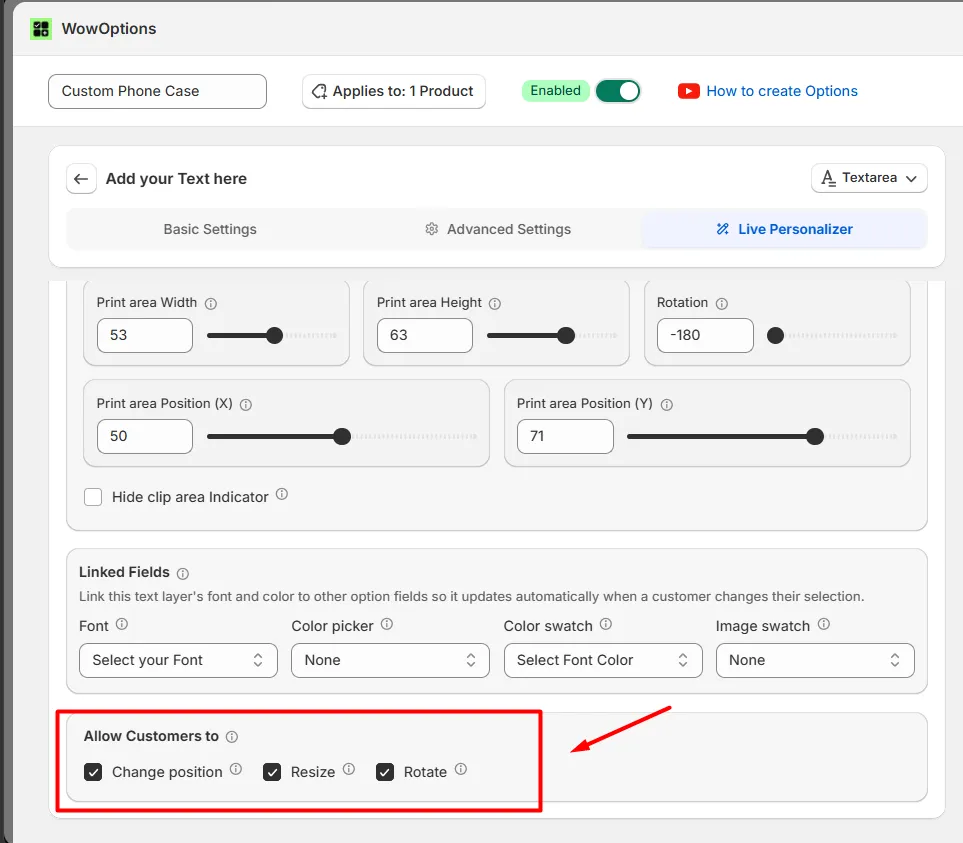
WowOptions allows you to control whether customers can:
For products where customers provide their own artwork, allowing more control can improve the customization experience.
For products with fixed designs or strict placement requirements, limiting these controls can help maintain production accuracy.
For this Custom Phone Case example, customers may be allowed to move and resize their uploaded artwork while keeping the design within the defined print area.
Step 8: Publish and Test the Complete Product Personalization Experience
After completing the setup, save the option set and enable it to publish the customization on your product.
Before launching, test the complete live personalization experience. For this Custom Phone Case example, we can check that customers can:
-
Upload artwork.
-
Add custom text.
-
Change font and color.
-
Preview all elements together.
-
Adjust position, size, and rotation if enabled.
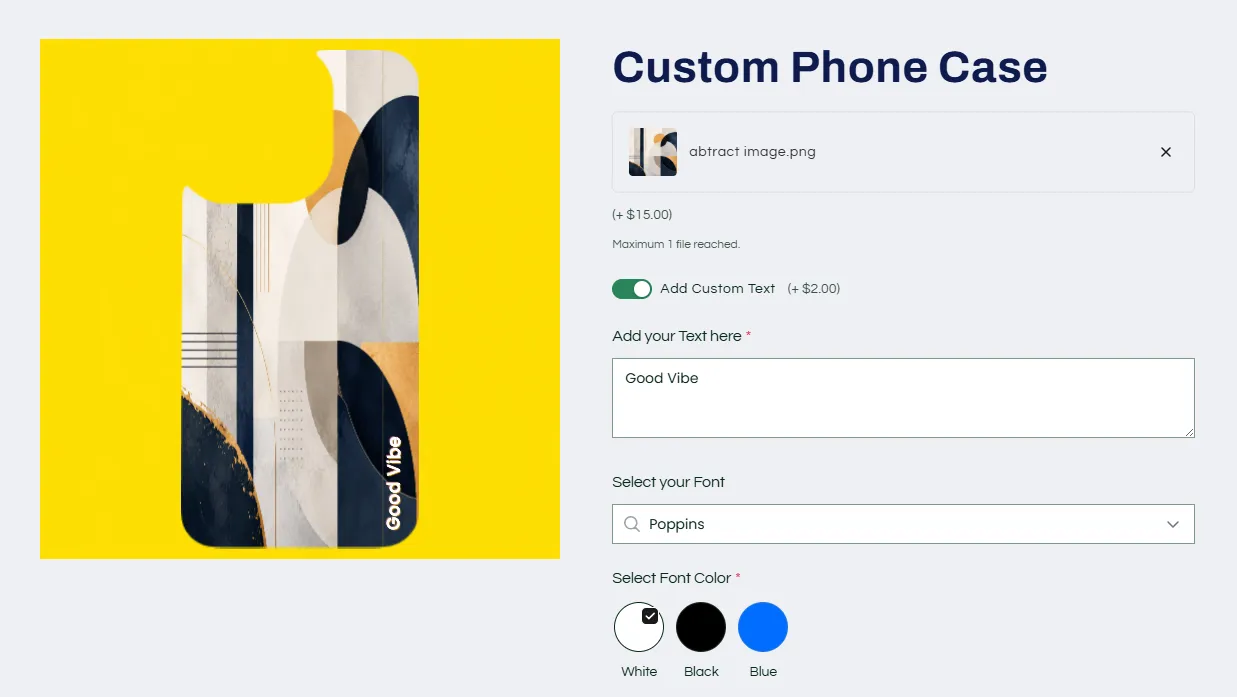
A successful Live Personalizer setup should provide an accurate product preview while capturing all required customization details for fulfillment.
Tips for Building a Better Live Product Customizer
A good live preview should make customization easier, not turn the product page into a design application customers need to learn.
Keep a few practical rules in mind.
Use a clean base product image. A centered, high-quality image with enough empty space around the customizable area makes positioning much easier.
Match the print area to your real production limits. Don't let customers create something visually that your printing or engraving process cannot reproduce.
Only enable customer controls when they are useful. If an element must always remain centered, there is no benefit in letting customers move it.
Keep the number of customization fields reasonable. More options are not automatically better. Ask only for information required to create the product.
Test extreme inputs. Try long text, unusually shaped images, wide logos, vertical photos, and different combinations of selections.
Check mobile carefully. Many customers will personalize products from a phone, where a complex desktop configuration can feel very different.
Make labels clear. “Upload your logo” is better than simply “Upload.” “Choose print color” is more useful than “Color.”
The goal is not to expose every control available in the app. The goal is to give customers enough control to confidently create something you can actually fulfill.
Frequently Asked Questions About Shopify Customizable Products with Live Preview
Can Shopify create customizable products with live preview without an app?
What products work well with live personalization?
Can customers upload their own images with WowOptions?
Can I restrict where customers place a personalized image?
Can customers move, resize, or rotate their customization?
Do all product options need Live Personalizer enabled?
No. Only enable it for fields that need to affect the visual preview. Standard options can remain ordinary product fields within the same option set.
For example, a gift-wrapping checkbox may not need to appear on the product image even though a custom logo upload does.
Add Customizable Products with Live Preview Without Overcomplicating the Product Page
If you want to add customizable products with live preview on Shopify, the key is not simply adding more fields. The customization interface should help shoppers understand what they are creating.
WowOptions combines the product-option side of that process with a Live Personalizer, so you can collect customer choices, map supported fields to a visual preview, control placement and sizing, define realistic print areas, and decide how much editing freedom customers receive.
Start with one straightforward product and one or two visual fields. Get the preview, print area, and customer controls right first. From there, you can build more advanced personalized products using text, uploads, swatches, selectors, add-ons, pricing rules, and other WowOptions features as your store needs them.