
Shopify Built-In Options: What They Can and Cannot Do
Shopify does have a native variant system built right into the admin. It lets you add up to 3 option types per product, like size, color, and material.
For a simple product with a few combinations, this works fine. You set it up once, and customers pick from dropdowns on the product page.
But here is the problem. A custom jersey is not a simple product with 3 options. You need a text field for the player name. You need a number field for the squad number. You need a file upload so fans can add a custom patch or logo. You need color swatches for kit variations. You need conditional logic so the page does not become a mess of irrelevant fields.
Shopify's built-in system cannot do any of that. No text fields. No file uploads. No conditional logic. No per-option pricing. You get 3 dropdown-based options, and that is it.
The moment you need anything more advanced, you hit a wall.
To be fair, Shopify has made some improvements over the years. Newer themes support up to 2,048 variants per product, which is a big jump from the old 100-variant limit.
But that still does not solve the core issue. Variants are combinations of predefined options. They are not the same as custom input fields where the customer types in a value or uploads a file. If you want a jersey with "Messi" printed on the back, that is not a variant. That is a custom input. And for that, you need an app.
Which Product Options App Is the Right Fit for Creating Custom World Cup Jerseys
The 2026 World Cup is being hosted across the US, Canada, and Mexico this summer. Fans want jerseys that represent their team and their own style.
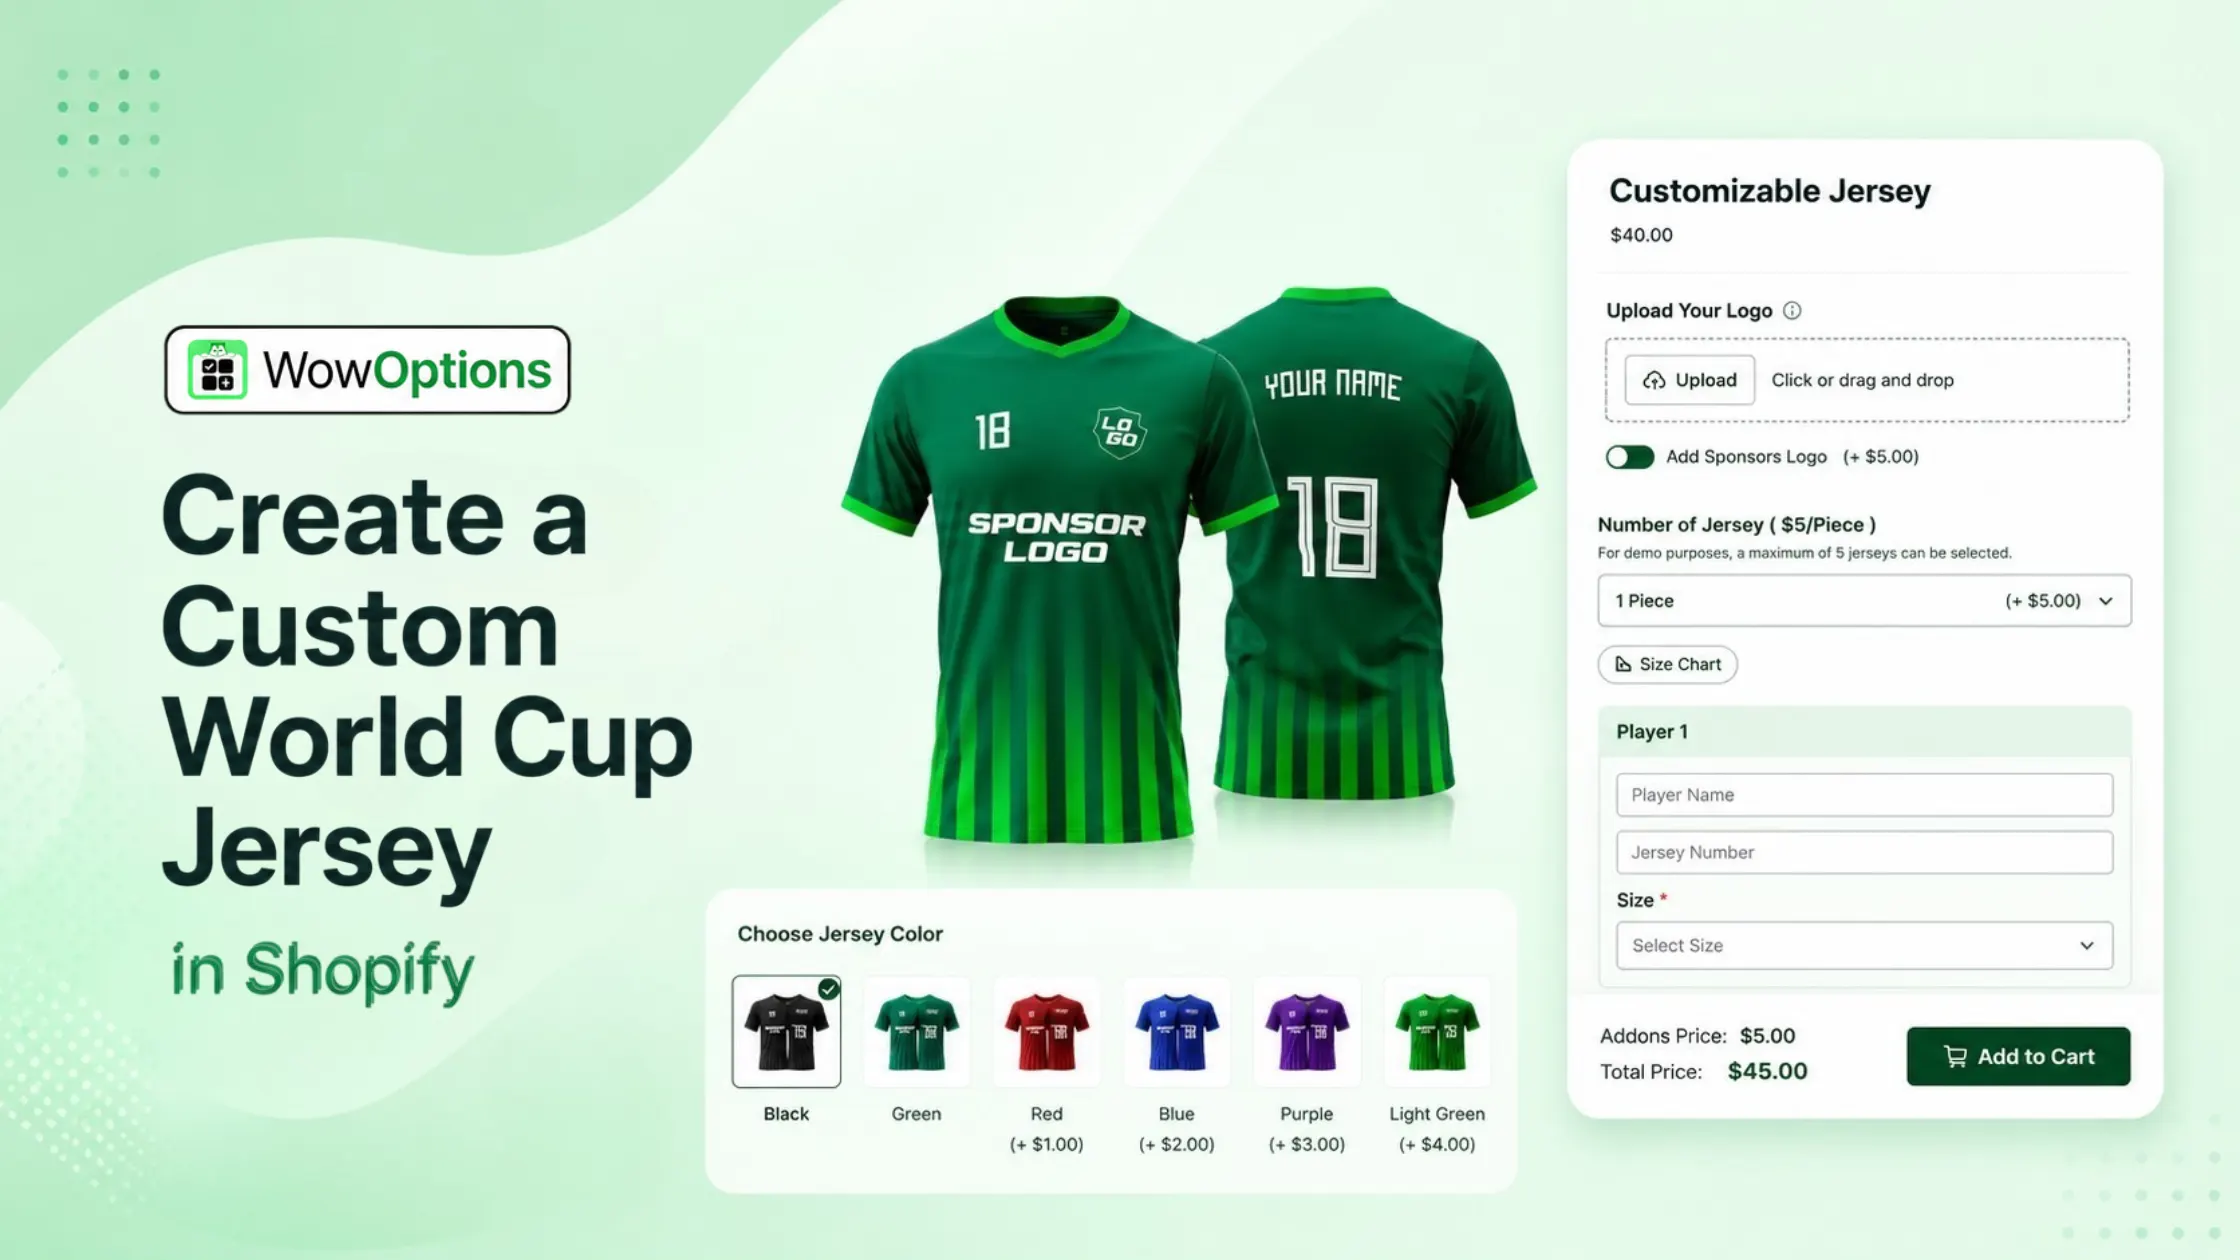
A custom jersey store needs a product page that lets customers enter a name, select a number, choose a kit color, and upload a patch or logo. That is where WowOptions comes in. It adds unlimited custom product options to any Shopify product page without requiring any code.
Other product options apps on Shopify limit you to a handful of option types or charge for every add-on separately. WowOptions gives you text fields, number fields, file uploads, and color swatches in one place. You can set price add-ons so that name printing or premium patches add to the order total. With conditional logic, you can show or hide options based on the customer's first selection, which keeps things clean when selling jerseys for multiple teams.
Creating a Custom Jersey with WowOptions Step by Step
Here is how you go from a blank product to a fully customizable jersey listing. I will walk through the exact steps you would take.
Step 1: Install WowOptions
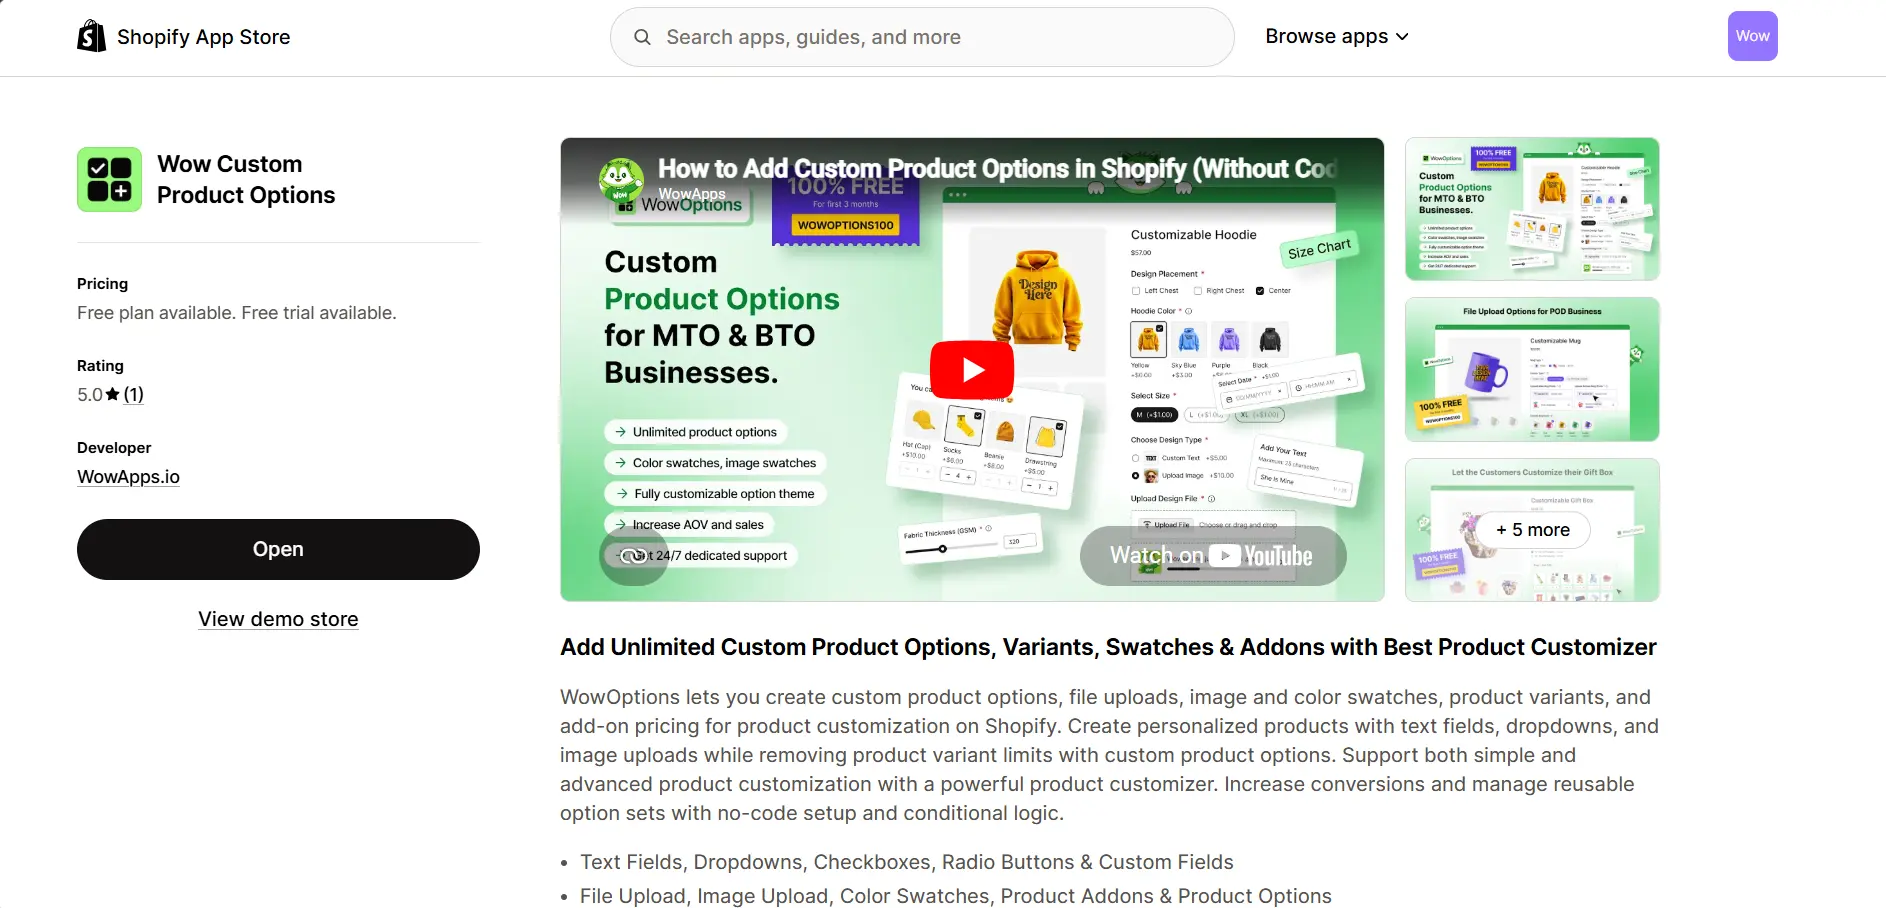
Log in to your Shopify admin. Go to Apps in the left sidebar, which will bring up a pop-up. Search for WowOptions to quickly find the app. Alternatively, you can visit the Shopify App Store directly and search for Wow Custom Product Options.
After finding it, click Install, review the requested permissions, and confirm by clicking Install again. Once installed, WowOptions will appear under your Apps section.
Step 2: Activate WowOptions on Your Storefront
Go to Apps and open WowOptions. You should see a few setup guide instructions on how to get started. Enable both the app block and app embed block for WowOptions.
Make sure both options, "Add App Block to Theme" and "Enable App Embed Block," are enabled. Save your theme after each step.
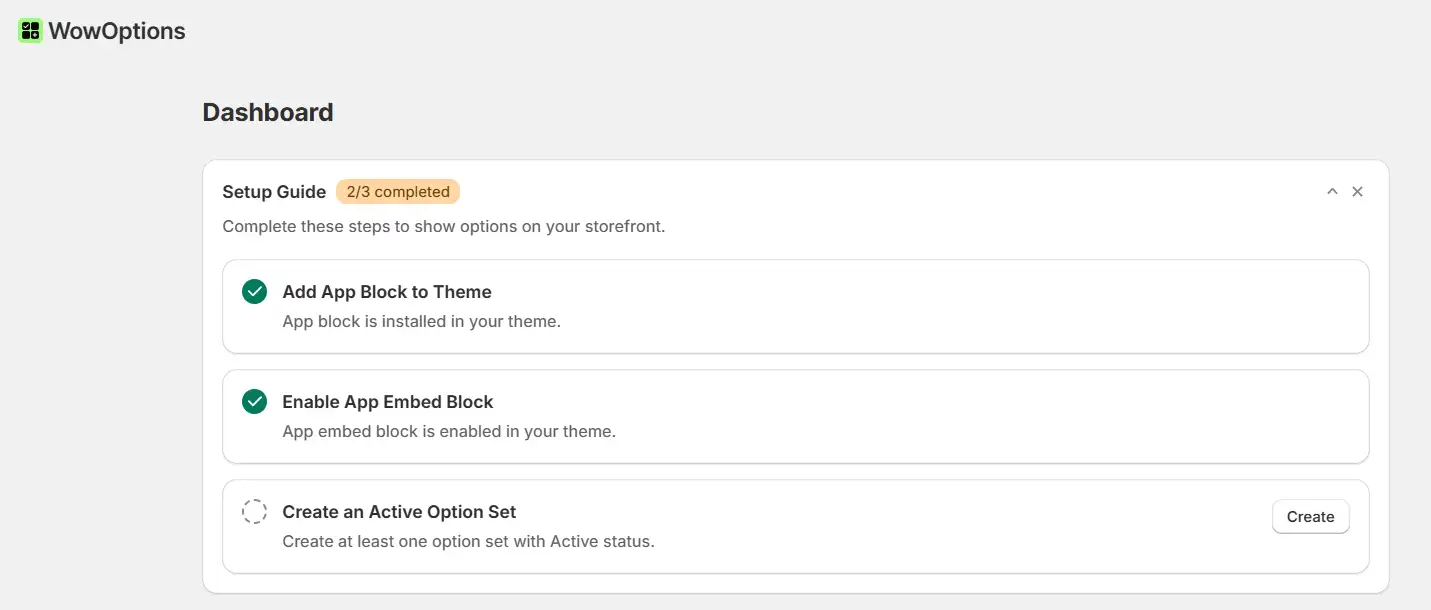
Both steps are required for the app to display on your storefront. Once activated, you are ready to create your first product option set.
Step 3: Create a new option set
Open the WowOptions dashboard and click to create a new option set. This is where you build the customization fields for your jersey. Think of an option set as a template that you can apply to one or more products.
If you are selling jerseys for multiple national teams, you can create one template and reuse it across all of them.
Step 4: Assign the Options to Your Products
At the top of the option set, you will see an "Applies to" section. Click it and choose how you want to apply this set. You can apply it to
- all products in your store,
- specific products only,
- or specific collections.
For a jersey store, you would typically pick specific products or a collection called "Jerseys."
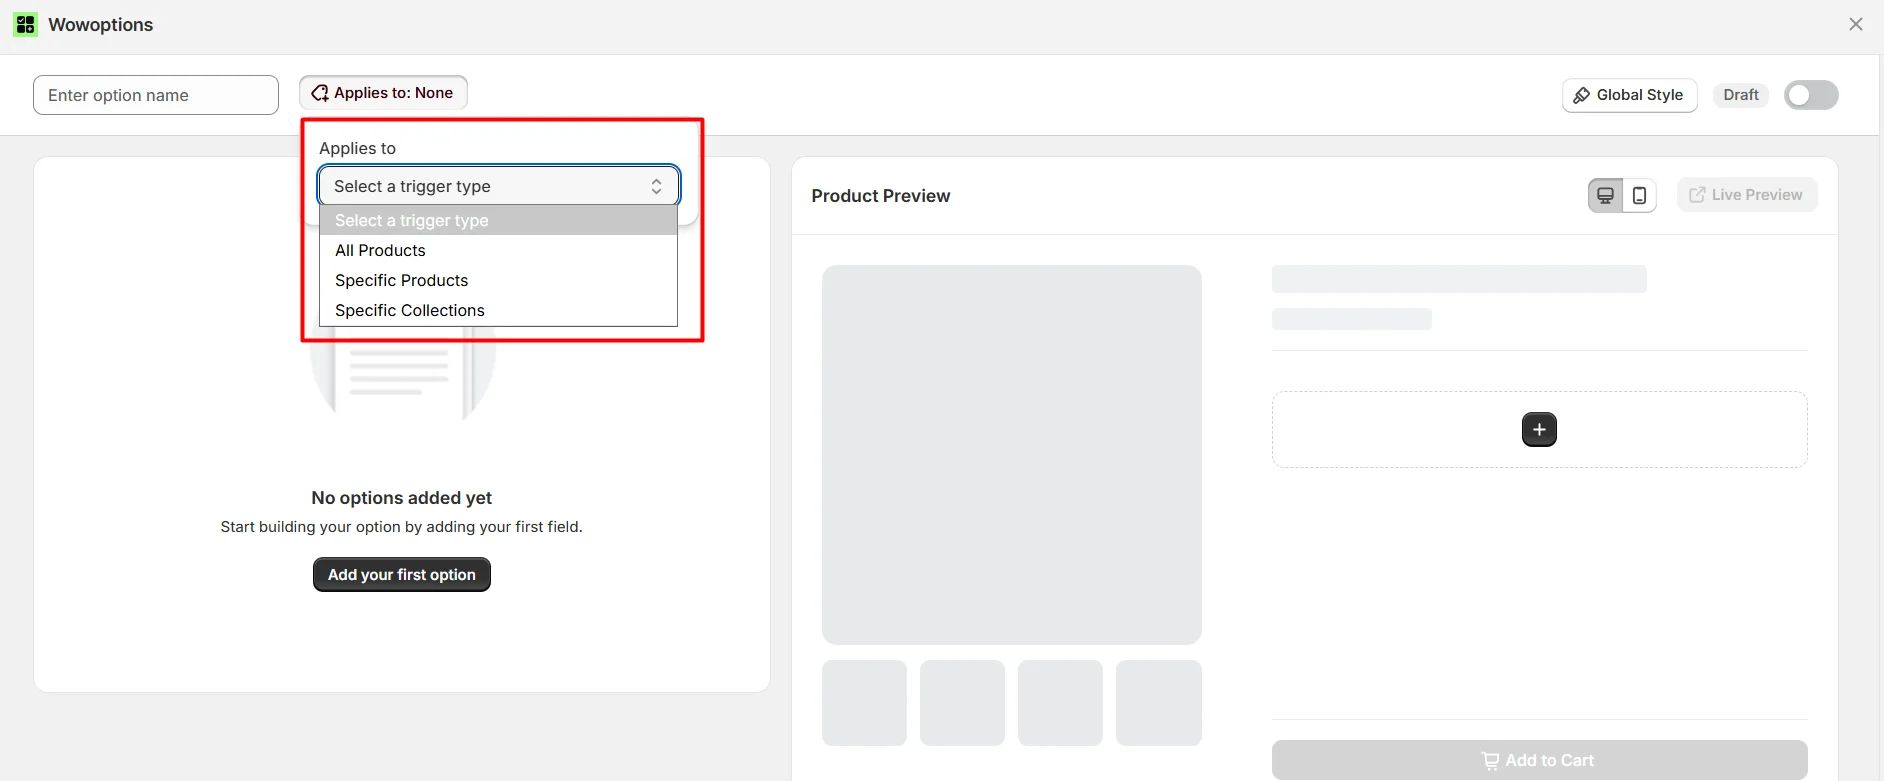
This way, the custom options only show up on the products where they make sense. Click Save to keep your changes.
Step 5: Add and Configure Required Options
Now the important part. Click "Add your first option," and you will see a library of option types offered by WowOptions.
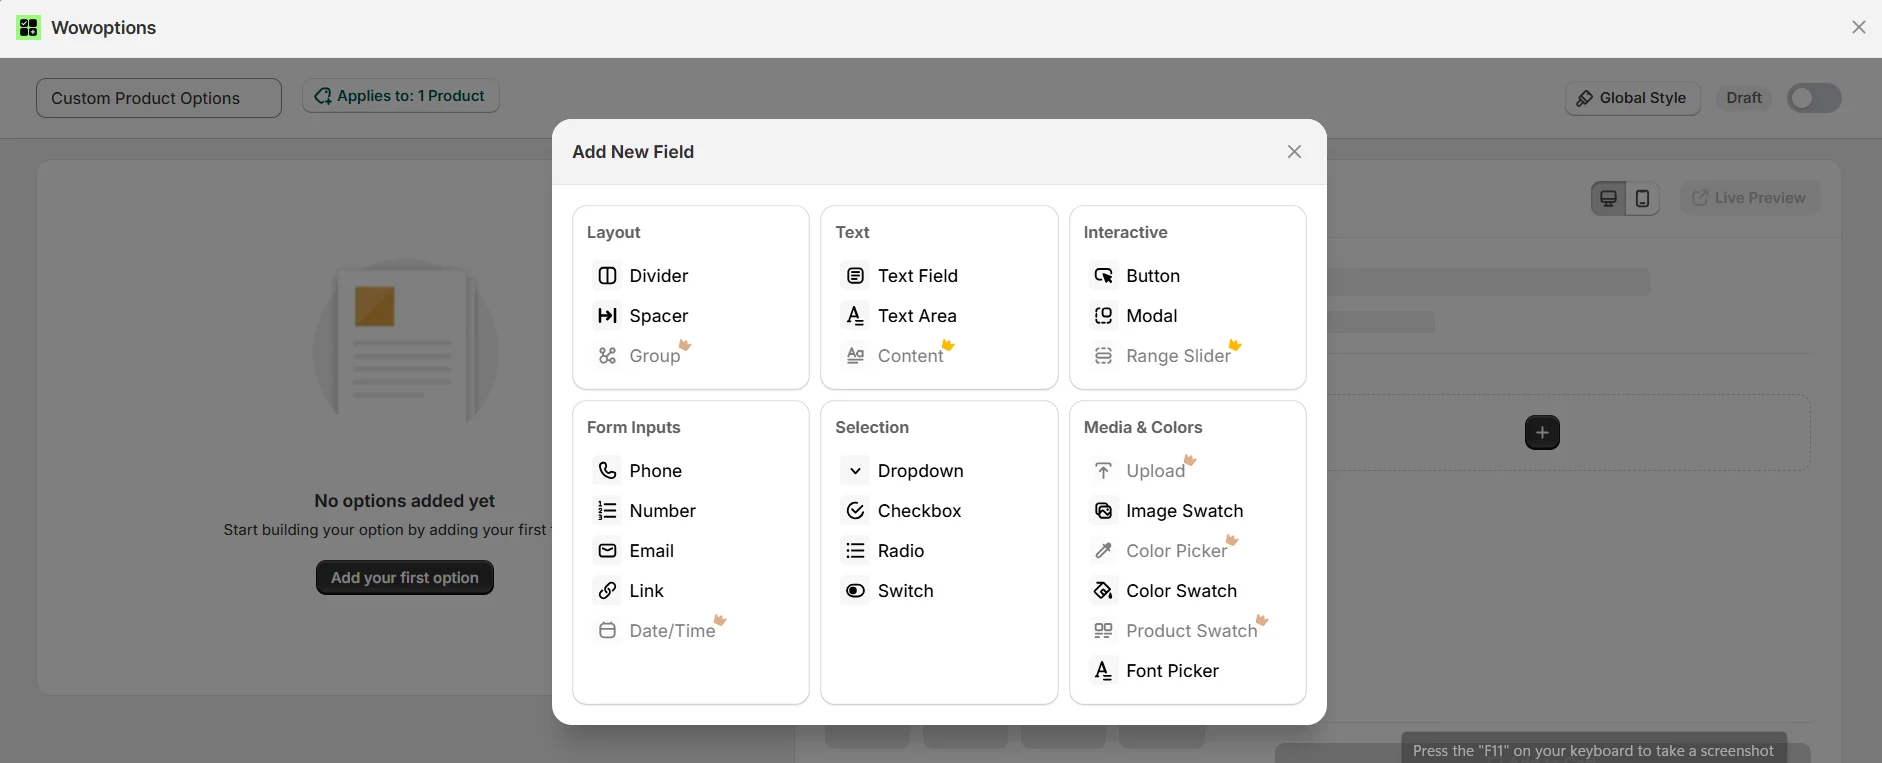
For a World Cup jersey, you would typically add a text field for the player name, a number field for the squad number, a color swatch for kit colors, a file upload for custom patches, and a dropdown for sizes.
Let's see how to configure each option field.
Adding the text field for player name
To start with, I added a Text Field addon, giving customers the option to type in the player name they want printed on the back of the jersey.
Adding text field option
After selecting the addon, you can customize it with a few helpful options. First, I customized the Label to be "Player Name" so customers can easily understand what the field is for. Next, I set a character limit to 12, which keeps the name reasonable and prevents layout issues on the printed jersey. You can also set a placeholder text inside the field, like "Enter name here," to guide the customer. For pricing, you can offer the text field for free, charge a fixed cost, or use a percentage add-on. I chose a fixed cost of $5 for name printing.
Adding the number field for squad number
Next, I added a Number Field addon, letting customers pick their preferred squad number.
Adding a number field option
Here, you can set a minimum and maximum value to keep inputs within a reasonable range. I set the range from 1 to 99. You can also customize the label to "Squad Number" and decide whether to charge extra for this option. I kept it free since the number itself does not add production cost, but you could add a fixed fee if you wanted.
Adding the color swatch for the kit color
Next, I added an Image Swatch addon, giving customers the option to choose their kit color.
Adding color swatch option
After selecting the addon, you can customize the swatch with your available colors. I customized the Label to "Kit Color" and then chose the colors you would typically offer for a World Cup jersey: White, Blue, Red, and Green. For each color, you can upload a small image or just use a solid color preview. You can also set add-on pricing per color if certain kits cost more to produce. I kept all colors at the same price.
Adding the file upload for custom patches
Next, I added a File Upload addon, letting customers upload their own patch or logo image.
Adding file upload option
Here, you can set allowed file types, a maximum file size, and a label like "Upload Custom Patch." I limited it to image files only and set the max size to 5MB to prevent oversized uploads. You can also charge a fixed cost for custom patch printing. I set this to $3 per upload.
Adding the dropdown for size
Finally, I added a Dropdown addon for the jersey size.
Adding a dropdown option
I customized the Label to "Size" and added the option values: S, M, L, XL, and XXL. Dropdowns work well for size because it is a single choice and customers are already familiar with this format. You can also set add-on pricing per size if certain sizes cost more. I kept all sizes at the same price.
Step 6: Set Up Conditional Logic for Your Options
You probably do not want to show every option to every customer. For example, if someone picks the home kit color, they should only see the home kit patch options, not the away kit ones. That is what conditional logic is for.
Go to the option you want to control, like the file upload for custom patches. Open the Conditions tab and choose the trigger. In this case, the trigger would be the color swatch for kit color. Then set the rule: show this upload field only when the customer selects "Home" from the swatch.
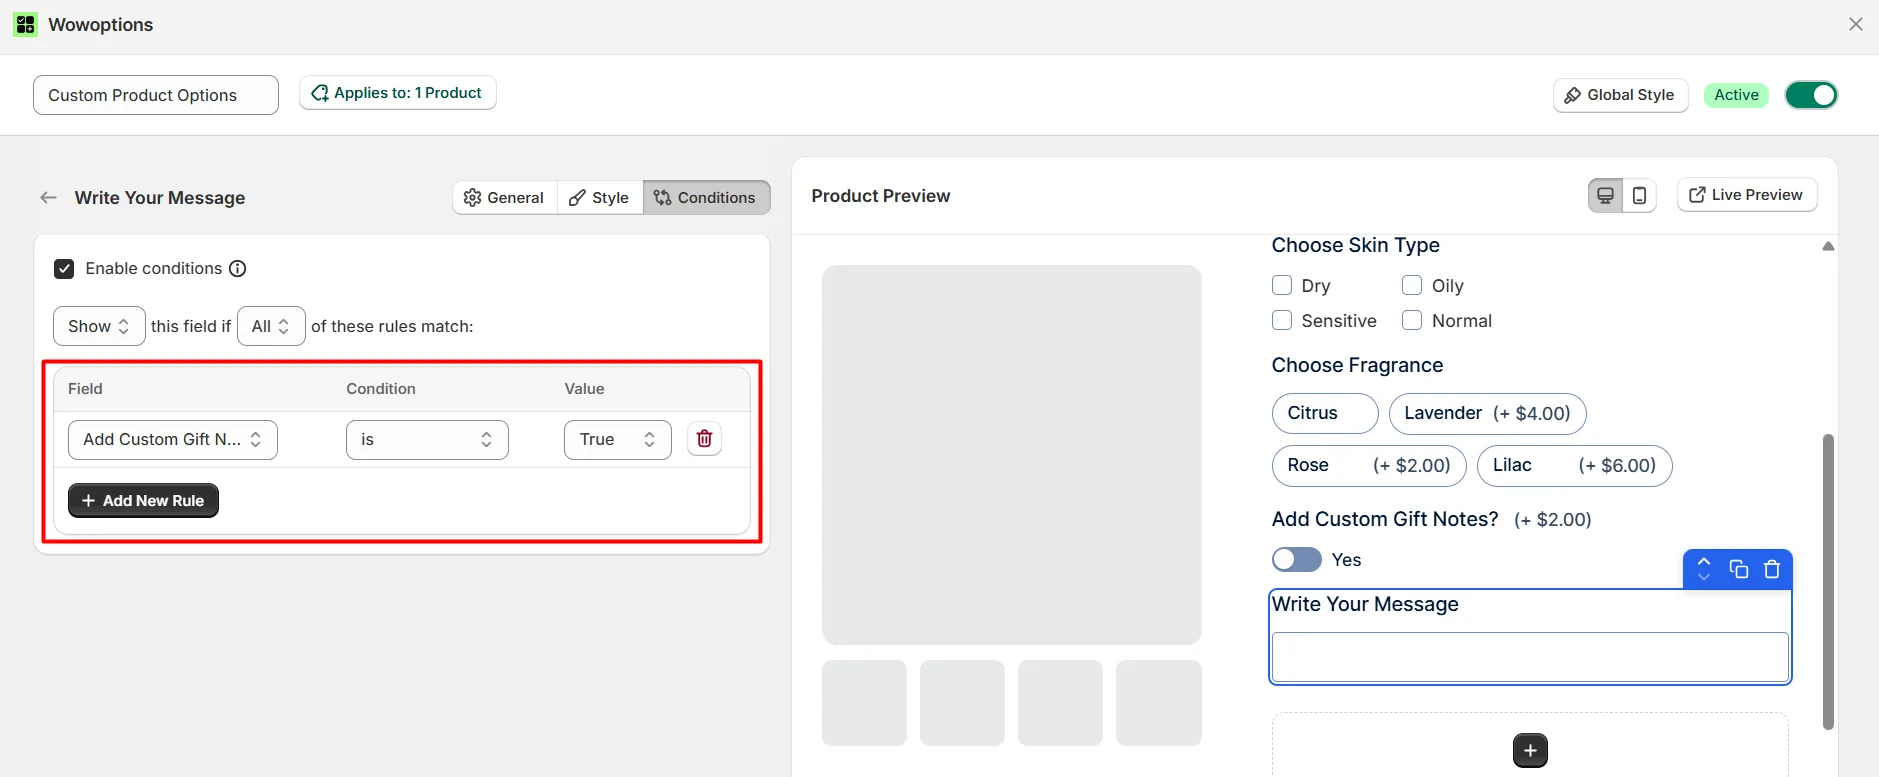
You can chain rules together, too. Use "Any" for OR logic or "All" for AND logic if you need more complex conditions. Just remember that you apply the condition to the field you want to show or hide, not to the trigger itself.
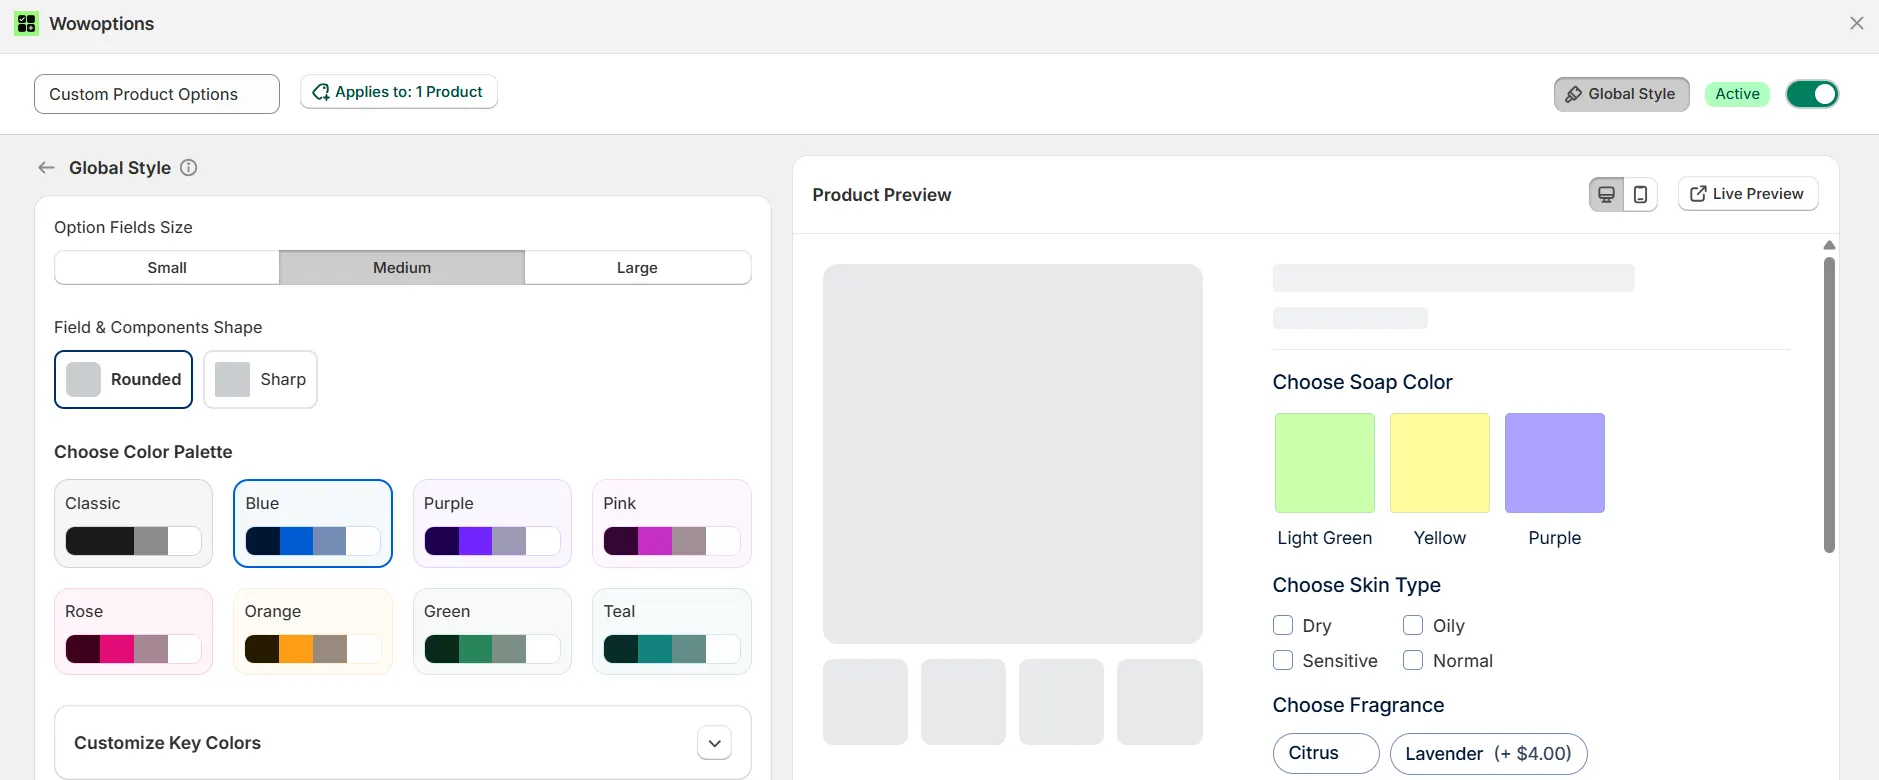
Step 7: Adjust the Look and Track Performance
Once your options are set up, you will want them to match your store's design. Go to the Global Style settings where you can change the size, shape, and color scheme of all your option fields at once. This keeps everything consistent without having to style each field individually.
Step 8: Test the storefront
After the options are live, go to your product page and walk through the customization flow as a customer would. Make sure every option shows up correctly, the pricing adds up, and the conditional logic works as expected.
Try different combinations. Upload a file. Type in a name. Switch colors. Make sure the page does not slow down or glitch. Test on mobile too, since a lot of World Cup fans will be ordering from their phones.
Additionally, you can check the Analytics tab. It shows you how much revenue your options are generating, which add-ons are popular, and how your average order value has changed. You can filter by week, month, or all time, so you can see what is working and make adjustments before the tournament ends
Tips for Running a Custom Jersey Store During the World Cup
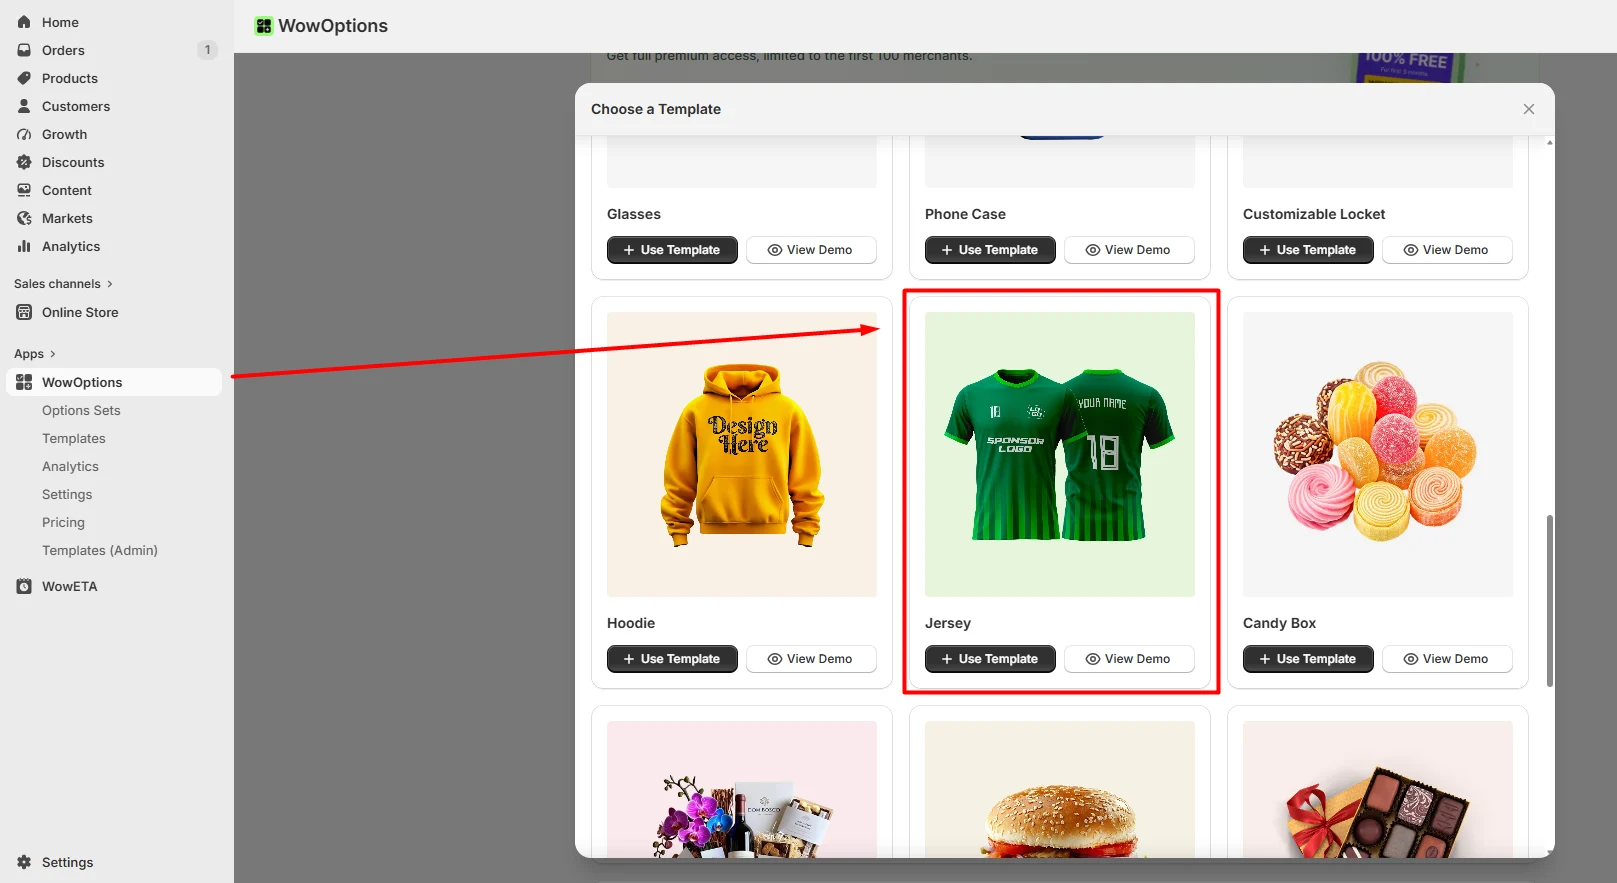
Use pre-made templates. WowOptions has built-in option templates you can use to get started. Use one as a base and customize it for your jersey products. This saves time compared to building from scratch.
Organize with option groups. If you are offering multiple product types, such as jerseys, scarves, and hats, group your options by product category to keep the dashboard clean. Option groups also make it easier to manage conditional logic across different products.
Track performance with analytics. Use the built-in analytics to see which kit colors, player names, and add-ons are driving the most revenue. During the World Cup, trends shift fast. One team might go on a run, and its jersey color becomes the top seller. You want to know about that as soon as it happens, so you can adjust your marketing.
Plan for fulfillment ahead of time. A custom jersey is not something you can ship from a shelf. Decide whether you are using a print-on-demand partner like Printful or handling production yourself. Make sure your fulfillment timeline matches what customers expect. During the World Cup, demand spikes are real. If a team wins a big match, orders for that team's jersey will surge. You need to be ready for that.
Keep the buying flow simple. Just because you can add 15 options does not mean you should. Focus on the choices that actually matter to customers. Player name, number, color, size. That is the core. Everything else is a nice-to-have. Too many fields will hurt conversions instead of helping them. Start with the essentials and add more options later if customers ask for them.
Set clear expectations about delivery time. Custom products take longer to produce and ship than standard ones. Make this obvious on the product page. Customers ordering a custom World Cup jersey understand it will not arrive the next day, but they should know roughly when to expect it. A simple note like "Custom jerseys ship within 5 to 7 business days" goes a long way.
Offer a preview if possible. Customers want to see what they are creating. If WowOptions supports live preview or if you can add a mockup generator, do it. Seeing their name and number on a jersey before they buy reduces hesitation and increases satisfaction with the final product.
Prepare for the post-tournament lull. The World Cup does not last forever. After the final, demand for custom jerseys will drop. Have a plan for what comes next. Maybe you shift to club jerseys, or other sports, or a different product entirely. The customization infrastructure you build with WowOptions can be reused for any of these.
Summing Up
If you are planning to sell custom World Cup jerseys on Shopify, the built-in product options will not get you far. You need text fields, file uploads, price add-ons, and conditional logic. That is where a product options app comes in.
After comparing what is out there, WowOptions stands out for this use case. It gives you unlimited option sets, multiple option types, price add-ons, and conditional logic, all without code. The setup is straightforward: install the app, create your option set, add your fields like player name and squad number, set pricing, add conditional logic, and test on the storefront.
For a custom jersey store during the 2026 World Cup, it is the right fit. Install it, follow the steps above, and you can have your store running in a few hours.
FAQs
1. Can I sell custom World Cup jerseys on Shopify without using an app?
You can sell basic jersey variants like size and color using Shopify's built-in options. But if you want customers to type in a player name, pick a squad number, upload a custom patch, or see a live preview, you will need a product options app. Shopify's native system does not support text fields, file uploads, or conditional logic.
2. Do I need to know how to code to use WowOptions?
No. WowOptions is a no-code app. Everything is set up through a visual dashboard. You create option sets, add fields like text boxes and file uploads, and assign pricing without touching your theme's code. If you can use Shopify's admin, you can set up WowOptions.
3. How many jersey products can I create with the free plan?
The free plan covers up to 50 products and 30 option sets. For a store selling jerseys for multiple national teams, that is usually enough to get started. If you need more than 50 products, the Pro plan at $9.99 per month removes the product limit.
4. Can customers upload their own images for custom patches?
Yes. WowOptions includes a file upload option type. Customers can upload a logo, patch design, or any image directly on the product page. You can set allowed file types and a maximum file size to keep things under control.
5. What happens if a team gets knocked out of the World Cup? Will I need to rebuild my products?
No. With WowOptions, you can use option templates and bulk apply them across all your jersey products. If you need to remove a team or add a new one, you update the template, and it applies everywhere. You can also hide specific options using conditional logic without deleting them.