

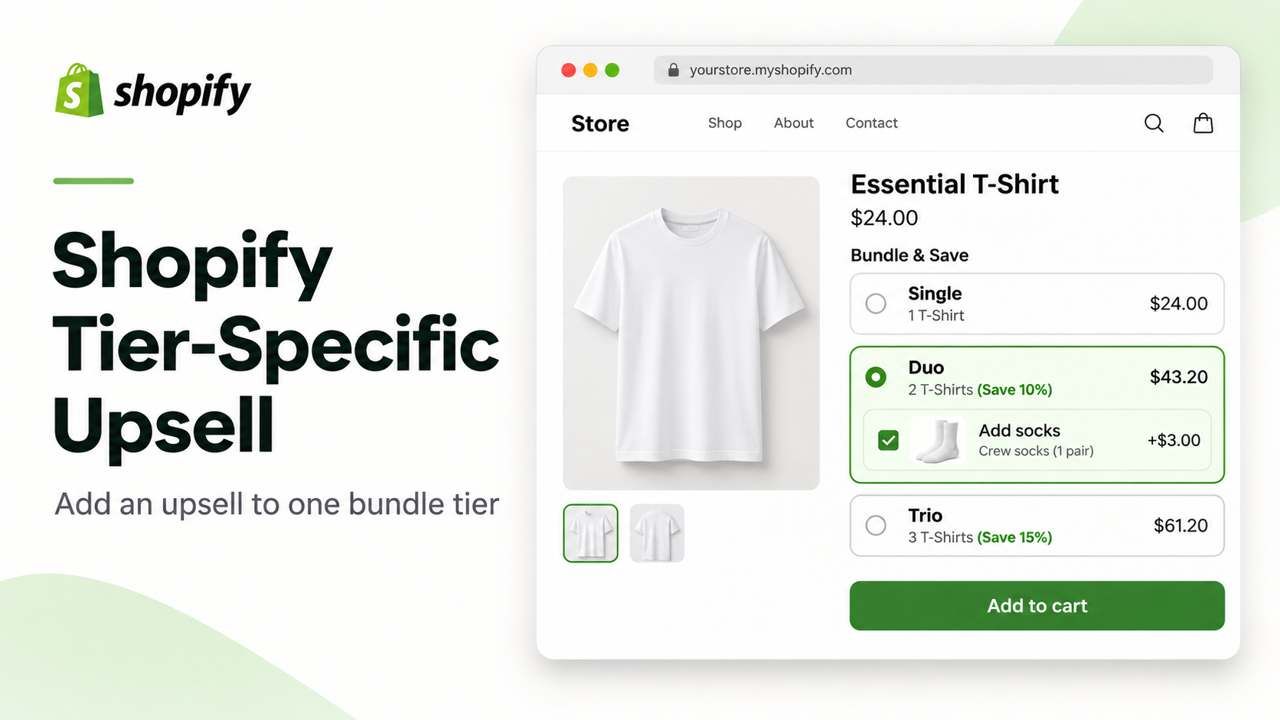
To offer an accessory with just one bundle tier, attach it to that tier's settings. In WowBundle, open the qualifying tier and use Add-ons → Upsell. That lets a shopper choose the accessory alongside that particular quantity offer.
A Shopify tier upsell is useful when the extra makes sense with one pack size. You might offer half-price socks with two tees while leaving the single tee and three-pack as straightforward clothing purchases. The socks stay optional, so someone who only wants the tees can continue without them.
Show the accessory’s price beside the choice and keep it easy to decline.
What a Shopify tier upsell actually changes
A tier-specific upsell puts a separate, optional product inside a particular offer choice. It doesn't automatically make that product part of every bundle.
Here's the structure of the WowBundle example used below:
| Shopper's choice | Tee offer | Optional accessory |
|---|---|---|
| Single | One tee at its regular price | None on this tier |
| Duo | Two tees with 10% off | Add Rib Socks at 50% off |
| Trio | Three tees with 20% off | None on this tier |
Those are the settings of this example, not a recommendation that every store needs three tiers or those discounts.
Notice that the largest pack doesn't include the socks offer. A tier-specific extra can belong to the middle choice. You decide where it fits rather than assuming every higher quantity inherits the same accessory.
There are two related controls to keep separate:
- Tier-level Upsell: configured inside an individual tier
- Checkbox upsells: configured under the offer's Extras section
If you want the second pattern, use the product-page checkbox add-on guide. Adding a complementary product is usually called cross-selling, although apps often group it under upselling. The upsell, cross-sell and bundle comparison explains that distinction.
Choose an add-on that makes sense at that quantity
Start with one accessory that helps the customer use or enjoy the main purchase. Then check whether its discounted price still leaves enough to cover its costs.
For apparel, that might be socks with a pair of everyday tees. A coffee store could offer a storage tin with a multi-bag purchase. A skincare store might offer a reusable applicator with a routine pack. These are illustrative merchandising ideas, not results from those businesses.
Ask three practical questions before opening the editor:
- Why would someone want this extra now? A compatible accessory is easier to explain than unrelated clearance stock.
- Which variants should they be able to choose? Size, color and availability matter for the accessory as well as the main product.
- What does accepting it add to the price? Show the actual extra charge, rather than making the customer calculate it from a percentage alone.
A large discount can leave surprisingly little behind. In a hypothetical USD example, a $20 accessory sold at half price brings in $10. If it costs $7, adds $1 of packing work and incurs an assumed 3% payment fee, only $1.70 remains before any extra shipping, returns or overhead. Those numbers are illustrative, not WowBundle demo prices or a statement of your payment rate.
You don't need the deepest discount. You need an extra customers understand and a price your business can support.
Apps to Evaluate for Tier-Specific Add-Ons
A tier-specific add-on should depend on the selected pack. A generic accessory widget may show under every tier. Check that distinction before buying an app.
| App | What to evaluate | Boundary test |
|---|---|---|
| WowBundle | Tier-level Upsell inside the selected quantity choice | Select single, duo and trio; check exactly when socks appear |
| Kaching Bundles | Deal-bar add-ons tied to a selected bundle offer | Toggle the selected tier and review accessory eligibility |
| Candy Rack | Product or cart upsells | Confirm whether tier-level conditions can be enforced, not just targeting by product |
A general product-page checkbox is a different offer. For that approach, use the offer-wide add-on guide.
Method 1: Add an optional extra to one tier with an app
Use an app when the customer should see and choose the accessory inside the quantity-tier offer itself.
The steps below use the tier-level Upsell control in WowBundle.
Step 1: Open the offer and the qualifying tier
Open the relevant offer in WowBundle and confirm that it targets the main product you intend to sell. For this example, that's Everyday Tee.
Check the theme connection if this is your first offer. WowBundle's setup screen separates the app embed from the optional app block used to control placement. If you need help building the base quantity offer, follow the first quantity-break setup guide.
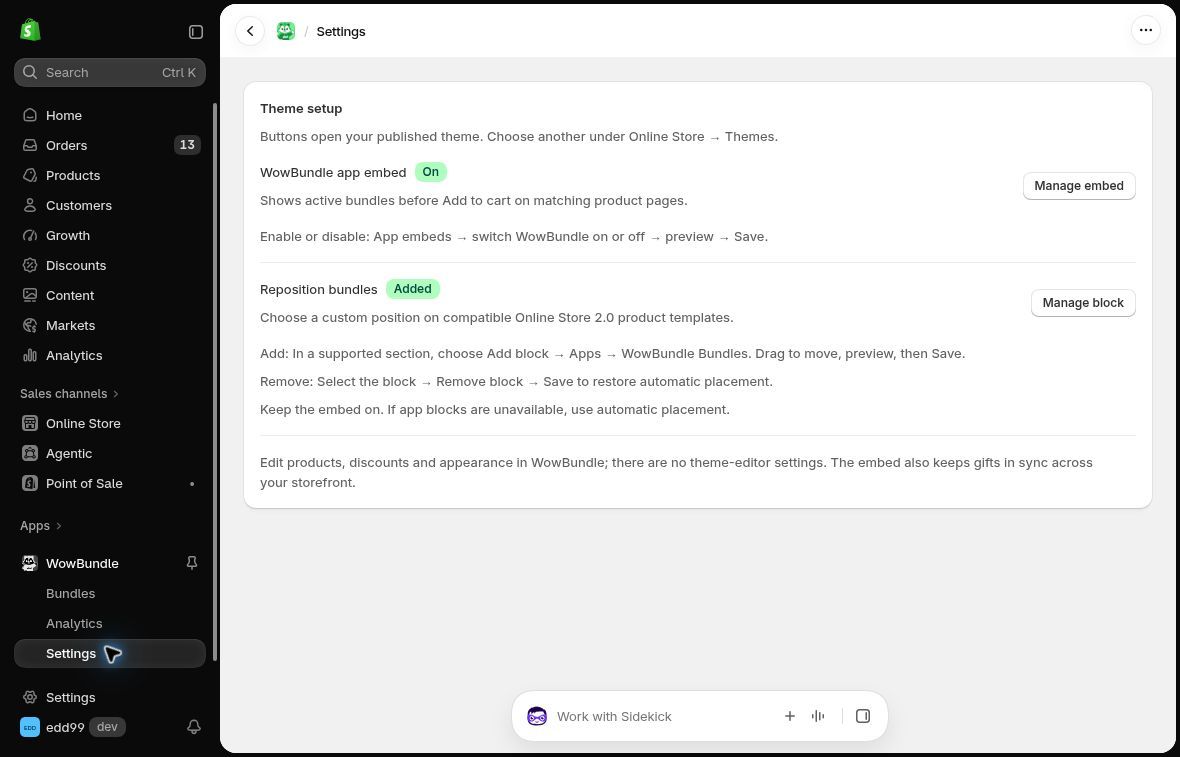 The theme connection determines whether and where the offer can appear. Check the theme customers actually use.
In Offer, expand Duo. This example uses a quantity of two and a 10% discount on the tees. Make sure you're editing that tier before adding the accessory.
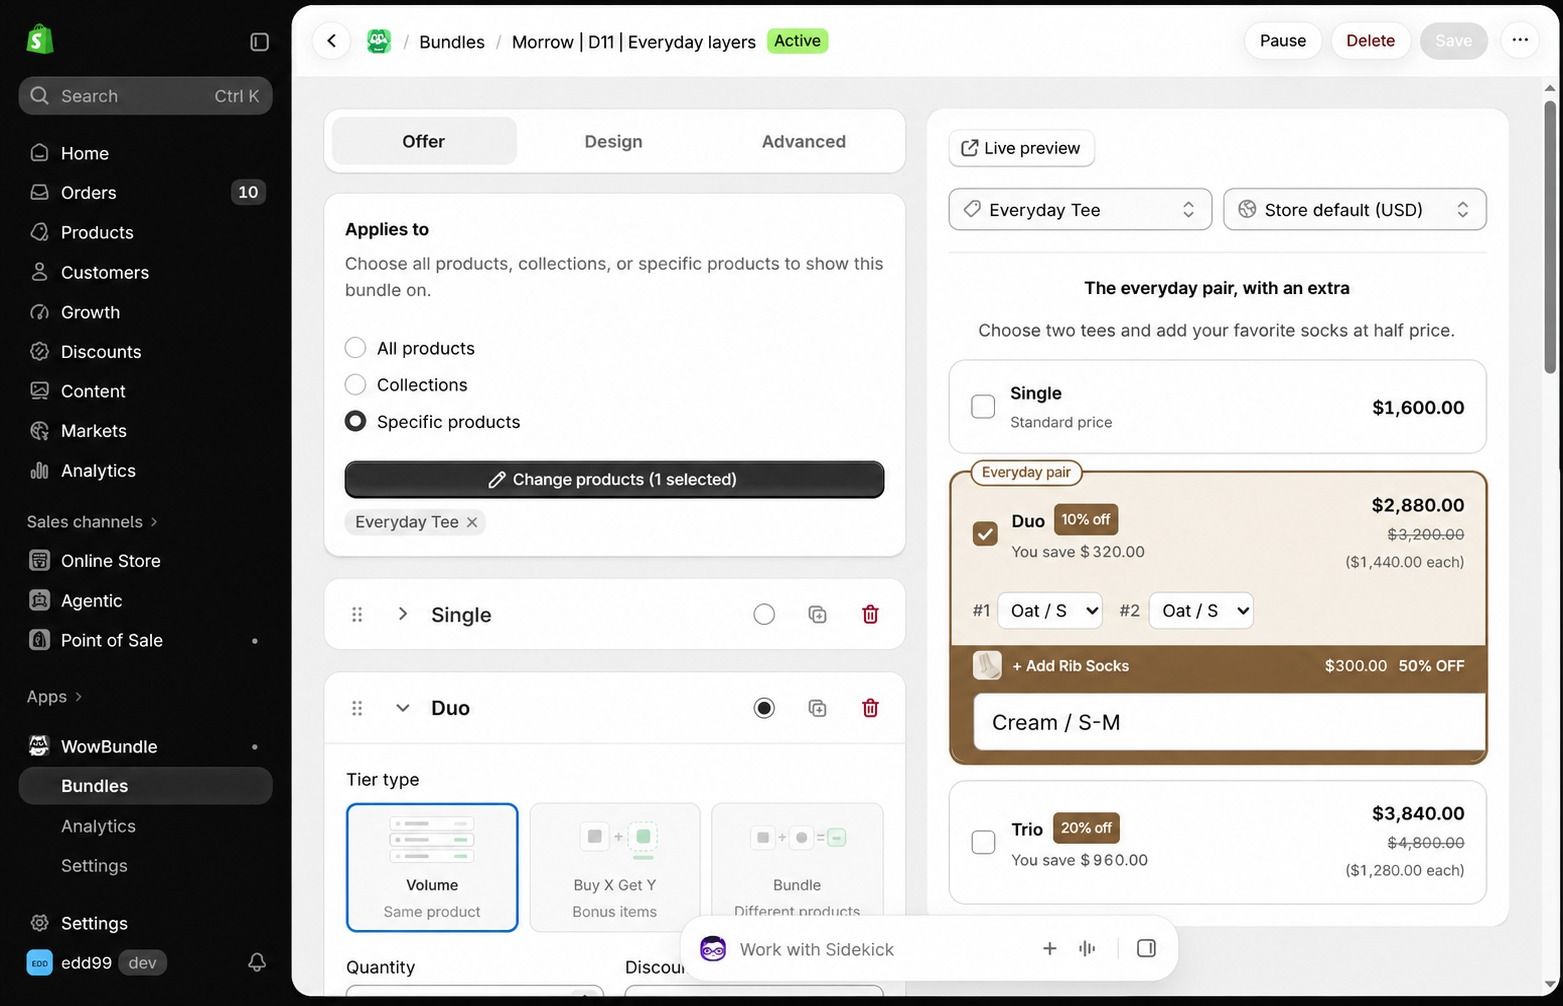 The offer targets Everyday Tee. The socks appear inside Duo in the preview.
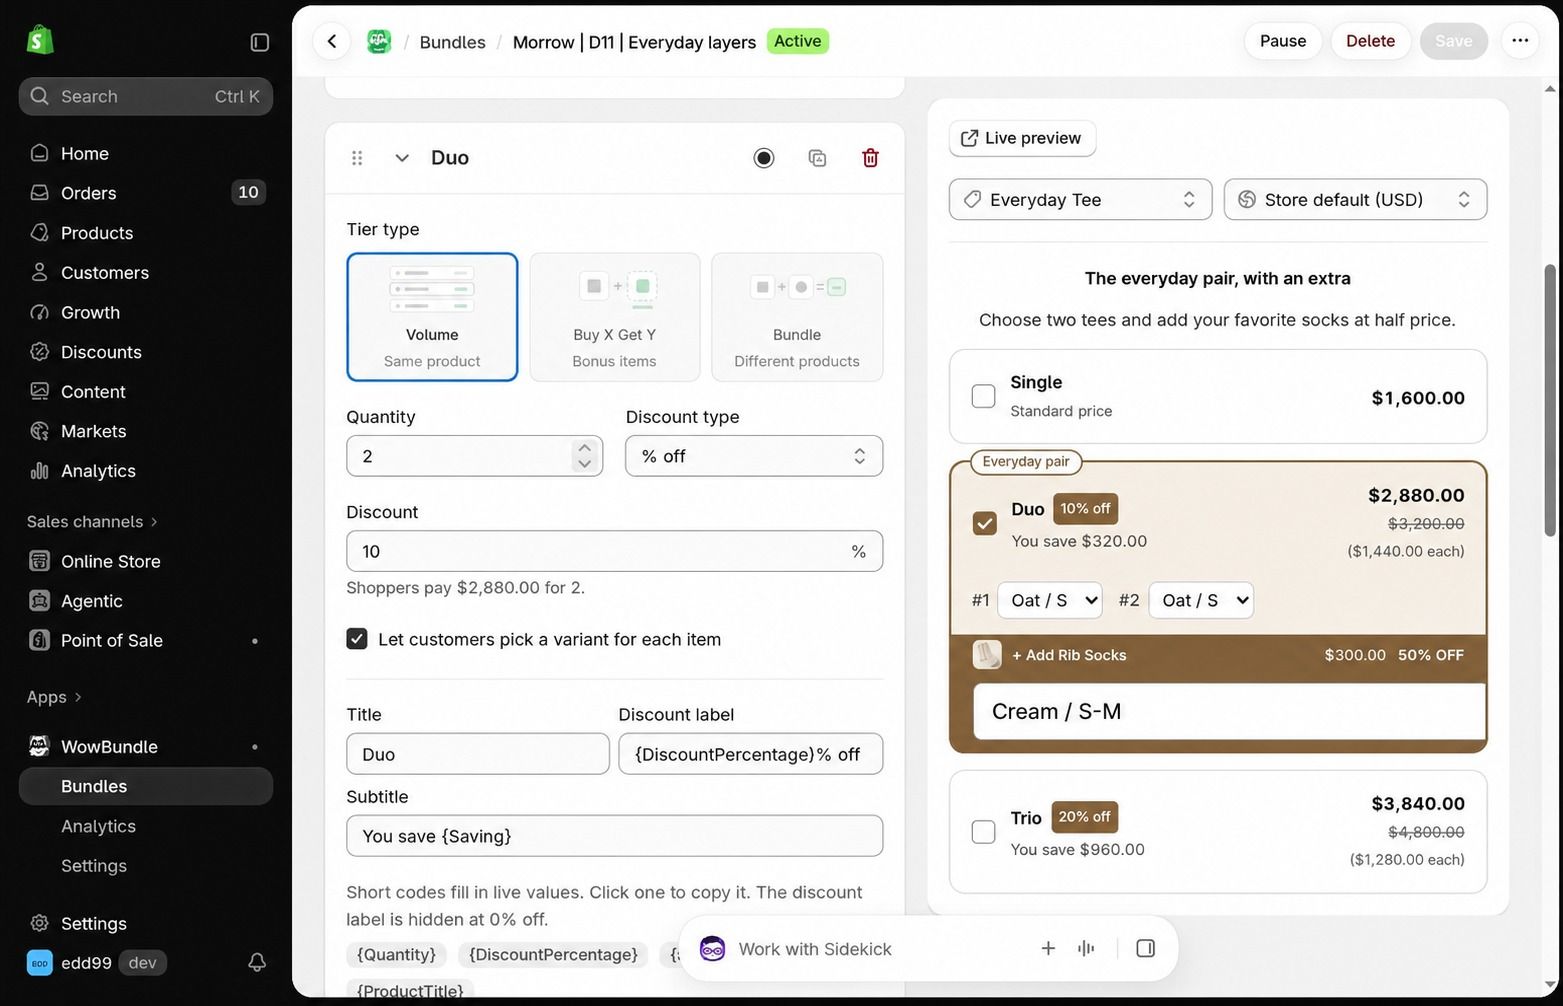 The main tier discounts the two tees by 10%. Its accessory discount is configured separately.
Step 2: Attach the accessory inside the tier
Within the expanded tier, find Add-ons and enable Upsell. Select the accessory product and set its discount.
The saved example uses Rib Socks with 50% in the discount field. This is separate from the Duo tier's 10% tee discount. Don't enter 50% as the main tier discount unless you intend to discount the tees by that amount too.
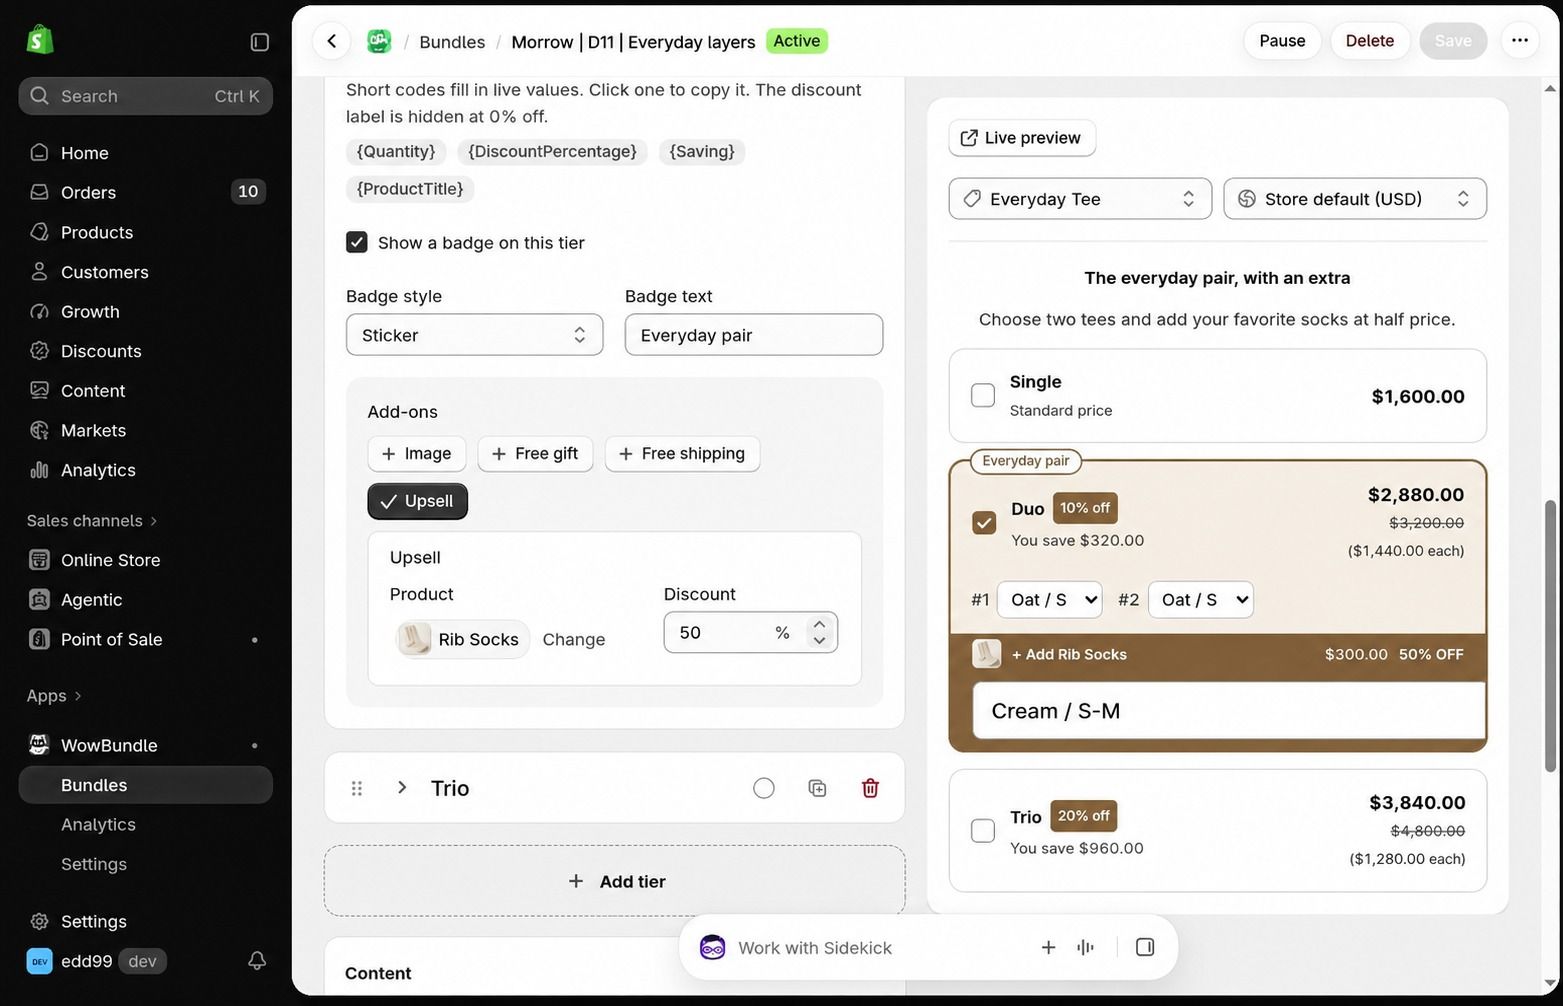 The accessory is attached inside Duo. The preview shows two tees at $2,880 and the optional socks at $300.
Keep the accessory published and available, then review its variants. A shopper choosing two tee colors still needs to choose the appropriate socks size and color.
Step 3: Publish within a controlled test scope
Limit Applies to to a designated test product before checking the storefront and cart. This reduces exposure while you test; it does not make the product private. Keep the offer out of wider promotions until the checks pass.
For a new draft, Publish makes the offer available on eligible product pages. For an existing active offer, Save applies changes to the live offer. Review the targeting before either action.
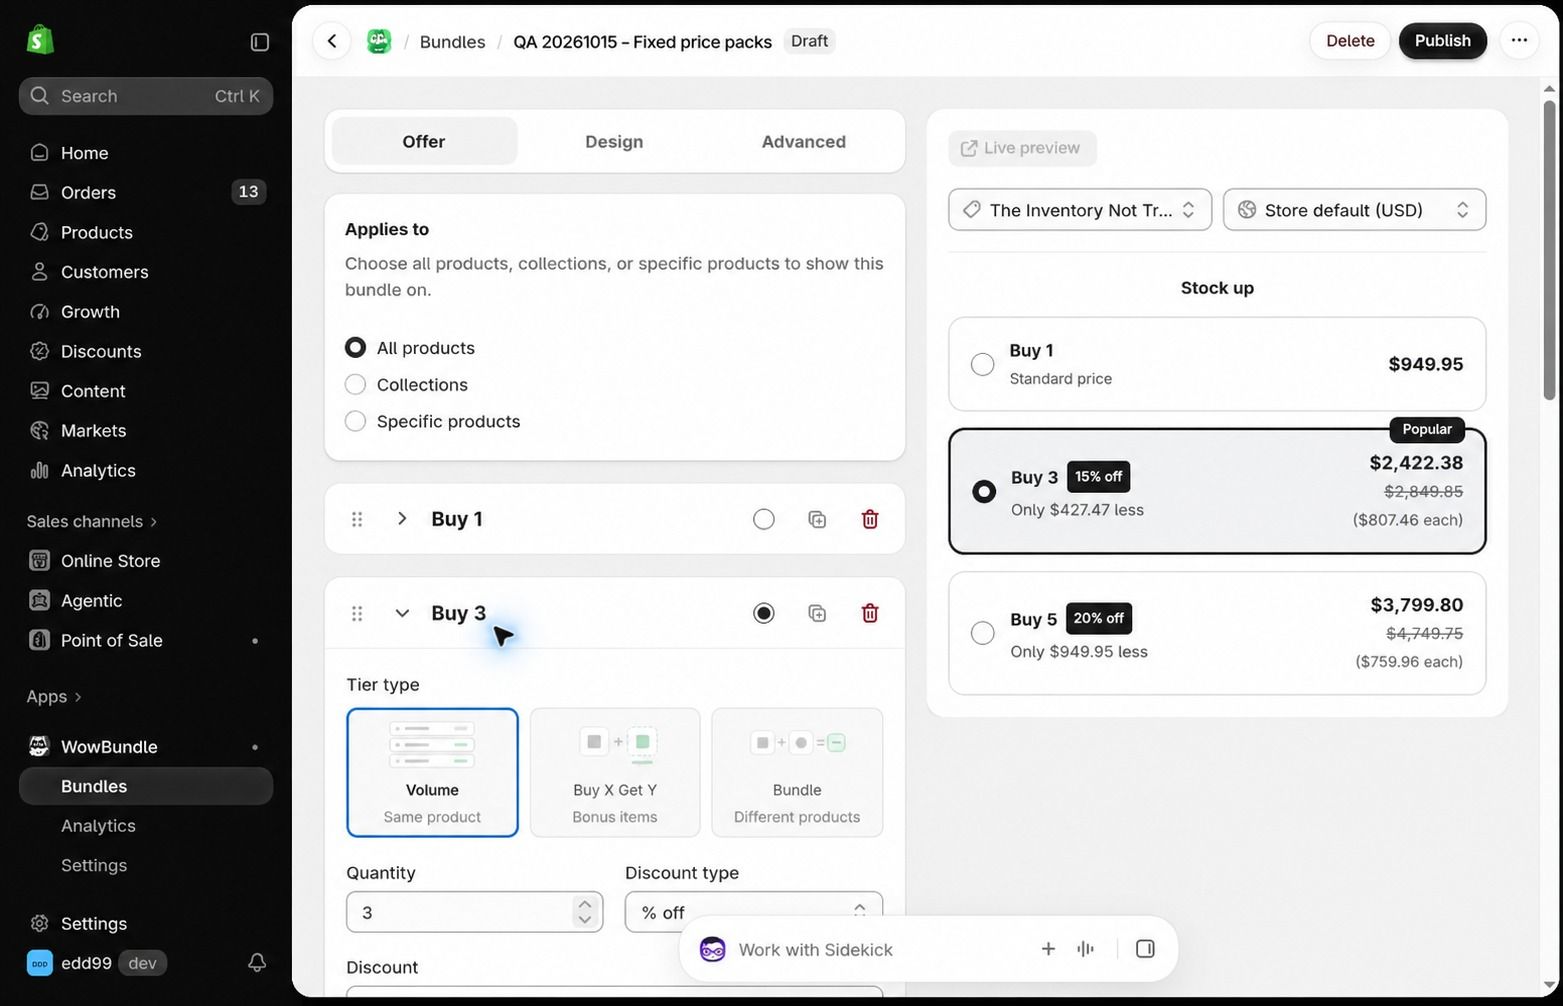 The Publish control appears on a draft offer.
Open the product page and choose Duo. The socks appear as an optional extra with their price and variant choice.
In the demo, the merchandise arithmetic is:
- Two tees: $1,600 × 2 × 90% = $2,880
- Optional socks: $600 × 50% = $300
- Duo with socks selected: $3,180
These USD example prices are before tax and shipping, separate from the illustrative USD cost calculation above.
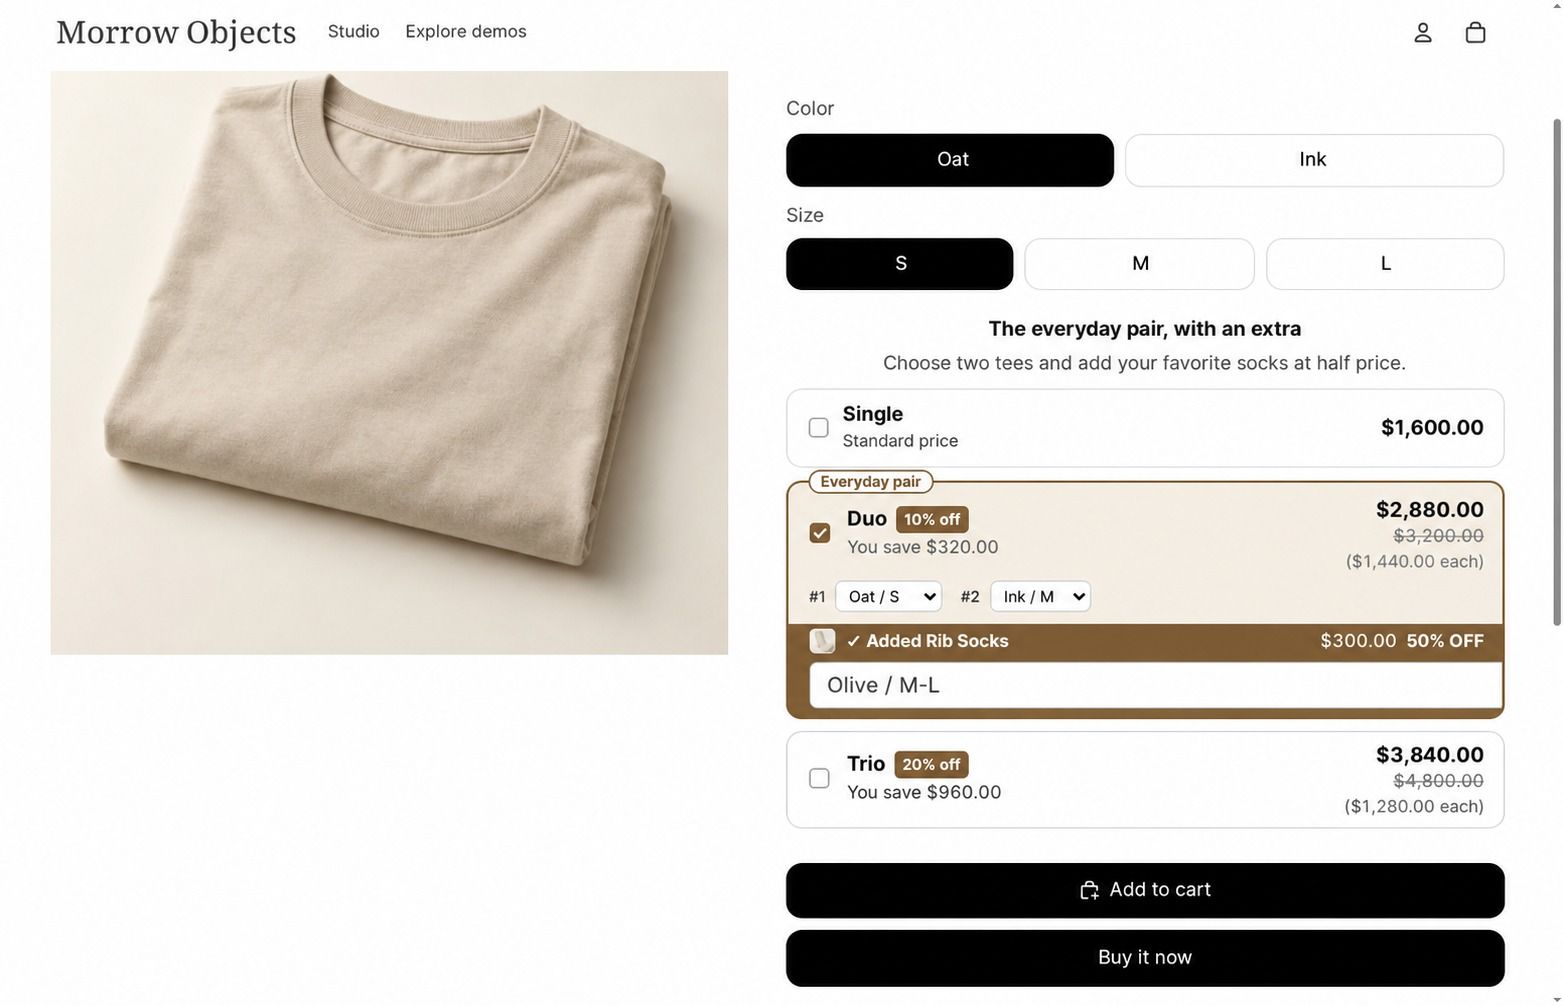 The selected two tees cost $2,880 and the socks cost $300, giving an expected merchandise total of $3,180. Confirm that total in the cart.
Single and Trio do not include the socks add-on in this offer; it belongs to Duo.
Confirm the selected tee and sock variants and the expected $3,180 merchandise total in the cart. Also run the tier-boundary checks below. Once they pass, apply the intended production targeting and save before promoting the offer more widely.
Method 2: Use a native discount without a tier widget
Shopify's native Buy X get Y discount can offer half-price socks when a cart contains at least two qualifying tees. Customers must add both products themselves; the automatic part is applying the discount. It doesn't create a selectable accessory inside a particular tier. Shopify's Buy X get Y guide
For that simpler promotion:
- Go to Discounts → Create discount → Buy X get Y and choose Automatic discount. Give it a clear customer-facing title.
- Under Customer buys, require a minimum quantity of 2 and select the tee product.
- Under Customer gets, choose quantity 1, select the socks and set Percentage to 50.
- Limit the promotion to one use per order if that's your intended offer. Review eligibility, combinations and dates, then save when ready.
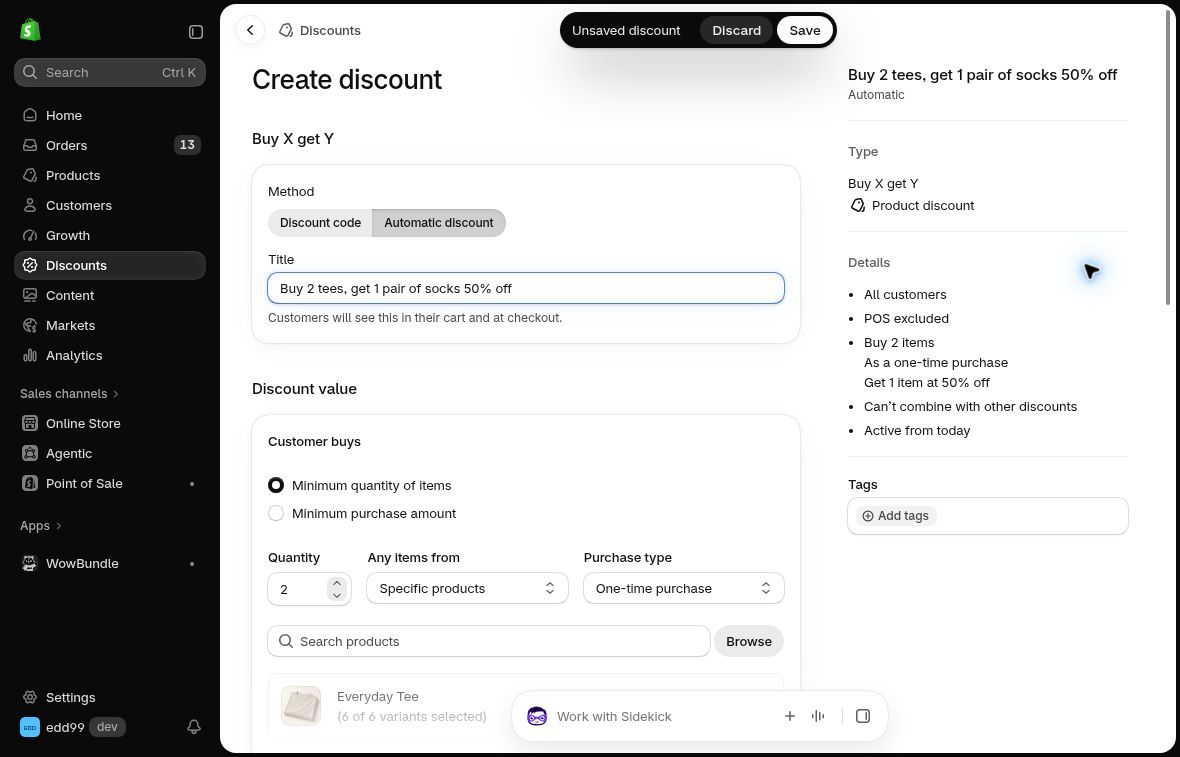 Choose Automatic discount for a rule that does not need a code.
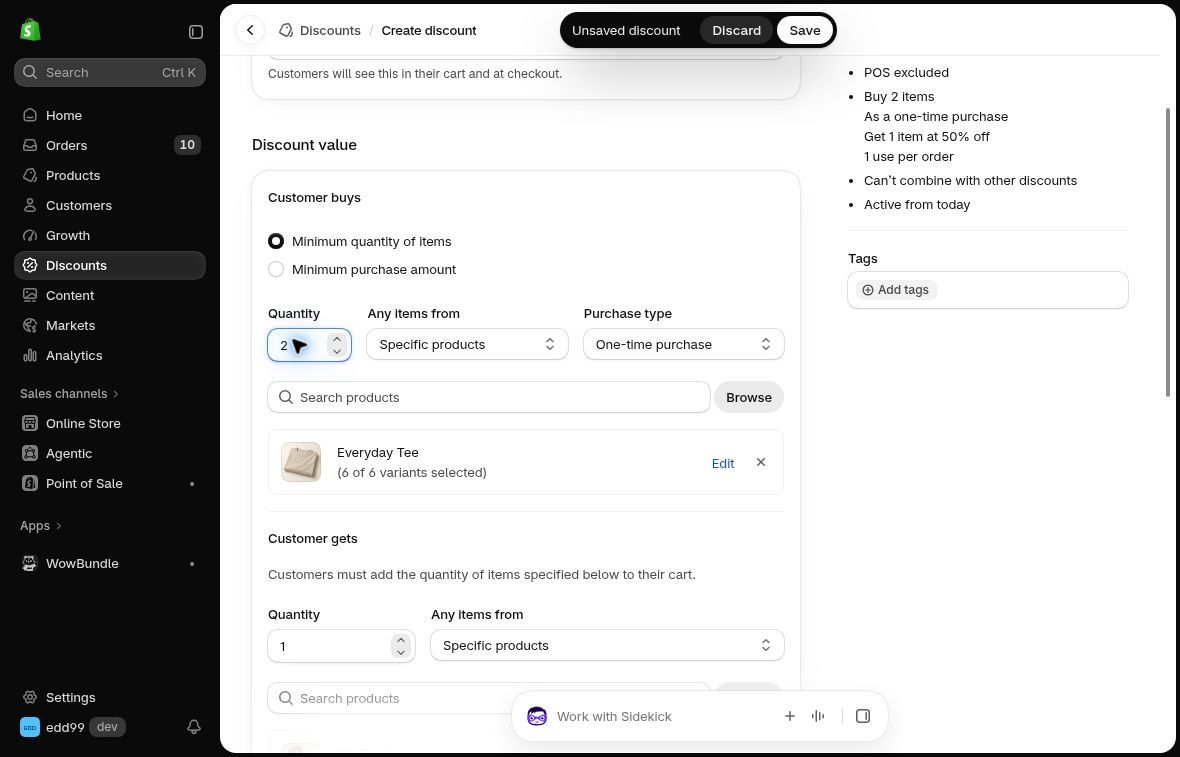 This minimum counts the selected tee product. It does not limit the offer to exactly two tees.
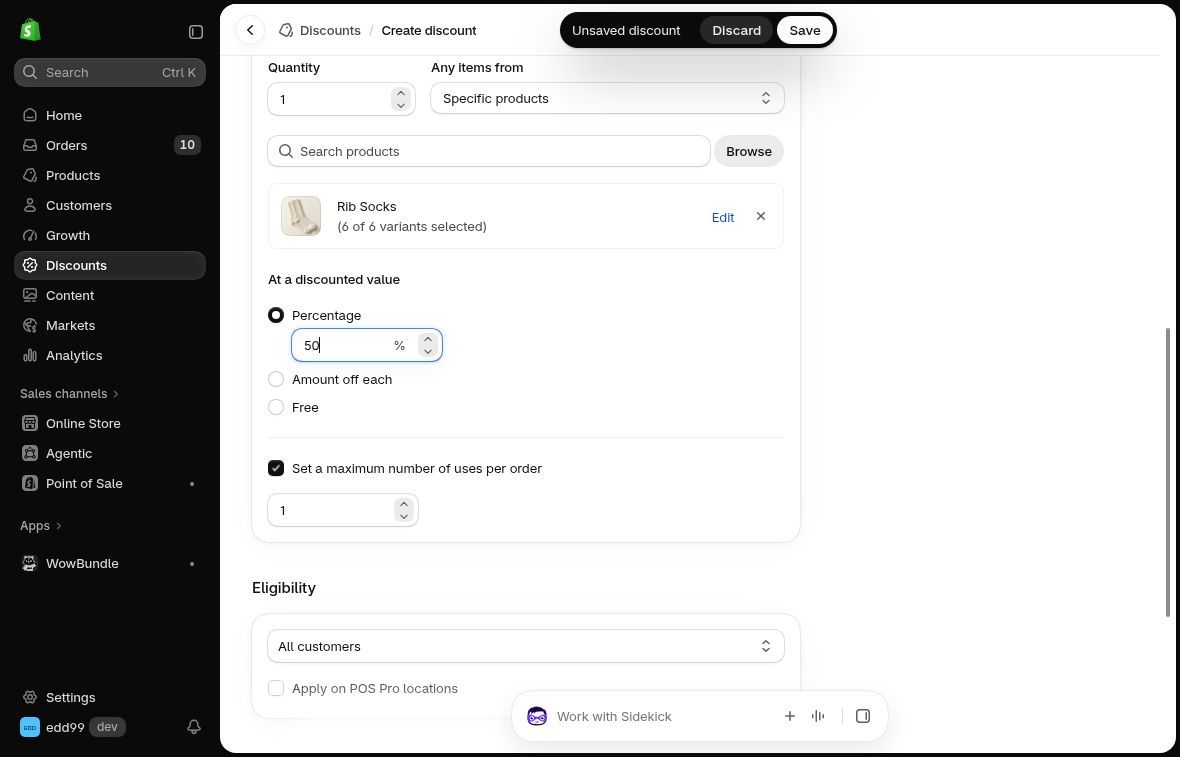 The accessory rule applies 50% off one pair of socks when the qualifying items are in the cart.
Explain the offer on the product page and give shoppers a clear route to the socks.
There are two important differences from the app example. First, a minimum of two also qualifies a cart containing three tees; it isn't “Duo only.” Second, this rule discounts the socks, not the tees. Don't assume adding a separate 10% product discount recreates the full demo: Shopify restricts further product discounts on items participating in Buy X Get Y, with a specific Plus exception for the customer-gets item. Shopify's combination rules
Choose this route when a simple qualifying-quantity promotion is enough. Choose the tier-level app route when the placement and optional choice are part of the experience you want.
Test tier boundaries before launch
Build carts with one, two, three and four tees. Accept the accessory at the qualifying tier, then switch tiers. Confirm whether it remains available, disappears or changes price. Repeat in checkout with a sold-out accessory variant. A selected-tier upsell must not silently become a free or discounted accessory for an unrelated quantity.
Check whether the add-on helps the offer
Use validated order records to compare purchases that qualified for the accessory. For this offer, count Duo orders separately from Single and Trio.
For example, an order-based attachment rate could be:
Eligible Duo orders containing the promotional socks ÷ all eligible Duo orders
Use the same definition each time. If your report counts offer views instead of orders, keep that separate rather than comparing the two rates as though they measure the same thing.
Then look beyond attachment rate. Compare the accessory’s contribution after its discount and costs with the effect on completed purchases. A higher order value alone does not establish a better offer.
Choose one accessory that belongs with the quantity offer and show its added price. You can build this type of offer with WowBundle.